Category: Animation Page 1 of 2

Stepped or Spline?


Stepped and spline refer to the way your keyframes are interpolated in an animation. Stepped means that there is no change in values between two keys.  With spline, the computer automatically adds in-betweens values between two keyframes.

Most 3D animation is splined in the end, making smooth motion, but there are two main ways of starting out when animating. So stepped and spline also refer to two different workflows.

With Stepped, you focus on key poses and only work on those keys. When you hit play, the software plays it like a series of drawings.


Pros
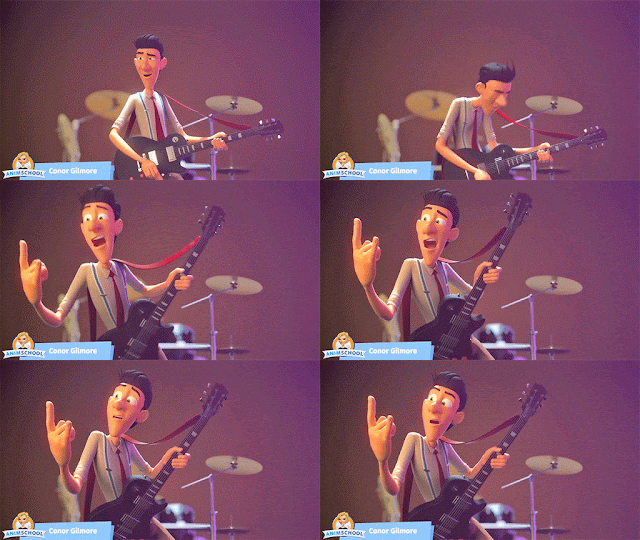
The biggest benefits of working in stepped mode is that you can really focus on the key poses for your shot. Since the software doesn’t interpolate between any of the keyframes, stepped mode allows you to keep your shot very clean in a way that you can tell the story of your animation with a small amount of keyframes. 
In other words, stepped mode helps you establish the important beats of your animation and allows you to get a basic idea of the timing while focusing on the key ideas of the shot.
Your graph editor is more manageable, and big changes are easier.

Cons

The biggest drawback of stepped mode is that it can be hard to envision how your timing is going to turn out. Animators fill in more and more poses as they go, but there is a point when you have to leave the stepped world behind and convert the curves from stepped to spline. That’s a simple click, but seeing your hard animation work that way is nearly always a disappointment.
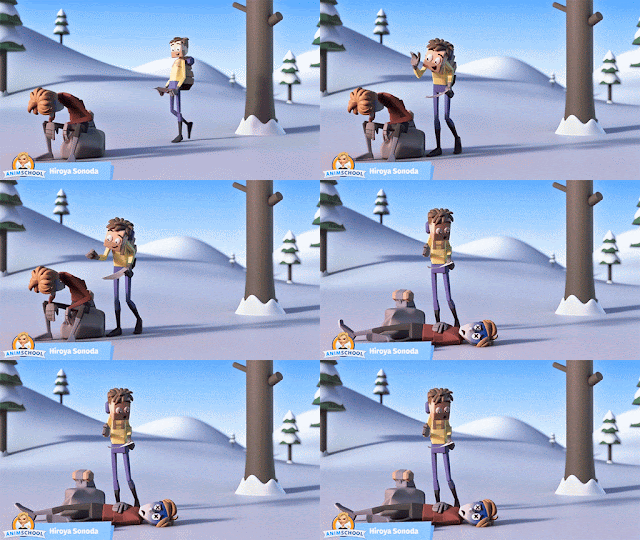

If you are an animator, you’ve probably seen how an animation loses its snappiness when going from stepped to spline. This is because your brain had been filling in the gaps but now the computer interpolates between each keyframe. The simple version you were used to looking at wasn’t a very complete representation of the movement. It’s the time when you get a big surprise seeing it with fluid motion – and it’s never a pleasant one!


Spline:
Another method of starting out is skipping the stepped keyframes
entirely and having smooth movement from the very beginning, where you
focus on the overall movement of the body and don’t worry about the
poses yet.

You start by moving the rig’s root control or COG (center of gravity) to find the movement of the scene in a fluid way. Then you layer in the spine and head’s motion, and the limbs.

Pros

Spline gives you the possibility to work more straight ahead and feel how your animation is going to look already in the early stages of blocking. You skip the painful process of getting used to looking at simplified stepped movement, only to hit the hard reality of the ugly “first spline” phase later.
If the movement doesn’t feel right, it is easy to shift individual keyframes around until you get what you are looking for.

Cons

It’s easy to get distracted by the interpolation of the keyframes and not focus on posing when using splined curves to block out a shot. It may also be hard to work in a clean way – the keyframes aren’t neatly organized on individual frames – they are scattered all over.

Since you’re not spending time on making beautiful poses up front, the posing can suffer and feel like an afterthought.

Students can have a difficult time learning with a spline method, since they get used to seeing bad motion and aren’t able to see how to improve it, and instructors aren’t able to see which timing decisions were made consciously and which are just the raw computer interpolation. At least with stepped blocking, an instructor knows exactly what the student’s posing and timing decisions are and can give specific ways to fix it.

Spline workflow is often associated with faster productions since the motion is worked out earlier, and it avoids that two-step process. But it is also associated with lower production values because of that.

However experienced animators can achieve excellent results with a spline workflow as well since they know how to overcome these issues. Now spline workflow is used at all ranges of quality, from the cheapest animation to the very best animation.

Although one method might be better than the other depending on the shot being animated, choosing stepped or spline comes down to personal preference. It is important to try both of them out and determine what’s better for your type of workflow.


Happy animating!

AnimSchool Interview: Alaa Aldeen Afifah

We’d like to welcome Animator Alaa Aldeen Afifah. Can you tell us a little about yourself, what is your background and how did you get into character animation?


Firstly, I want to say thank you for having me in your Blog.
I’ve become obsessed with animation and film making at a very young age, when playing video games and watching
movies.
Since then, I’ve come a long way. Now with 11 years of industry experience, I focus on character
animation and how to bring characters to life.
During my career I’ve worn many hats, from rigging to modeling but also lighting
and other aspects of CG, which gives me 
a solid understanding of the entire CG pipeline.
I’ve started as a self taught animator but when I realized that I couldn’t push myself any further I decided to join an online animation school to expand my knowledge.
I would love  an opportunity to work
on a big studio like BlueSky, Disney or Sony. 

What is your current
work?

Right now I’m a Senior Animator and the Animation Team Lead for Real Image Post Production Studio. I also work as a tutor where I record video lectures specifically focused to the Arab World future animators.


Your shot “The Elf” it’s pretty
impressive and really funny. You went for a cartoony style there, what were your
thoughts before animating it?

Actually, I am always looking for something
challenging and that I’ve never worked on before. For me, this is very important in order to improve my skills as an animator.

Also I have been animating  subtle shots for a
while  so I thought it was the right time for something cartoony. I wanted to get out of that mode and try out something new and
fresh, where I could push the character’s facial even more. And in the process have some fun with
it too!


What was your workflow for this shot?

The
first thing I wanted to do is determine the cameras position and the entire
flow of the shot.
So I did a simple animatic  where I had the
character in position and I could see
 
the shot flow, and also seeing whether my thoughts were working or not.
Basically, I’m very obsessed with Blocking,  and I love staying in the Blocking stage as much as I can so I get to nail down everything I want to see in the shot.
I recorded  lots of video reference for myself playing the two roles. I had different takes for each character and
then I chose the best ones and combined them together.

Here
is a progression for “The Elf” shot showing my workflow: 


You’ve worked with the Animschool Malcolm
rig for that shot, what do you think of it?
Simply
Amazing! Malcolm is one of the best rigs I’ve ever touched, he is very appealing
and expressive, and it has never constrained me or hold me back on doing any expression
I had ever thought of.
Not to mention the performance and the speed factor of the Malcolm rig, where I could play the shot  in real time inside Maya’s viewport without making any playblasts!

AnimSchool Classtime: Keith Osborn

In AnimSchool’s Animating Characters class, instructor Keith Osborn shows how to convey line of action and weight on a character’s walk.

Come join all the students learning online at AnimSchool.

AnimSchool Student Spotlight: Diego Collell

Today we’re interviewing AnimSchool Student Diego Collell.
Hi Diego! Tell us about yourself: where are you from, and how did you became interested in character animation?

First of all, I’d like to say thanks to David Gallagher, Animschool and all its teachers. In special, Juan Pablo Sans (former AnimSchool instructor) and Garrett Shikuma.

Hello! I’m Diego Collell, 35 years old and I live in Buenos Aires, Argentina, with my two kids Tiziana and Benicio, and my wife Cecilia.

Since I was a little kid, animated cartoons fascinate me (Chuck Jones and Tex Avery). When I started growing up, my willing to learn about these drawings and to really dive into animation.

By always watching cartoons, my love for animation grew everyday, a true hobby for me.

The first thing I did was to buy a bunch of animation related books and kept hours reading them.

In my free time I practice sports; I really like playing soccer and watch movies. Some of my favorite actors are Jerry Lewis, Rowan Atkinson (the guy that plays “Mr. Bean”), Steve Carell, etc. But one that amazes me is Jim Carrey. I really have fun with his performances. For that reason I chose to do a shot with his audio!

Did you have any experience as character animator before joining AnimSchool?

Yes! Here in Buenos Aires I’ve been working a lot in production companies for advertising, series and movies.

Tell us about your shot of your assignment for the Character Performance class. The character
has some really cool and exaggerated poses! What was the process from start to finish?


Since the beginning I told my instructor, Garrett Shikuma, that I wanted to make a shot in the style of “Horton Hears a Who!”, and with the help of my instructors, I was able to improve it every time.

Research:
I’ve searched for an interesting audio for the animation so it would have texture.

Listening:


Soon after I start listening it several times in loop so I can understand every beat and clue. After that, I analyse the beats carefully, keeping into account every high and low, so I can apply the emotions and intentions according to the tone of the voices.


References:

Once I got a clear idea of what I want, I go to the mirror and practice.

Recording:


When I have more precise acting choices, I record myself doing it several times.

Editing the reference:
Somtimes I do, sometimes I don’t. When I do, I use After Effects.

Blocking:
I use my reference to nail all the main story poses, not worrying with any extra detail.

Blocking Plus:
I take the key poses to the extreme so they can clearly convey the character’s feeling in that shot. I also refine some facial expressions.

Spline:
I clean all my curves. Approximately, I spline my blocking every 50 frames.

Polish:
I made sure of polishing everything possible, frame by frame, checking everything!

I’m very happy with the final result of the shot. All of my instructors were essential for this.

The rendering and lighting was done by a friend, David Alexander Ary Aguero.

How do you think your instructors helped most in achieving the quality of animation you
wanted?

In general, my instructors are all very kind and solicit. The General Review classes have been a huge help. The instructors there care for your shot and your progress just like your main instructor.

Truth be told, all of Animschool teachers are AMAZING!

Are you working as a character animator at the moment?

Yes! At that moment I’m working as a character animator.

Any tips for your fellow students?
Work hard! The more you animate, the more you lern.

We thank Diego for his time, be sure to check his reel, LinkedIn and Facebook profile!

AnimSchool Interview: Xin Zhao and Florent Rubio, makers of “The Answer” short

Today we are interviewing not one, but two people! Xin and Florent are the makers of “The Answer”, a short animation film using Animschool’s Malcolm Rig. 


The short is now featuring in Vimeo’s “Staff Pick”collection. Check it out:


Both of them are now applied to our 3D Animation Program. Lets begin the interview!

Hi guys! Can you start by telling us where you’re from, your experience with character animation and background?
Xin: Hi, I’m Xin. I’m from Beijing. I always wanted to be a animator since I was a kid and they told me knowing how to draw is going to be benifical even if I want to be a 3D animator in the future. So I started my professional Fine Art training since I was in primary school. Since then I learn Fine Art for nearly 10 years before I went to Teesside University to get a Bachlor of Art Degree in Character Animation in the UK, where I gained a lot of 3D Generalist skills as well as animation skills.

Florent: I am from Toulouse, in France. I have always been a big fan of animation and video games but for some reason I thought about it as a possible career pretty late and I studied different subjects (including food processing…) in the end, after graduating in computing science in France I decided to move to England and learn animation.
We both studied at Teesside University, in England, where we graduated from Bachelor of Art in character computer animation. After our studies, we both got hired as animation interns by Ubisoft in Newcastle-Upon-Tyne. We are now still working at Ubisoft and we decided to study at Animschool on our free time to learn more about animation as our University course was very oriented on CG generalist skills.

How did the idea for the script came up? Who was in charge of what in the short?
Xin: Of course, it is slightly based on real events. My partner Florent was shaving in the bathroom with his electric razor, and some minutes later, he came back in the room with a half shaved beard and his razor which was out of power and the cable was nowhere to be found. With this idea in mind, we also wanted to find an idea about how he could finish up shaving in a funny way. I remembered reading a famous self-helping book based on “The law of attraction” and which marketing is based on a “secret” linked to many historical figures and conspiracy. And so we decided to make a parody of it.

Florent: We shared the different tasks according to our skills and what we wanted to do.
Both our dreams were to become character animators after university so we evenly shared the animation.
For the pre-production, after defining our story and getting some rough shot ideas, Xin draw an amazing storyboard (see panel). Xin’s storyboard was so clear we even used it as the main reference for the environment design.

A panel from the storyboard

We both modelled and textured environment and assets.
Xin took care of Malcolm rig modifications, the 2D/motion graphics and compositing Florent did the shading, the lighting and the rendering.
And just a word about the book narration voice actor: Fernando Zamora. Who worked with us remotely and did an amazing job. Thank you again 🙂

Can you tell how much time did you guys spent per day on it and how long did it took from start to completion?
We started over the summer to be ready to animate at the start of the academic year so it took a part of the summer and half of the academic year (because we had another project), so around 5 months spread on a year.
The days were busy, we did everything from home and it was an average of 9-10 hours/day. A lot of hard work but it was worth it in the end 🙂

What did you guys think of the Animschool Malcolm rig? Did it meet your expectations on the production of the short?
From the start, this project goal was to produce the best character animation we could make to showcase our animation skills. To get the best results, we had to give up the idea of using our own character.

Quickly, we decided to use a Free Rig which allow us to have maximum performance of the character animation. We choose Animschool’s Malcolm Rig due to its flexibility after we saw many great animations including a short animation called Mistakes on the 11 Second Club website. The runner-up of March 2012 gave us a great idea of how flexible and controllable the Malcolm Rig’s hands are.

The Malcolm Rig has an amazing facial rig. The eyebrows and mouth in particular allowed us to have greater facial animation without being limited by the rig itself. Of course, the body rig of Malcolm is fantastic too. The controllers on his limbs enable us to have great line of actions during the animation.

Malcolm flexibility and deformations 

Can you share the main process for the character animation and model modification?
This is the animation workflow we used for this project:

  • Video Reference Recording – Record video references of ourselves for the animation.
  • Character Animation Thumbnail – Decide the character’s actions by drawing out the storytelling poses.
    Example of thumbnail drawing for animation
  • Blocking Animation – Blocking of the storytelling poses of the animation and establish the rough timing of each movements.
  • Spline Animation – Change stepped animation curves to spline curves.
  • Polish Animation – Add textures to the spline animation and clean the curves in Graph Editor.


Model Modification

Geometry Modification
To fit our purpose, we wanted to personalized Malcolm geometry and textures. Considering the complicity of the rig, Xin didn’t dare to make too much changes on the geometry, otherwise it might result some problem on the rig. The main modifications are the general face shape was sculpted to be rounder and the hairs were removed to leave space for a Maya hair system

Malcom face modification
We also gave him a shirt collar to add some detail. The collar is animated by 6 blendshapes to reduce shoulders intersection once animated.
Blend Shapes for Malcom’s collar

Our issue was that only Malcolm’s face was UV mapped. We did not know at that time that uv mapping a rigged character would not end well 🙂

When we though skinned character’s UV were still movable

After doing some research, Xin found an article from a blog called Anim Bizz, talking about how to transfer UVs after rigging. A “Shape Orig” node includes the information of the character before rigging. Therefore, a UV transfer can be applied to this and it allowed us to UV map Malcolm’s body.

Hair System
For the hair, we wanted the non-dynamic hair system since dynamic hair is not necessary and it requires more work to do with the simulation which is way too complicated for us. Xin followed a course talking about hair system on DigitalTutors.com and had a basic idea how to build up the hair system with curves.
The idea was to create curves where we wanted the hairs to be and apply hair systems on them. Three layers of curves were created to had more realism and volume to the hair.

Layers of curves for more realism

These little guys were quite an inspiration 😉


For the Beard and Eyebrows, we used the Maya Fur system.
So after all these modifications, the character looks like this:

Malcom after a complete makeover

Detail of Malcom’s new textures

The “new” Malcom

What were the main challenges for this short?
Hahaha… Everything. We basically had no experience using Maya for more than animating a basic walk cycle and lip sync exercise for University. Every aspect was new and we were constantly doing research and learning: how to rig, how to shade, light and render, how to use hair and fur .. and well .. how to animate. Thanks to a lot of great ressources online (including AnimSchool Youtube channel, Digital Tutors, countless blogs, univeristy feedback) we managed to get to the result we wanted.
Hair and fur were particularly difficult because there is less content about it ( how to create, how to render)
Oh! and having a big mirror in the first shots didn’t make things easy ^^ (Camera angles, lighting, rendering and compositing)

What was the technology involved in the creation of the short (render, software, hair system, etc)?
The render was done using Mental Ray in Maya. It was done in parrallel with the lighting and shading. It took a lot of time and a lot of experiment. Here is an example of the process to find the lighting:

Several attempts in finding the correct lighting

And so on until we could get it right:

The final lighting set that made into the final version of the short

Most of the shiny/reflective materials are Mental Ray’s “mia_material_x”, the rest are Lambert materials:

Mental Ray’s architectural materials are good for cool a realistic look. 

Another example of Mental Ray Area light and shadow transparency node use.

The other software we used were:

  • Maya 2013 for all the 3D (including non-dynamic hair system and fur)
  • Adobe After Effects for compositing, 2D and motion graphics
  • Nuke for some of the compositing (motion vectors)

Any advice for animators that want to start production of their own short?

The only advices we can give to people who want to produce a short film are the ones we wish we had heard/followed before we get started most of them are probably obvious and specially relevant if you are still studying:

  • Keep it simple: Especially if you are alone, it is hard to find the line between challenging yourself and putting the bar too high.
  • If the goal of your short is to demonstrate your animation skills, We advise you not to try making your own character/rig. (Unless you have time and you are an amazing character TD/ rigger 🙂 ). There are a lot of rigs available out there, and as far as we know, Malcolm is by far the best. (No, Animschool don’t pay us to say that !) 🙂
  • Find a subject/story that get you really engaged. So you don’t throw everything by the window some months down the production.

If you have any questions, feel free to contact us through Vimeo or our websites:

http://www.florentrubio.com/

http://www.xinzhao.co.uk/

We thank Florent and Xin for this interview and hope to see more works from them in the future! If you want to learn real character animation taugh by professionals in the industry, come apply now!

AnimSchool Student Spotlight: Jilmar Altamirano

Today we are interviewing AnimSchool student Jilmar Altamirano. Jilmar is taking the 3D Animation Program at AnimSchool and is showing some real talent in his animations!


Hi Jilmar! Can you share a bit about yourself, where you’re from, experience with animation prior to AnimSchool, and background?
I’m 20 years old and I currently live in Gainesville, FL. I was born in Ecuador and when I was 12 years old I moved to the US. When I was little, like most kids, I loved watching cartoons and playing video games. In particular, a video game called “Skullmonkeys” which I really enjoyed. At that moment I did not know anything about animation, or that people actually could make a living off of it. A few years ago I remembered about “Skullmonkeys” and decided to get it again. I still loved it. That’s when I started to do some research about animation and began to practice stop motion animation. After months of doing stop motion, I switched to computer animation.

Skullmonkeys in-game animation


The first year of my learning experience I watched tons of tutorials learning as much I can about modeling, rigging, lighting, rendering, etc. I really enjoyed all of those, but animation was still my priority. Learning animation with tutorials or on your own is very limited. So I decided to take my education further. I did not choose a college because of the poor reviews a lot of them got and how expensive they were. I looked into online animation schools. Luckily I found Animschool. I was really impressed with the student showcase, and the characters were very appealing. So I applied and here I am blessed to be doing this interview, and to have a very supportive family, friends and instructors.


Who are your favorite animators and artists?
I really don’t have a favorite animator or artist in particular; but if I had to pick I would say the whole team responsible for creating The Neverhood / Skullmonkeys because without them I probably would have never found my passion for animation. I also look up to my Animschool instructors. They are all great animators who are very supportive which inspires me to keep pushing myself.
We can see a very good foundation on your shot for your Body Acting class assignment. Can you describe how the idea came up and what was your process?


The idea of having a Halloween theme on my animation just popped in my head for some reason. It could have been because Halloween was coming up and also because I wanted to use the awesome “BoneApart” rig.
I won’t take all the credit for the idea, my story was improved by my awesome instructor at the time, Trevor Young, and at a general reviews class with another great instructor, Tony Bonilla.
I did not know I was going to do a cartoony piece until the middle of my first blocking, but I just felt like it needed to be snappy and it would just add to the comedy of the shot.


For the blocking I always try to block on 3’s or 4’s, but since this was a very snappy animation I found myself having to block on 1’s in those transitions.

For splining, I find it easy because of how much time I spend blocking. I just have to go through all my curves, cleaning them up, making sure the mechanics are there and the arcs are clean.


For polishing, I would say I focused 75% of the time I had on the kid and 25% on the skeleton. Since the kid was the focus of the shot I tried to polish him as much as I could, going frame by frame checking that every arc was clean.


You also have a great shot for the Character Performance class. Can you share your process from start to finish?

Picking audio clip: When I picked this audio clip I was telling myself: “what have I done? This is going to be way too hard for me.” I had no experience with dialogue shots, so I knew it was going to be very challenging for me from the beginning.

I listened to the audio like a hundred times. The character sounded very crazy and manipulative. I pictured the character in my head but when I would try to act it out it just wouldn’t be the same.


Reference: My instructor, Marcelo Sakai, recommended me to study Mother Gothel from Tangled, so I did. I watched all her clips from the movie a bunch of times. I shot a lot of reference; I mean a lot, maybe like one hour of footage in total. I also had a lot of help from my wife who acted it out. She helped me see a more girly performance and she made some acting choices I would have never thought of.


Blocking: Finally got my reference and after the fourth or fifth week of class I had my first blocking pass. It had a few story telling poses maybe 4 or 5 with basic facial expressions.


Blocking Plus: I added a lot of breakdowns, blocked on 3’s and 4’s. I refined some facial expressions and blocked all basic mouth shapes.


Spline: I splined the body first, cleaned all my curves. At this point I found myself getting more into the character, and finding facial expressions that fit the dialogue better. After spline on the body was done, I splined everything on the face except the mouth. I cleaned those curves, and then moved into the mouth, pushing the shapes. I had a lot of fun with those mouth shapes.


Polish: At this point I focused mostly on the face and hands, going frame by frame checking every arc, even the arc of the corner of the mouth. Also pushed mouth shapes even more. Added more fleshiness on the face and I worked on the hair.


I am really happy with how it turned out at the end. All my instructors were very helpful and supportive throughout the whole term.


How did your instructors help you achieve the desired quality in your animations?
My instructors are very supportive. When you tell them your goals for the term on your first day of class, they won’t stop pushing you until you reach that goal. They are all very talented artists and that is why my animation has improved so much over the past year. I tried to attend to as many extra classes offered in Animschool as possible.
The General Review classes have been very helpful. The instructors there care about your progress as much as your main instructor.
I can’t thank all of them enough, and I can’t thank Animschool enough for having all these amazing instructors!

Any advice for your fellow students?

Always try to challenge yourself on your assignments, try different things you haven’t tried on your previous work, like different styles (cartoony or realistic), different workflows, if you have only animated guys, then try animating girls, animals, robots, etc. Experiment a lot.

Don’t give up! If your assignment isn’t coming out like how you hoped, don’t get frustrated just keep working on it, it will look great in the end. Don’t be afraid to ask for feedback.
If you send your reel to studios and don’t hear back from them, it doesn’t matter: just keep improving your reel, and keep sending it to more studios.
Work hard!


We thank Jilmar for his time, and be sure to check out his siteVimeo and LinkeIn pages!

AnimSchool Student Spotlight: Nanda Van Dijk

Today we are interviewing animation student Nanda Van Dijk. Nanda is very talented in the digital arts realm and is taking the 3D Animation Program at AnimSchool.

Hi Nanda! Can you start by telling us a bit about yourself, like your background and experience before AnimSchool?

Animation
has always been my passion. As a child I was always drawing and
watching animated films. I went to the Utrecht School for the Arts in
Holland and studied computer animation and visual effects and graduated
with a master’s degree. I learned a lot about creating animated films,
from writing the scripts to making the storyboards to the production
itself. There wasn’t really an option to specialize yourself in
animation. The Dutch animation market doesn’t really work with
specializations so the school trained me to be a generalist. Because I
didn’t learn much about animation at the Utrecht School of Arts I taught
myself as much as possible. I was hired in 2010 as a 3D artist at
Mediamonks, a creative digital production agency, right out of school
and worked there for two years. In 2012 I started Animschool in class 4.
I showed my work to Tony Bonilla and he told me that I had enough
experience to skip the first 3 classes. After 3 terms at Animschool I
had to take a couple of term breaks to work on a feature film. I had the
opportunity to work as a 2D key animator at the Anikey Studios for the
Dutch feature animated film “Trippel Trappel”. Currently I am
working as a freelance 2D and 3D artist in my own company Anim.nl and
I’m back at Animschool to resume my classes. 


This term I’m taking the
Advanced rigging class as an in between class to learn how I can
make a high level facial rig and next term I will take class 7 in
Animation.


You seem to be comfortable with digital painting, rigging, modeling and animating. What area do you like the most and why?


Animating
is still my favorite area, I always loved acting and character
development. But the most fun for me is is to design, model, rig and
animate an entire character. It’s great to have control over the entire
process. To animate a character and make it come to life is always a
magical thing, but to make your own creation come to life, makes it
extra special. When I started to animate in 3D at school there weren’t
many great free rigs to work with like the amazing Malcolm rig that
Animschool offers for free. I had to work with rigs like the Generi rig, a
very unappealing basic free rig. Some of you will probably remember him
with mixed feelings, haha. This is one of the reasons that I wanted to
make my own models and rigs so that I would have appealing characters to
work with. This is also one of the main reasons why I picked Animschool
over the other schools to go to. Animschool has some of the most
appealing and professional character rigs that I have come across.


Who are the artists that inspire you?


There are so many amazing artists that
inspire me. Everyday I try to look at blogs with artwork. A couple of my
favorites are, David Colman, Peter de Séve, Greg Dykstra, Loralay Bove,
Ryan Lang, Pascal Campion, Barbara Canepa, and lots and lots more. And I
have a lot of very talented Dutch friends who inspire me every day as
well, specially the illustrations by Lois van Baarle and Wouter Tulp,
two amazing artists. And as for animators, I’m a huge fan of Glen Keane. I
love his animation style and the appeal his characters have. When I
went to CTN in 2012 I watched him animate the little Mermaid. That was
very inspiring to watch. And of course the animations by the nine old
men are a huge inspiration for me.


Can you share your process from start to finish on your shot with Mr. Bones for the Body Mechanics class?


That
animation was so much fun to make. I had an amazing teacher, Tim Crawfurd. He has over 12 years of experience working at Pixar. I
couldn’t have asked for a better instructor. It was also a coincident
because Tim is also from Holland. That was a lot of fun because we could
sometimes speak in our native tongue with each other and make small
inside jokes. The assignment for this term was to make a short pantomime
story with one of the simpler Animschool rigs. I loved the look of the
Mr. Bones rig so I decided to create my story around him. I knew it had
to be a Pirate story because Pirates are simply awesome! The idea for
the character to lose his arm came really quick to me but it was very
tricky to think of a way to communicate this idea to the audience. First
I had to establish that the character lost his arm and that he still
had to find out himself that his arm was gone. It all depended on the
timing of the animation. If he noticed his arm missing too quickly the
audience wouldn’t have noticed it themselves yet so they would miss the
punchline. I really had to think about a way to direct the eye of the
audience to the missing arm so. the yawn, and the looking for the arm
helped to stage out this scene. It also helped the performance to give
the character some real personality. After figuring out the staging and
the blocking I polished my animation, modeled the stage for the cave,
modeled and rigged the bat and did the lighting and shading. To really
finish the animation I asked Dave van Luttervelt, a very talented
composer, to do the sound design and music for me. I’m very pleased with
the end result. I hope you’ll enjoy it as well!


You
worked on Trippel Trappel, a dutch feature animation film. Can you tell
us more about the film, your role and what challenges did you face in
the production?


Trippel
Trappel is produced by il Luster in co-production with ViviFilm,
animated at Anikey Studios. The story is about a couple of pets who want
to celebrate the Dutch Holiday ‘Sinterklaas’. Sinterklaas is very
similar to Santa Claus, he also brings presents to children through the
chimney. The pets want to get presents too so they’re going to find
Sinterklaas to bring him their wishlists. The film is still in
production and will be released October this year in Dutch and Belgian
theaters. This will be the first fully hand drawn animated feature from
Holland since 1983. When I learned about this production I made an
animation test and the studio asked me to be one of the Key animators
for this film. In the studio they use TV paint and Wacom Cintiqs to
animate. Unlike the old Disney films I didn’t work on just one
character. More like in 3D I got an entire scene and had to animate
everything in it, so I had the chance to animate all the main characters
in the film. It was very fun to do but also very challenging especially
because I normally work in 3D and now had to animate by hand in 2D. I
had about two weeks to learn how I had to draw the characters and after
that I got my first scene. Because the movie is funded mostly by the
government there isn’t a big budget to work with. So I had to work very
quickly and still try to keep the quality as high as possible. It was
very challenging and hard work but I think it payed off.
I’m very impressed by the quality of the animations made by everyone in the
studio and I know that it will be a very beautiful film when it’s done.

Here
is a small teaser of the film. This piece is animated by Marcel
Tigchelaar, our supervising animator. The official trailer will be
released around February.
This is the Facebook page of ‘Trippel Trappel’:

What do you think is the most important thing you learned at AnimSchool so far?

I
think the most important thing is to really think about your scene
before animating. Thinking about what is happening in the scene, what
the character is thinking. If the character says one thing but thinks
something else. How you can use staging and timing to improve the
performance of your character. Thinking about every eye dart and every
small movement why you are animating it like this and if that is the
best way to communicate an emotion or thought. Most of the time I work
on short projects with very tight deadlines and then I just start to
animate and see where I’ll end up. In Animschool I finally have the
chance to really take my time to focus on small details and work on my
acting skills.

We thank Nanda for her time, and be sure to check out her awesome works on her site, LinkedIn profile, Facebook Page, Vimeo Page and Behance!

AnimSchool Interview: Animator Carlos Luzzi

Today we are interviewing Carlos Luzzi. Carlos is a professional hand drawn animator, with 10 years of experience. He has done work for TV and film and is also a concept character artist and visual development artist.


Hi Carlos! Could you start talking a bit about yourself, your education background and when did you begin to be interested in drawing and animation?

I have been interested in drawing since I was a kid. The cartoons that I watched on TV drew my attention a lot and I tried to reproduce the ones I liked on paper. I went through my childhood drawing, and had some professional experience with drawing in my teenage years. I studied Graphic Design but I was always so interested in animation, which I studied by myself in parallel to the university studies. There were no courses in my home town, so in the beginning I had to teach myself, through books that I bought by my own. In the last year of college, I got an internship in a big studio in São Paulo and soon after I moved to Los Angeles where I spent several months studying life drawing, guided by masters Glenn Vilppu and Karl Gnass at the American Animation Institute (today Animation Guild). I had a big desire to develop my skills as a traditional artist before fully focusing on animation. After that, I came back to Brazil to pursue my career as a traditional animator.

Tell us a bit more about your professional experience. What was your first job in the field? For how long have you been an animator now and what are the works you are the most proud of?
My first job in animation that I consider professional was at the Daniel Messias Studio, where I started as an animator back in 2003. This studio was one of the biggest studios for animation ads in Brazil for decades, a market that kept the animation industry moving in Brazil and formed several generations of traditional animators here because of that. I was part of the last generation; today that industry is taken by CG and certainly much less traditional animators are being formed here, which I think is a shame. In the last years I became a freelancer, and diversified my works doing storyboards and visual development. One of the works I enjoyed doing the most was animating Mickey and Minnie Mouse in a short for Disney that was exhibited at the NY Fashion Week. We had little time, but having the chance of working with those characters doesn’t happen every day, and that was very special to me.
You are also an excellent character artist – what came first, the love for creating characters or love for animating them?
I think drawing is a part of me, so the process of drawing storyboards and character designs always ended up mixing with the process of animation in the short productions. Having said that, my main focus was animation for many years. I have full knowledge of the complexity of the animation process, and I’m still studying to refine my work. Since I love drawing, my interest for character design always existed, but most of the time I worked with pre-established characters, so I didn’t have the chance of designing them often – one thing I’m trying to compensate now. Recently I had the opportunity to do a little visual development for a movie from Reel FX that is still going to be released and I really liked the experience. My interest for story is also growing by the day. I have been reading and studying about it since I started as an animator, but in the later years I’ve become more dedicated to the subject; recently I worked on the storyboards for a movie in Brazil and the process of story building is fascinating.
In your opinion, what does a character must have to grab the audience?
Tough question; I’m still looking for that answer, but at the moment I think it’s honesty. I watch live action movies and what attracts me the most in terms of acting are those moments when the characters have “honest moments”, where they are being themselves, doing day to day tasks, like there isn’t a camera pointing at them. That action makes it so that only the character being at the scene is enough, because the action is powerful and honest. Every subtlety becomes perfectly natural (even so they have been thought before by the actor), for they belong to that specific character and you believe in it. That is very hard to simulate, specially in animation, for we draw the character frame by frame, and the actor does in in real time. We always try to overdo the movement of the characters, where I think we should try to under-do it, finding the right moment and do what is right for the scene.
As a freelancer, you have the chance of working for several clients. How is the experience of being a freelancer in the animation industry?
Sometimes is intense. There are projects that happen all at the same time, and I’m always busy even on a regular day, either looking for possible projects or making quotes for future ones. The good think is that I have positive surprises, like having the chance of working on things outside animation, like concept art or storyboarding – that has sparked new interests for me and it has been fun.

What are your perspectives for the 2D animation industry, in Brazil and worldwide?
The industry right now is very small for hand drawn animation in features, that have been crushed by CG animation. That is nothing new, but there is always a movie coming up. I’ve heard about features in development, and there are always smaller projects coming up like ads and short films. I think the interest for good animation comes from the public for the most part, regardless of the final form, be it hand drawn, CG or stop motion. I’ve always been available to migrate to CG but the funny thing is that hand drawn, storyboards or visual development projects are always coming up and don’t let me leave the drawing board.

What do you think animation students must focus to improve the quality of their works and get noticed and possibly be hired by a studio?
Animation have many ways and it’s possible to reach excellency in several ways. There are CG animators that don’t know how to draw and are excellent in what they do using video references. In my particular case, I have drawn for many years by observation, capturing how people naturally act. People from my family, pets, people in the street. I’ve carried sketchbooks with me my whole life, and tried to capture life, the real stuff. That’s still a long way to go, and I’m constantly learning. Today I use other references, like video, for analyzing actions and the actors, as well animations that I consider to be excellent. But I always advise beginning students to draw the world around them.


We thank Carlos for his time. Be sure to check out some of Carlo’s work on concept character below, his site and Vimeo profile.


AnimSchool Interview: Kevin Lan

We are very excited to present you Kevin Lan, animator currently working at ILM, who animated Richard Parker (the amazing tiger from “Life of Pi”) and several other awesome creatures and characters like The Hulk and Yogi Bear!

Hey Kevin! First of all, could you talk a bit about yourself and what led you to be a character animator?

I am an animator currently working at ILM, before that I was a lead animator at Rhythm & Hues for the past 6 years.
I was not the typical kid that grew up with Disney animation or super hero comics. I was born and raised in Taiwan, where Japanese anime and manga are the dominant culture influence. However I wasn’t interested in them until college. During my college years I was totally hooked by all the 80’s and 90’s anime and manga, through these I also got in touch with experimental animation from Europe and Canada. Anime director Otomo Katsuhiro and film maker Norman McLaren were the major influences for me to want to create animation. Eventually I knew I was going to pursue animation as my career of choice. After I finished my college degree (with struggles of course), I came to the US to study animation in SCAD. It was a time people were talking about 2D being dead and 3D animation is the future. I was very stubborn and decided to focus on 2D animation because of my anime/indie animation root. During my time at SCAD, I was exposed to more Pixar/ Disney style of animation. I think that was the first time I became more aware of “character animation” and started thinking about being an animator in the future.
What was your first job in the animation industry? How did you land the position?
I consider my job at Rhythm & Hues was my first real job in the industry. It was back at early 2007, I had just finished my MFA degree and brought my wife and kid to SF to attend a Pixar class at AAU. So I was learning 3D animation at the same time I was trying to find a job. Time was not on my side because as international students we only had one year to work legally in US. Luckily Rhythm & Hues liked my reel, even though I didn’t have much 3D animation in there, they somehow saw my potential from my 2D thesis film and brought me in for Golden Compass. 
Your animation on Richard Parker (the Tiger from “Life of Pi”) is pretty jaw dropping. Can you share how much time you spent researching reference and what was your overall process from start to finish of the animated shots?


We wanted to stay absolutely true to the tiger from Life of Pi, which means there should be no anthropomorphization or any guessing from animators. I spent the first 3-4 months studying reference and animating on test shots only. That was the time we figured out how the tiger would behave in different situations, the general physicality and posing, and how the muscle and skin works. Although I was matching reference in these tests, I didn’t do it blindly frame by frame. I still tried to find the key frames, analyzing where the force was generated, which control to use, how the force would impact other parts of the body and how the residual energy would be resolved. I also tried to emphasis the realistic motion quality on Richard Parker, tried to limit the usual CG smoothness and put in the imperfections we see in real life. Through these exercise I got a hold of the feeling for the tiger, and eventually I could deviate from reference in my shots and still make Richard Parker believable.  

Our general process started with animation director kicking off a sequence and shots.  Then we would compile a playlist of references suitable for each shots and gave those to the animators. If you were lucky enough, you could find a perfect reference and just try to match it. But that was not generally the case. We always needed to piece together segments from different clips and finding creative solutions for the best possible performance for each shots. 
I got some of the most challenging shots in the film. Without much similar references I could use, I tried to study all the tiger footages and real tigers in other movies for inspiration, then just imagining how Richard Parker would behave under these unlikely situations. I would block out my shots straight in spline mode, creating my key poses and also putting the correct physicality along the way. I think it’s the only way I could know for sure if my idea would work. After the blocking was approved  (usually this took the longest time), I would start adding all the juicy nuances and details on the tiger. While we were working on the shots, the model and rig itself was improving too. So it was a very organic process, and we were constantly improving and changing our shots until the very end.
You also animated a lot of scenes in movies going from Alvin and the Chipmunks 2 to The Incredible Hulk. Do you enjoy taking on projects with different styles from one another?


I definitely enjoy doing different styles of animation. I suppose being an animator means I’m suppose to animate “everything”, not being limited to a certain style or characters. Although, I can see myself enjoying more on creature/VFX films recently. Partly because I got recognition from what I did in Life of Pi, also mainly I feel like there are a lot of unknown territory waiting for us to explore. If you think about how many scripts are still hidden inside James Cameron’s drawer, and those impossible-to-make-movies may one day become possible, it’s a very exciting time for animation and VFX.
Do you have any advice for students wanting to land a job in the animation industry? What would they want to really master before applying to any job in big studios?
I can only talk about VFX industry as I’ve never worked in feature animation. The situation in today’s industry is very complex and much more difficult than before. Being a team player and work hard are the must. I would also suggest animators should master their sense of physicality and try to be original. A good sense of weight and presence of character would benefit you whether you are working in feature animation or VFX. It’s the most fundamental thing you will need for the rest of your career. Being original is extremely important in today’s animation. I think it goes back to observing real life and experience it yourself. Learning from existing animation is great, but it should just be a stepping stone for you to create your own character, even your own style. 

Episode 005: The Croods – Round Table Part 2

In this episode we conclude the conversation started in Episode 04 with seven animators from the Dreamworks production crew of “The Croods.” Their positions rank from Character Animator up to Supervising Animator.

 Podcast | Right Click to Download | Play in New Window | (48.0 MB)

Link to Podcast on iTunes

Line Andersen
Supervising Animator – Eep
IMDB profile
 Hans Dastrup
Supervising Animator – Thunk
IMDB profile

Gabriele Pennacchioli
Character Animator
David Couchariere
Character Animator
Thomas Grummt
Character Animator
 
 
 Jennifer Harlow
Character Animator
IMDB profile
Liron Topaz
Character Animator
IMDB profile

Page 1 of 2