Category: 3D animation Page 1 of 4

3 Ways to Take Your Animation Above and Beyond Your Reference

Shooting reference is an essential part of the planning phase when animating a shot. It gives the animator an opportunity to step into the character’s shoes and fully explore their personality through movements and acting. Studying reference is a key part of how students learn body mechanics because it allows them to experience the movement and timing of a scene firsthand. Over time though, it is easy for animators to fall into the habit of relying on their reference too much. So much that they begin rotoscoping the reference into their shot, frame for frame.  

It is easy for student animators to fall into the habit

of relying on their reference too much. 

So does this mean that you should stop filming reference? Of course not! You still need to do reference in order to try out different acting ideas and provide some kind of foundation for the timing and body mechanics of your shot. The key is knowing when you can steal directly from your reference, and when you can simply ignore your reference. Your reference is a foundation, it is—as the name implies—simply a  reference. It is an inspiration, something to refer back to, but it is not meant to become a carbon copy of your animation. When animators begin rotoscoping their reference, they forget to think about pushing appealing poses, creating stylized breakdowns, maintain smooth arcs, and deciding what’s leading and what’s following. It’s these decisions that really make animation an art form and the animator, an artist. 
Below we’ve compiled a few ways you can avoid falling into the habit of rotoscoping and push your animation beyond your reference to make a performance that’s all your own. 

1. Stop putting reference into your viewport.

This is a debatable topic, so it is definitely not for everyone, but we encourage you to try it out. The idea is, that if you put the reference directly into your Maya viewport, there is a greater temptation to copy the poses and the timing of the reference frame for frame. Without the reference sitting in the viewport though, you’re more likely to push the poses and timing of the shot.
Don’t stop using your reference though! If your reference is open in another program such as QuickTime or SyncSketch, you can easily frame by frame through it and pick out the poses you want to use. You can even count the frames in between the poses if you want to get the timing in Maya the same as your reference. But isn’t this just rotoscoping, why not put the reference in Maya and save time? By having your reference in a separate window, you will automatically feel less tied to the reference’s poses and exact timing. Instead of animating on autopilot, you’ll become more conscious of how many frames it takes to get from Pose A to Pose B, and therefore more likely to make the timing more your own. 
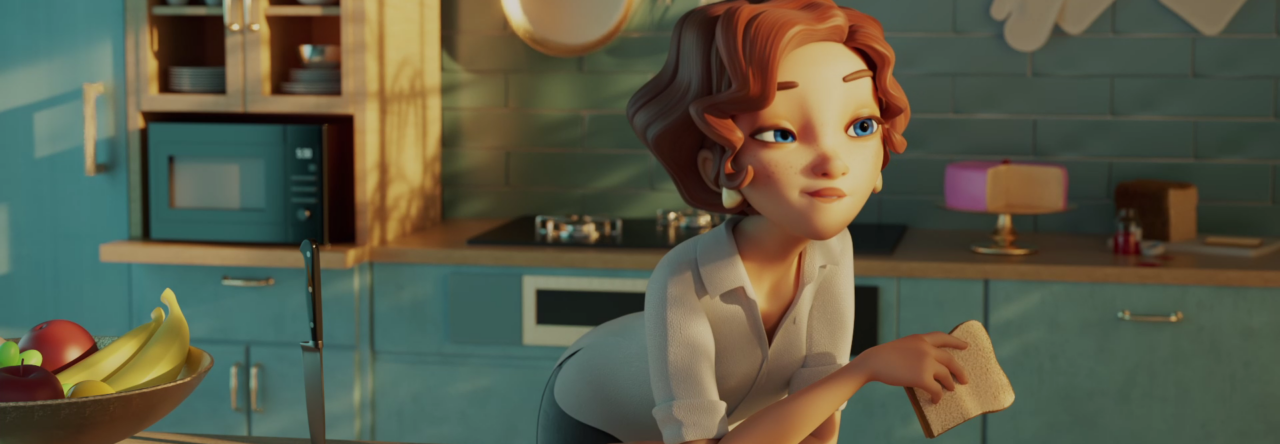
AnimSchool Student NyGyra Lawson
Nonetheless, if you’re still adamant about sticking your reference in the viewport, that’s okay! Many professional animators actually prefer it this way. The key point is to remember that animation is an art and as an artist, you need to make decisions about timing, poses, breakdowns, and all the animation principles, independent of your reference. If you copy the timing of your reference exactly frame for frame to start off, that’s fine! Just be sure to go back, and move those keyframes around to really push the timing before you start polishing. You should also keep in mind that sometime during the late spline phase, it’s ok to just turn off your reference. There will be a point when you’ve got everything you could from it, and now it’s up to you as an animator to make the animation really shine. 

2. Study the reference in your sketchbook and do a 2D drawing pass of your reference before you even touch the rig. 

If you like drawing then this tip may be great for you. First, observe your reference and try to get a good understanding of the motionwhat’s leading, what’s following, where’s the arc, etc. Once you feel like you understand the reference, pick out your golden poses and some key breakdowns and draw them in your sketchbook or directly on top of your reference (you can do this pretty easily in SyncSketch). 
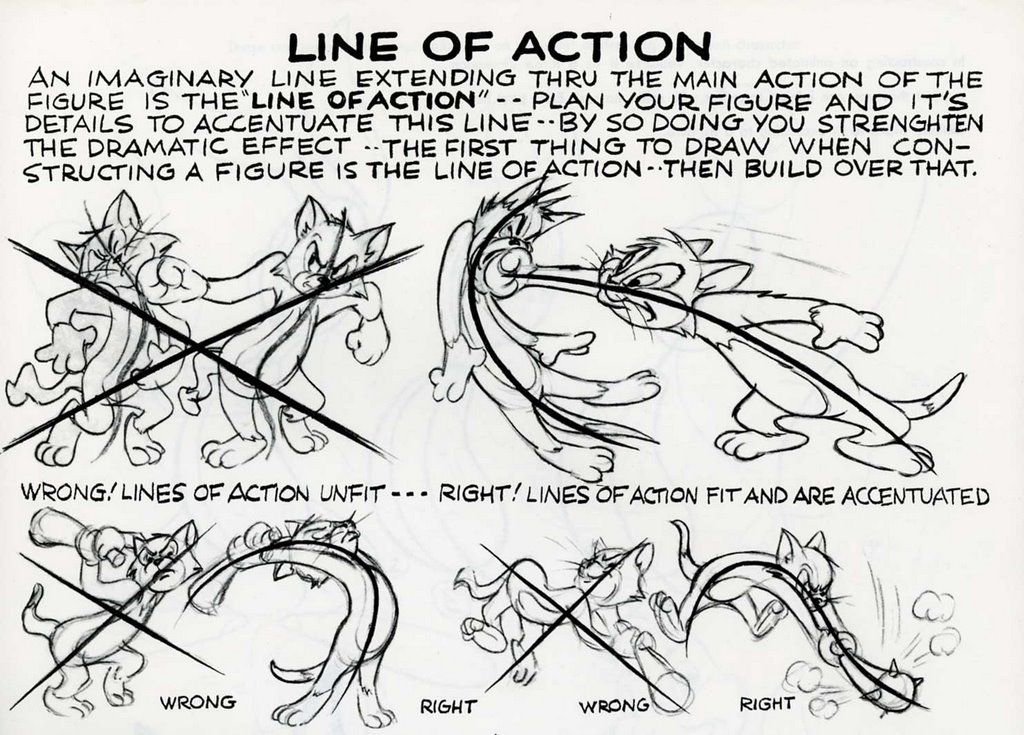
Now that you have a solid understanding of the reference, draw some variations and try to improve the appeal of your sketches. Try pushing some poses or pulling back on others. You can push the timing of certain movements for exaggeration by changing up the spacing. Experiment with spine reversals, line of actions, and even mouth and eye shapes. 
By doing this, you’re figuring out a lot of the body mechanics and posing before you even get into Maya. Figuring this stuff out on paper is much faster than in Maya, and you do NOT need to be a good artist to use this method. Trying a new pose out in Maya can take 30 minutes to an hour, but you can easily sketch out a stick figure in a few different variations of a pose in a couple minutes. Working in 2D will also help you avoid getting too caught up in the complex 3D rig, and instead focus on appealing graphic shapes and silhouettes for poses. 
They say animation is ultimately 50% planning and 50% animating. Though this planning phase can seem time-consuming, it’ll more than likely be worth it and make your animation not only better but quicker to complete.
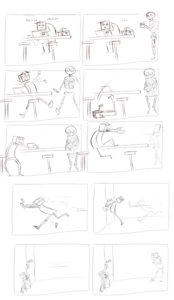
Here is an example of some planning thumbnails from AnimShool’s Body Acting Class. 
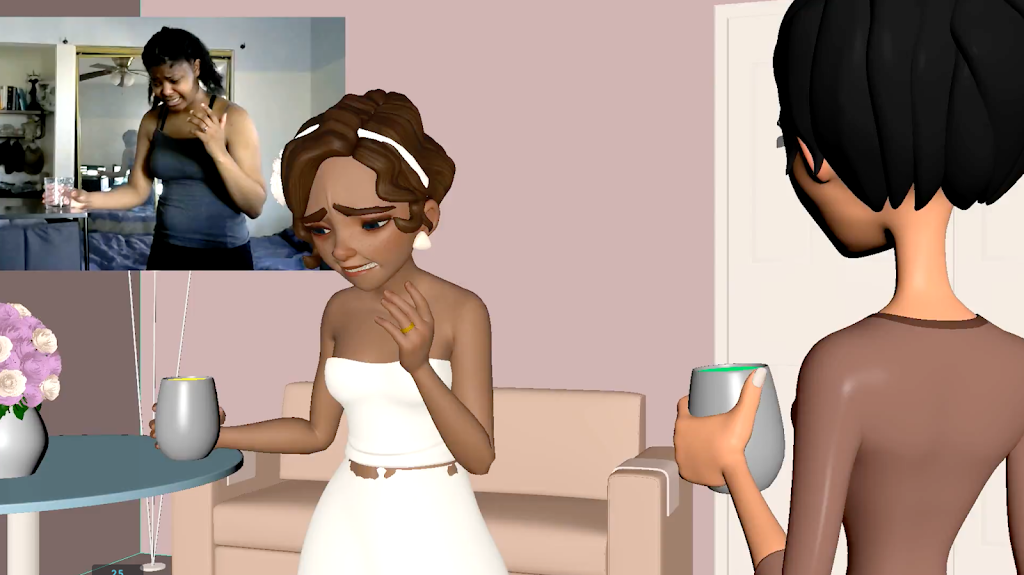
AnimSchool Student Rhys McKenzie

3. Push the poses in Maya.

This is probably the most obvious way to go beyond your reference: push the poses! 
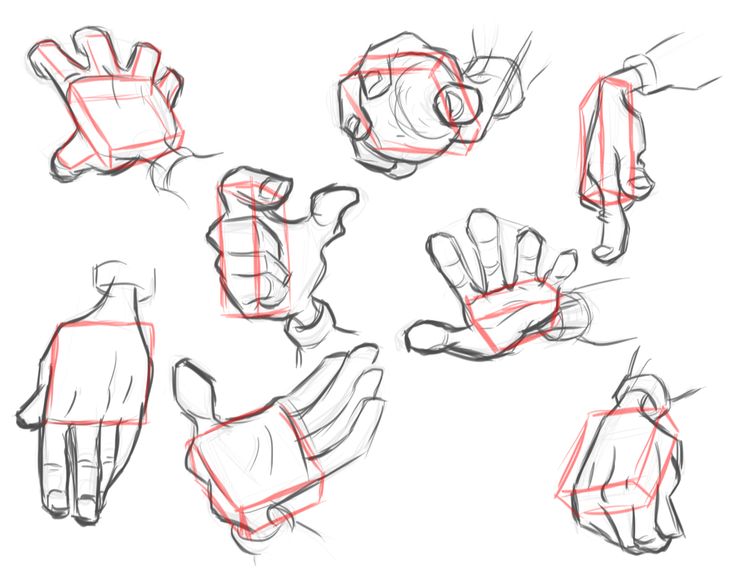
The biggest things to remember when translating a pose from reference to the rig are line of action, silhouette, and character. Oftentimes, humans aren’t the most elegant creatures and our line of actions can feel a bit disjointed no matter how much we try. This is where you as an animator can come in and make the poses your own. Try and simplify that line of action, in one coherent statement that supports the way the character is feeling. Doing this will not only improve the clarity and appeal of your pose, but it’ll also allow the character’s thoughts and feelings to read better. Improving the silhouette of your character can have a similar effect as well. Ensuring that limbs and hands don’t get lost in a character’s body will allow your character’s emotions to be read with clarity. They say that after the eyes, hands are the most expressive part of a human, but if you can’t see the hands because they’re lost in the character’s silhouette, the pose ultimately doesn’t read as clearly as it could.


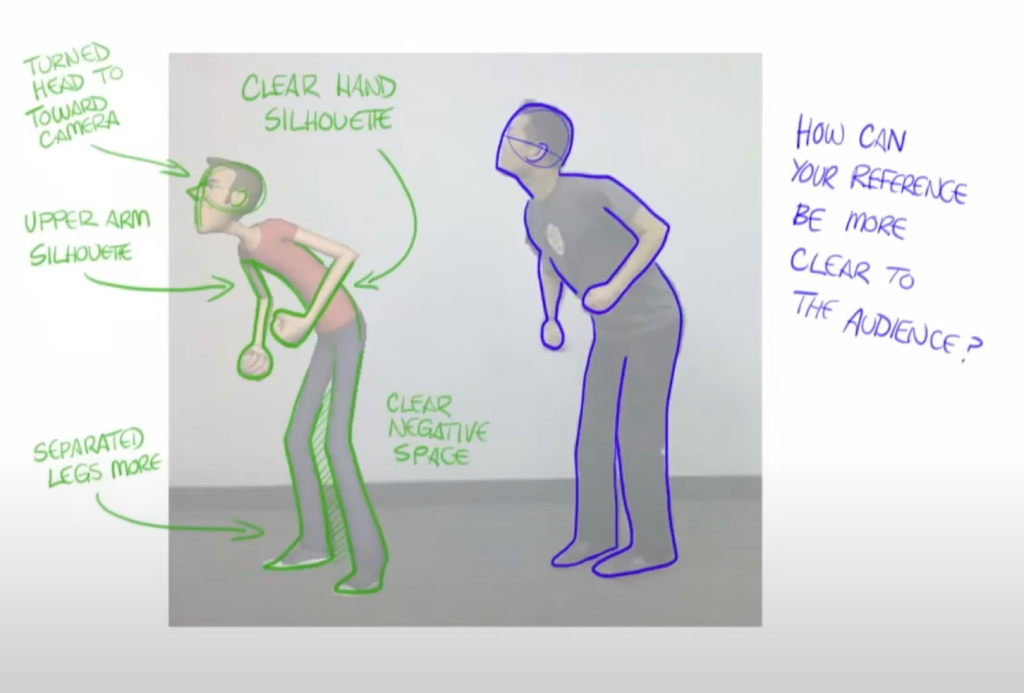
AnimSchool instructor Garrett Shikuma does a fantastic job of demonstrating some methods to push a character’s pose to be better than the reference. Though Garrett says you can always push your poses, he emphasizes the importance of remembering to make intentional acting decisions while posing your character as well.

We hope you found some of the methods useful. What are some of your best tips for animating with reference? 
Join our online community of 3D artists and animators in our online accredited courses (ACCSC). Apply today at animschool.edu

Introduction to Maya Keys II: Breakdowns

In this video from Maya Keys series, professional instructor Justin Barrett explains the second important Maya key in setting an animation setup called, Breakdowns. He explains the role of breakdowns keys in 2D animation setup in the past and what their function is now in a 3D dominating world.


Visit www.animschool.edu for information regarding our animation program so that you could learn more such tricks and tips from our professional animator instructors.


Introduction to Maya Keys I: Keyframes


Autodesk Maya is a powerful tool to animate in 3D. However, in order to animate, one has to understand how to set up keys in order to make the shot work. Animschool offers one of the best online courses to teach Maya under the tutelage of professional animator Justin Barrett. This following clip is from one of his classes.

In this clip from his “Introduction to Maya” class, Animschool’s instructor Justin Barrett explains the history and usage of keyframes in Maya animation setup.

Visit www.animschool.edu for information regarding our animation program so that you could learn more such tricks and tips from our professional animator instructors.

How to Animate 3D Eyes- Quick Eye Movement

Eye animation is considered to be the hardest part of facial animation. Considering how people pay most attention to the eyes of the character, it is absolutely necessary to sell the eye movements to the audience so the character could feel like a living and breathing individual.

In this clip from our “Animating Characters” class, the instructor Paul Pammesberger explains how to animate a quick eye movement in animation and so that it looks natural and not an out of place motion to the audience. 

Visit www.animschool.edu for information regarding our animation program so that you could learn more such tricks and tips from our professional animator instructors.

Blocking Plus Workflow – Part 4 (Multiple Limbs and Smears)


So you’ve blocked in your poses for your animation – now what? You could hit spline, but you can already imagine the cringey, floaty movement that will come out of it. How about taking another pass at your blocking and getting it to blocking plus


If you’re not sure where to start, take a look at instructor Jean-Luc Delhougne’s blocking plus workflow in Maya (from our Body Mechanics animation course). He takes a blocking pass of a jump from basic poses to a well-timed blocking plus pass with arcs and natural movement. In Part 4, he goes over a quick and easy way to add multiple limbs and smears in Maya if you don’t have the tools for them.


If you missed Part 1 (Timing), take a look here:
http://www.animschoolblog.com/2019/05/so-youve-blocked-in-your-poses-for-your.html

Part 2 (Arc tracking) is available here:
http://www.animschoolblog.com/2019/06/blocking-plus-workflow-demo-part-2-arcs.html

Part 3 (Breakdowns) is available here:
http://www.animschoolblog.com/2019/07/blocking-plus-workflow-part-3-breakdowns.html

These are the kind of skills you can learn in our online animation classes and animation workshops. If you’re interested in 3D animation programs, check us out at our website link below! 


Start your journey into 3D Animation. Apply today! For more information about AnimSchool and our online animation programs, visit us at www.animschool.com

The Basics of Bangin’ Brows

    The eye mask is an immensely important part of any kind of acting animation, and it’s an area which requires much time and attention to detail. Principles of animation apply not just to the body, but to the eyelids and eyebrows as well. Utilizing these animation principles well will allow you to shape your way to more expressive and appealing brows. A few of these ideas include:


Arcs – Track the motion path of the brows to make sure that they travel in arcs rather than linears
Offset – Offsetting the movement of one brow can make it look as though the other one is pulling it up/down and add variety to the brow motion
Lead/Drag – Offset the brows from the eyelids to make the brows either lead the eyelids or be pushed/dragged by the eyelids. One or the other could look better depending on the context of the action or beat.

Overshoot – Especially in the case with large, exaggerated motions, the brows can overshoot their final positions and then take a few frames to settle to give the illusion that the muscles underneath are settling into place.
Connectivity – Everything in the face is connected, so when the eyelids move, so do the brows, and vice versa. This applies to blinks, eye darts, expression changes, etc.
Framing the Face – Good posing in the brows will help direct the attention and frame the face. Brows are often used to help open up the face to one side or the other, and tend to support the direction of the eye gaze.


    To help drive these points home, instructor Greg Rizzi animated some quick examples on AnimSchool’s Marnie rig. See the principles of animation for brows in play in this super informative and helpful video:


Looking for the best 3D Animation schools? For more information about AnimSchool and our online animation programs, visit us at www.animschool.com

Parenting? Constraints? Choose Wisely.

    If you’ve ever animated a shot with props in it, chances are you’ve had some difficult encounters with constraints. Just creating a parent constraint often doesn’t meet the needs of a shot, and it can be confusing to try to figure out how to animate the prop correctly. Parenting is another way of creating a relationship between two objects, and can be quite effective if done properly. So, should you use parenting? Constraints? One of the best ways to deal with props is actually to use both.  


Parenting: Parenting refers to putting an object (the “child”) directly under the hierarchy of another object (the “parent”). The child follows the parent, but can also be moved independently of the parent. This hierarchy cannot be toggled on and off.


Parent Constraint : A relationship between a parent object and child object. The parent object dictates the movement of the child object, and the child object cannot be moved independently of the parent. The relationship can be toggled on and off.


   By parenting a child object to a locator, then parent constraining that locator to the parent object, you can create a degree of separation between the parent object and the child object. This way, you have a parent constraint which you can toggle on and off as needed, and the child object can still be moved and animated independently of the parent object.


    If you’re new to parenting and constraints or just need a refresher, check out this clip from our Body Mechanics class, where instructor Charles Larrieu covers parenting, parent constraints, and using locators to gain more control over the constrained object.


Looking for the best 3D Animation schools? For more information about AnimSchool and our online animation programs, visit us at www.animschool.com 

Pushing Poses Through Iteration

    There are so many animation principles to keep track of when creating poses – line of action, silhouette, appeal, and contrast, to name a few. The first pose you create is almost never your best, so here are some techniques that many professional animators use to take their poses to the next level. You can use these along with others as a great way to help train your eye to both see and create better poses.


(Preston Blair on Line of Action)


  • Purpose: What’s the drive and intention of the character? What emotions does your character have? What are they trying to express? Where is their focus and their energy? 
  • Line of Action: Push your main line of action to reflect the story behind the character at that frame, whether opening them up to one side or the other, or hunching away. Follow the line through the body, and see if you can extend the line of action through the limbs and other extremities.
  • Silhouette: Make sure you have a clear pose even in silhouette. Can you get rid of or make use of negative space?
  • Appeal: Is your character’s personality showing in the pose? Is the pose engaging and interesting to look at?
  • Contrast: Make use of different shapes and angles to add interest to your poses. Think of what your character is doing before and after that pose – can you exaggerate certain parts of the body to accent a motion, or play with squash and stretch to contrast a previous or upcoming movement?
  • Iteration: Keep pushing your poses until you end up with something a little more appealing. Don’t worry if you don’t see much change or improvement right away, or if you’re concerned about pushing things too far. It’s an iterative process, and as instructor Thom Roberts mentions in the demo clip below, you can’t judge your progress or determine whether you’ve gone too far until you can compare with what you had before. Make sure to occasionally flip between your old pose and new poses to compare and make decisions about what parts look better. 


    In the clip below, you’ll be able to see Thom’s process for iterating on a pose. Watch as he takes into consideration the purpose of the shot to shape the character, little by little, into a pose with more appeal.  


Looking for the best 3D Animation schools? For more information about AnimSchool and our online animation programs, visit us at www.animschool.com  

Hand Posing 101

(Hand poses drawn by Milt Kahl)


    When creating poses, some of the most overlooked yet important parts of the body are the hands. Hands can reveal a great deal about your character, but many beginning animators tend to leave the hands in flat, default poses. Even a neutral hand pose should adhere to the principles of good posing, such as readability and appeal. Hands can help accentuate a movement or action, and bring life into a gesture. Hands and fingers call follow a path of motion, reinforcing the path and strengthening the impression of a quick movement.


(Model sheet for the Disney animated film, Tarzan)


    Some ideas to keep in mind when posing hands are spacing and grouping. The fingers should be in harmony, and create appealing shapes with strong, interesting silhouettes. It’s preferable to avoid even spacing and parallel fingers. You can create interesting groupings, and play around with pushing one or more of the fingers to set them apart from the others. It also helps to utilize the arches and curls in the fingers, and to pay attention to the splay of the fingers in relation to each other. Don’t forget that fingers also have 3 axes of rotation!

(Hand references for Hogarth from the Warner Bros animated film, The Iron Giant)


    It can be difficult to effectively pose hands with all the different controls you need to keep in mind. In this clip, instructor Thom Roberts goes through his process of posing simple hand poses and gives us some helpful tips, such as rotating in the palm for a more relaxed and natural look to the hand, focusing on the first two joints of the fingers, and achieving visual interest by pulling out one or more fingers.   


Looking for the best 3D Animation schools? For more information about AnimSchool and our online animation programs, visit us at www.animschool.com

Lecture- Animating Pupils

In this clip, AnimSchool instructor Luke Randall discusses how to animate a character’s pupils to make them appear more alive and getting the maximum effect out of an eye animation.

Looking for the best 3D Animation schools? For more information about AnimSchool and our online animation programs, visit us at www.animschool.com

Page 1 of 4