Tag: maya tips

Introduction to XGen

Character model by AnimSchool student Chip Richman

Whether it’s to make grass or hair, XGen is a powerful tool within Maya that can help take your models to the next level. In this snippet from a live AnimSchool class, instructor Koji Tsukamoto demonstrates how to get started in XGen. With Koji’s guidance, we can get a better grasp of the daunting task that is XGen, breaking down his method step by step.

XGen is Autodesk Maya’s powerful tool for generating hair, fur, and complex geometry. It has become an industry standard for 3D character design, allowing artists to fine-tune every aspect of their hair simulation—from the description and guide placement to the final sculpting.

Hair creation begins by setting up “descriptions”—the building blocks for different parts of a hairstyle. You might create separate descriptions for areas like the sideburns, top of the head, or eyebrows, each with its own parameters. These can be grouped into collections to stay organized, especially when working with multiple styles or variations.
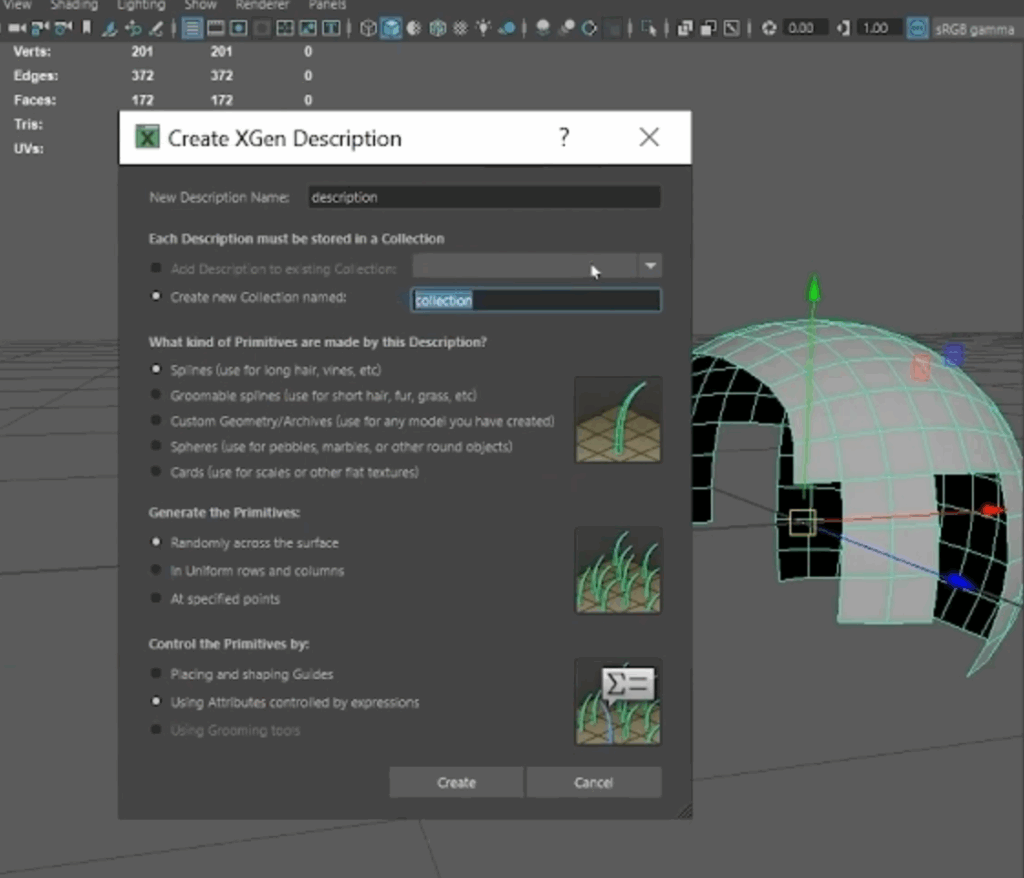
The next step is adding guide curves. These guides are essentially the blueprints for your hair, dictating its direction, flow, and overall volume. You can either scatter the guides automatically or place them manually. Manual placement is typically preferred when shaping hairlines or specific contours. The number and placement of guides determine the overall flow and density of the hair, so striking the right balance is key—too many can slow down performance, while too few can limit detail.
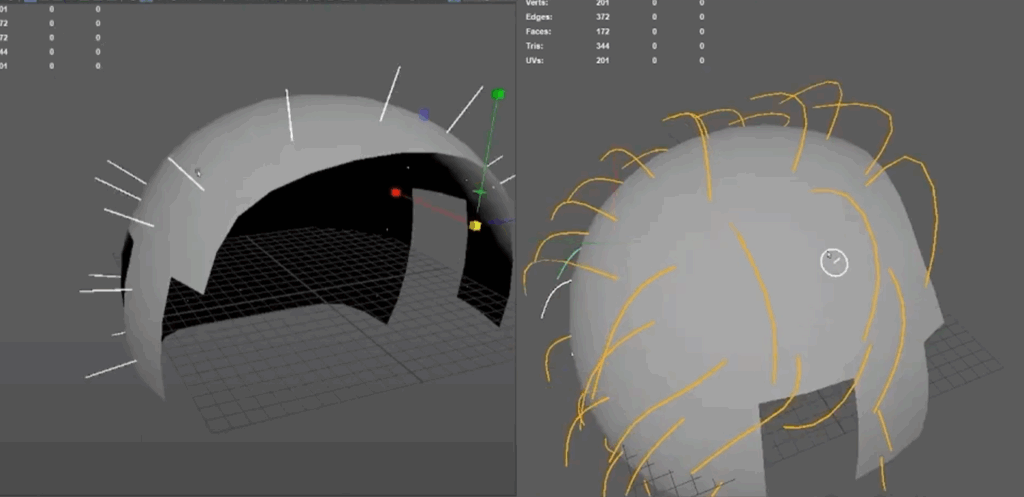
Once guides are in place, you can manually sculpt each guide to adjust curve shape, flow, and length.

In addition to sculpting, XGen provides control over the density of the hair. While it’s tempting to max out the hair density for a more detailed look, doing so can slow down the system and make the scene harder to work with. It’s often best to start with a lower density and gradually increase it as you refine the hair’s shape and styling.

Toggle the visibility to help temporarily focus on other elements of the character.

For more complex hairstyles, XGen allows you to use multiple hair descriptions for different sections of the hair. Switching between these descriptions allows you to adjust each section independently, giving you a holistic view of the character’s hairstyle. This modular approach also makes it easier to make global changes across different hair sections without disrupting the entire design. By managing descriptions, carefully placing guides, and using the sculpting and visibility tools effectively, you can achieve natural and believable hair simulations.


Watch the full clip from an AnimSchool lecture here: 

At AnimSchool, we teach students who want to make 3D characters move and act. Our instructors are professionals at film and game animation studios like Dreamworks, Pixar, Sony Pictures, Blizzard & Disney. ⁠Get LIVE feedback on your Animation from the pros. Learn more at https://animschool.edu/

Setting Up Hot Keys in Autodesk Maya

Every animator wants to have a quick, clean, and organized workflow system that helps them animate more efficiently. Hotkeys in Maya can help achieve that and save valuable time. In this clip from a live AnimSchool lecture, instructor Justin Barrett explains how to set up these hotkeys, and how to manage the hotkeys in order to animate quickly and efficiently.

The Default and Duplicate Hotkey Sets

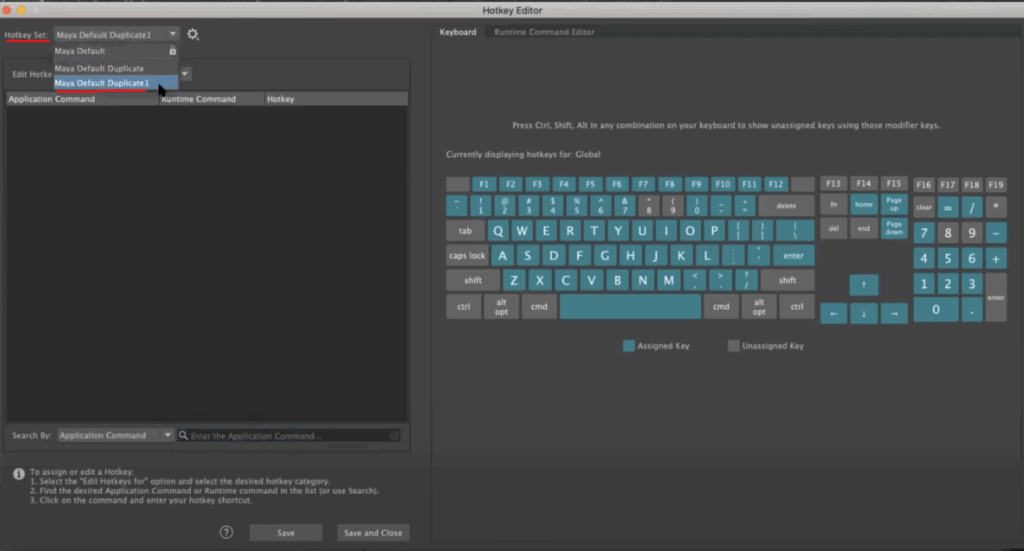
When you first open the Hotkey Editor in Maya, you’ll notice a default hotkey set, labeled “Maya Default.” This set cannot be deleted, so you can always revert to it. However, as you interact with the interface, Maya automatically creates duplicate sets to avoid accidental changes to the default set. These duplicates copy all the hotkeys, allowing you to make changes without altering the core configuration. Be cautious—if you switch back to the default set or jump between duplicate sets, you may end up with conflicting changes across multiple sets. You cannot merge sets, so, to keep things organized, it’s best to stick with one duplicate set and make all your adjustments there.

Categories and Runtime Commands

The Hotkey Editor organizes available commands into categories, such as “Menu Items,” “Editors,” or “Custom Scripts.” While browsing through these categories, you’ll encounter runtime commands, which are essentially single commands that trigger a sequence of other actions. When linked to hotkeys, you can execute complex actions with just a key press.

Managing Hotkey Assignments

To assign or change a hotkey, simply click in the hotkey space and input your desired shortcut. Maya will warn you if you’re attempting to assign a hotkey that’s already in use. You can override existing assignments, but be aware that doing so will remove the previous function attached to that hotkey.

Maya also displays the available keyboard keys and any current assignments. You can filter these by modifier keys, such as Shift or Command, to help you find an unused combination. Once you’ve made your adjustments, remember to save your changes to ensure they’re applied.

Tips for Efficient Hotkey Management

  1. Stick to One Duplicate Set: Avoid jumping between multiple duplicate sets to prevent confusion and conflicting hotkey assignments.
  2. Use the Search Function: Use the search bar to quickly locate specific hotkeys or commands, ensuring you’re not accidentally overriding important settings.
  3. Test New Hotkeys: Always test your new hotkeys to ensure they work as expected and don’t interfere with existing system-level shortcuts.

Watch the full clip from an AnimSchool lecture here: 

At AnimSchool, we teach students who want to make 3D characters move and act. Our instructors are professionals at film and game animation studios like Dreamworks, Pixar, Sony Pictures, Blizzard & Disney. ⁠Get LIVE feedback on your Animation from the pros. Learn more at https://animschool.edu/

Common Maya Mishaps

Whether you’re a modeler, a lighter, a rigger, or an animator, the one software we all share is Maya. Maya is an incredibly powerful tool that can help you as an artist achieve amazing, incredible, and unimaginable things, but with great power comes great… troubleshooting. We’ve all been there: we open Maya and something unexpected occurs. Most of the time a quick Google search will lead you back in the right direction, but sometimes the problem is just so odd and confusing that you are at a complete loss as to what to do next. In this short lecture, AnimSchool Instructor Luis Labrador highlights just a few of the most common Maya mishaps he has seen students struggle with over his career. No matter your specialty or how far in your career you are, these tips could save you time and energy that you can now spend on making your next masterpiece.


Clipping Plane

When an object is extremely small and the user attempts to zoom in, the object may appear to cut open or clip through the perspective camera. The reverse can also happen when objects are extremely large. To remedy this, open the camera’s attributes and adjust the Near Clip Plane (default is 0.1) and the Far Clip Plane (default is 10000) by multiples of 10. In Luis’s example, he sets the Near Clip Plane to 0.001, which allows him to zoom in closer to the small object without the clipping occurring. When zooming out, you may need to increase both the Near Clip Plane to prevent shading artifacts, and increase the Far Clip Plane to prevent “losing” the object as it clips from behind.

Exporting/Importing as OBJ

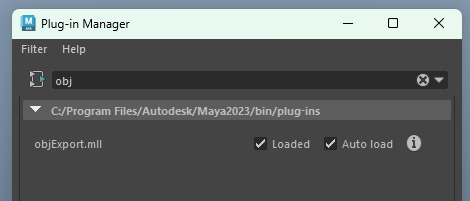
Sometimes, you may find that something in your file has changed unexpectedly, resulting in various issues across your project. The best way to “bleach” and clean up your project, as recommended by Luis Labrador, is to export as an OBJ file and reimport it into a fresh Maya file. To do so, first ensure that OBJ exports are enabled in the Plug-in Manager by checking the “Loaded” and “Auto load” boxes. Then, the OBJ option should appear in the drop-down list of export file types. When exporting as OBJ, two file types will be exported: OBJ and MTL. The MTL file is a reference file that can typically be ignored.

OBJ files work well for “resetting” your project because, in 3D, it is the most basic file type, and only represents coordinates of points in space.

Maya ASCII vs Maya Binary File Types

When saving out a Maya file, you may come across two main file types: Maya ASCII (.ma) and Maya Binary (.mb). Maya ASCII files are generally “heavier,” containing data that allows the file to be opened in test editors that have the ability to change the version of Maya being used. Maya Binary files are much lighter and more efficient in comparison, as they store the data as 1s and 0s. Luis explains that neither are technically “better” to use – it’s up to personal preference.


Watch the full clip from an AnimSchool lecture here: 

At AnimSchool, we teach students who want to make 3D characters move and act. Our instructors are professionals at film and game animation studios like Dreamworks, Pixar, Sony Pictures, Blizzard & Disney. ⁠Get LIVE feedback on your Animation from the pros. Learn more at https://animschool.edu/