Tag: autodesk maya

Understanding Constraints in Maya

Knowing how to use Maya constraints is important for both riggers and animators. Navigating the world of constraints and parenting can be confusing, but mastering them opens doors to a more flexible and nuanced approach to control. In this clip from a live AnimSchool lecture, instructor Daria Jerjomina demonstrates how the different kinds of constraints work, and how to utilize constraint weights.

Constraints allow an object to follow another’s position, rotation, or scale without the strict dependency of parenting. By applying constraints, you can fine-tune how one object behaves in relation to another. This method offers greater flexibility, especially in complex rigs, by allowing animators to maintain offsets, blend movements, and create more dynamic interactions.

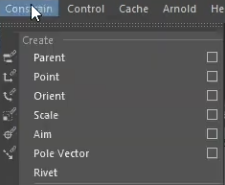
Types of Constraints

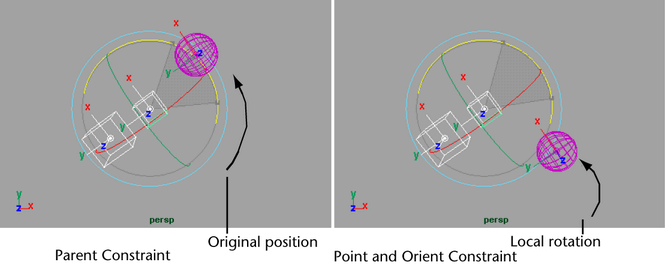
  1. Parent Constraint: This is the most commonly used constraint. It links both the translation and rotation of an object to another—essentially mimicking the behavior of parenting but without directly linking the two objects. A major advantage here is that scale is not affected by a parent constraint. This makes it ideal when you need to control the position and rotation of one object without altering its size.
  2. Point Constraint: The point constraint focuses only on translation. This means one object will follow the position of another but will not inherit its rotation. It’s a useful tool when you need one object to follow another in space, but with independent orientation.
  3. Orient Constraint: The orient constraint only affects an object’s rotation. It makes one object rotate in the same way as another, without influencing its position. This is particularly useful when you need an object to face a specific direction or match another object’s rotation.
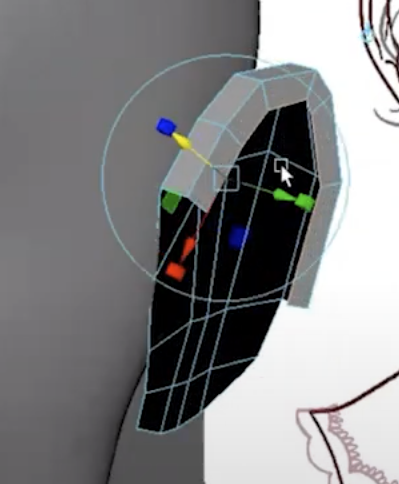
  4. Aim Constraint: The aim constraint affects the direction that an object faces or points, which is especially useful in creating eye rigs. Adding an aim constraint will allow the eyes to always face the controller, which gives animators easy control over facial animations.
  5. Pole Vector Constraint: Used more in IK (Inverse Kinematics) rigs, pole vectors allow for more precise control over joints and limbs, offering a different and potentially more intuitive way to pose characters depending on the situation.

Constraints can also be used in tandem with one another. For instance, combining point and orient constraints will allow it to follow the translation and rotation of multiple objects independently, which can create more complex behaviors.

Benefits of Constraints

  1. Maintaining Offsets: The ability to maintain an offset between objects is a powerful feature of constraints. For example, when a parent constraint is applied with the “maintain offset” option enabled, the constrained object won’t snap to the parent’s position—it will retain its relative position in space.
  2. Adjustable Weights: Constraints come with adjustable weight attributes, meaning you can control how much influence one object has on another. Setting the weight to zero will completely remove the effect of the constraint, while a weight of one will fully enforce it. This is useful for creating dynamic rigs where an object might follow another at certain times and not at others.
  3. Multiple Constraints: You can also apply multiple constraints to a single object. For example, you can apply both a point and orient constraint to an object, allowing it to follow another in both position and rotation independently. This can be expanded further by blending the influence of multiple objects, as seen when applying a parent constraint to an object, or directly parenting it via the hierarchy, and controlling its position between two different objects.
  4. Separation of Controllers and Mesh: By constraining objects rather than parenting them, animators can separate controllers and mesh components into distinct groups. This ensures a more organized rig and hierarchical structure, where controllers and mesh elements can be toggled on or off as needed.

Constraints are an essential tool for animators and riggers, providing flexibility and control that parenting alone cannot achieve. By understanding the different types of constraints—such as parent, point, orient, and aim constraints—you can create more dynamic rigs with cleaner hierarchies. Constraints not only improve the organization of your project but also enable more nuanced animation controls, which is crucial for creating sophisticated, interactive animations.


Watch the full clip from an AnimSchool lecture here: 

At AnimSchool, we teach students who want to make 3D characters move and act. Our instructors are professionals at film and game animation studios like Dreamworks, Pixar, Sony Pictures, Blizzard & Disney. ⁠Get LIVE feedback on your Animation from the pros. Learn more at https://animschool.edu/

Setting Up Hot Keys in Autodesk Maya

Every animator wants to have a quick, clean, and organized workflow system that helps them animate more efficiently. Hotkeys in Maya can help achieve that and save valuable time. In this clip from a live AnimSchool lecture, instructor Justin Barrett explains how to set up these hotkeys, and how to manage the hotkeys in order to animate quickly and efficiently.

The Default and Duplicate Hotkey Sets

When you first open the Hotkey Editor in Maya, you’ll notice a default hotkey set, labeled “Maya Default.” This set cannot be deleted, so you can always revert to it. However, as you interact with the interface, Maya automatically creates duplicate sets to avoid accidental changes to the default set. These duplicates copy all the hotkeys, allowing you to make changes without altering the core configuration. Be cautious—if you switch back to the default set or jump between duplicate sets, you may end up with conflicting changes across multiple sets. You cannot merge sets, so, to keep things organized, it’s best to stick with one duplicate set and make all your adjustments there.

Categories and Runtime Commands

The Hotkey Editor organizes available commands into categories, such as “Menu Items,” “Editors,” or “Custom Scripts.” While browsing through these categories, you’ll encounter runtime commands, which are essentially single commands that trigger a sequence of other actions. When linked to hotkeys, you can execute complex actions with just a key press.

Managing Hotkey Assignments

To assign or change a hotkey, simply click in the hotkey space and input your desired shortcut. Maya will warn you if you’re attempting to assign a hotkey that’s already in use. You can override existing assignments, but be aware that doing so will remove the previous function attached to that hotkey.

Maya also displays the available keyboard keys and any current assignments. You can filter these by modifier keys, such as Shift or Command, to help you find an unused combination. Once you’ve made your adjustments, remember to save your changes to ensure they’re applied.

Tips for Efficient Hotkey Management

  1. Stick to One Duplicate Set: Avoid jumping between multiple duplicate sets to prevent confusion and conflicting hotkey assignments.
  2. Use the Search Function: Use the search bar to quickly locate specific hotkeys or commands, ensuring you’re not accidentally overriding important settings.
  3. Test New Hotkeys: Always test your new hotkeys to ensure they work as expected and don’t interfere with existing system-level shortcuts.

Watch the full clip from an AnimSchool lecture here: 

At AnimSchool, we teach students who want to make 3D characters move and act. Our instructors are professionals at film and game animation studios like Dreamworks, Pixar, Sony Pictures, Blizzard & Disney. ⁠Get LIVE feedback on your Animation from the pros. Learn more at https://animschool.edu/

Modeling the Ear

When approaching a big modeling task, the big picture may become so overwhelming that it becomes difficult to remember how to break down a model into smaller parts. By slowing down and approaching a character model as the sum of its parts, as opposed to an all-encompassing project, we are able to set ourselves up to succeed. In this lecture taught by AnimSchool instructor Emilie Austin, we approach a small feature in a character model, the ear. Modeling an ear in 3D can be one of the trickiest aspects of character design. The ear’s unique shape, curves, and intricate details can pose challenges for even experienced artists. Emilie demonstrates how with careful planning, great reference, and patience we are able to break down this complicated shape into a manageable and approachable task, focusing on key techniques for creating a realistic and functional ear. Such a technique is applicable not only to the ear, but any modeling task at hand.

Start with the Basics: The Plane

Begin by creating a simple plane to use as your starting geometry. This is the foundation for shaping the ear. Instead of extruding the geometry from the head, which can create messy topology, it’s better to model the ear separately and merge it into the head later. This method avoids disrupting the face geometry and ensures that both the head and ear can be worked on individually for precision. Block out the basic shape of the ear from the side view, then move the plane into the desired position and adjust the orientation as needed.

Extruding the Ear’s Structure

With the base shape established, start extruding parts of the ear to give it depth. The back of the ear is crucial to define early on, so pay attention to its curvature and the way it wraps around the head. As you extrude, focus on the ear’s thickness and how it gradually tapers at different points. Add edge loops as necessary to preserve the ear’s form and detail.

Shaping and Refining Details

As you continue to extrude and adjust the topology, take time to refine the ear’s unique features, like its folds and curves. Ears have many subtle shapes that contribute to their realistic appearance, such as the helix and the concha. In many 3D programs, you can slide edges and vertices to manipulate these areas more efficiently. Don’t forget to constantly check your reference images to ensure accuracy.

Final Adjustments and Optimization

Once you’ve blocked out the main structure of the ear, continue refining it by adding details like the inner ear folds and adjusting areas where the geometry is too thin or too thick. Afterward, check the ear’s alignment with the head and adjust the angles as needed.

It’s perfectly fine if your model initially contains some triangles. These will be hidden in areas where they aren’t visible, such as the interior of the ear, which doesn’t need to be highly detailed. Finally, add a few holding edges to reinforce curves and make sure the ear transitions smoothly with the rest of the character’s face.

Modeling an ear in 3D may seem daunting, but breaking it down into steps—blocking out the shape, extruding to form depth, and refining details—makes the process manageable. With practice, you’ll be able to model ears quickly and efficiently, whether you’re designing realistic characters or stylized ones for animation and games.


Watch the full clip from an AnimSchool lecture here: 

At AnimSchool, we teach students who want to make 3D characters move and act. Our instructors are professionals at film and game animation studios like Dreamworks, Pixar, Sony Pictures, Blizzard & Disney. ⁠Get LIVE feedback on your Animation from the pros. Learn more at https://animschool.edu/