Tag: 3D modeling

Adding Stiches in Substance Painter

Substance Painter can be a daunting program to learn, but it is a very rewarding one. The power of Substance Painter lies in the amount of details one can paint on. Adding details like stitches can give the model the final touch it needed to bring it all together. In this snippet from a live class taught by AnimSchool Instructor Lorin Z. Pillai, learn about painting on stitches. Adding stitching details to digital textures can be time-consuming, but the Auto-Stitch feature in Substance Painter helps make the process much faster.

Auto-Stitch

Start by creating a black fill layer with a black mask, then apply the Auto-Stitch generator. Auto-Stitch will automatically place stitches according to your UV layout. If you don’t want stitches in specific areas, simply mask them out. This makes it easy to handle areas like sleeves or shoulders where different parts of a garment or texture might meet.

Customizing Stitches

Once the stitches are in place, you can customize their look. The Auto-Stitch feature lets you adjust the stitch path, distance from seams, and even the stitch size. For larger stitches or panel lines, you can increase the stitch length. This is great for creating a more prominent stitch that mimics a thick, reinforced line. Additionally, you can adjust other properties, like roughness or height, to control the appearance of your stitches. For example, increasing roughness will give the stitches a less shiny, more realistic appearance. If you want to tweak the lighting on the stitches, modifying the height will help you control how much light the stitches reflect.

For more precise control, you can use a paint layer to add hand-placed stitches. When doing this, be mindful of the layer settings. Once stitches are applied, they become part of that layer and cannot be edited directly in terms of size or shape afterward, so it’s best to work on a temporary layer for adjustments.

Stitch Brushes

To have even more detailed control over your stitching, use the brush palette to select specialized stitch brushes. These brushes offer additional settings, such as the ability to simulate punctures or seams, adding even more realism to your design. However, like the Auto-Stitch, once these stitches are painted down, they’re fixed to that layer.

Be prepared to adjust your settings repeatedly, as finding the perfect stitch type and configuration may take some time. You can also use the Lazy Mouse feature to smooth out your strokes and maintain consistent stitching across your texture. While editing settings might take some trial and error, combining these brushes with Auto-Stitch offers a highly efficient way to add stitching to your designs.


Watch the full clip from an AnimSchool lecture here: 

At AnimSchool, we teach students who want to make 3D characters move and act. Our instructors are professionals at film and game animation studios like Dreamworks, Pixar, Sony Pictures, Blizzard & Disney. ⁠Get LIVE feedback on your Animation from the pros. Learn more at https://animschool.edu/

Blog cover image credit: Niles Thiselton

Modeling the Ear

When approaching a big modeling task, the big picture may become so overwhelming that it becomes difficult to remember how to break down a model into smaller parts. By slowing down and approaching a character model as the sum of its parts, as opposed to an all-encompassing project, we are able to set ourselves up to succeed. In this lecture taught by AnimSchool instructor Emilie Austin, we approach a small feature in a character model, the ear. Modeling an ear in 3D can be one of the trickiest aspects of character design. The ear’s unique shape, curves, and intricate details can pose challenges for even experienced artists. Emilie demonstrates how with careful planning, great reference, and patience we are able to break down this complicated shape into a manageable and approachable task, focusing on key techniques for creating a realistic and functional ear. Such a technique is applicable not only to the ear, but any modeling task at hand.

Start with the Basics: The Plane

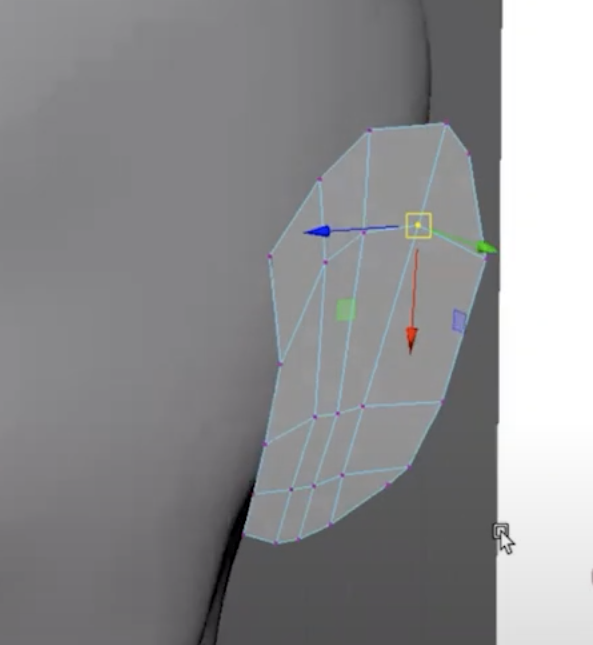
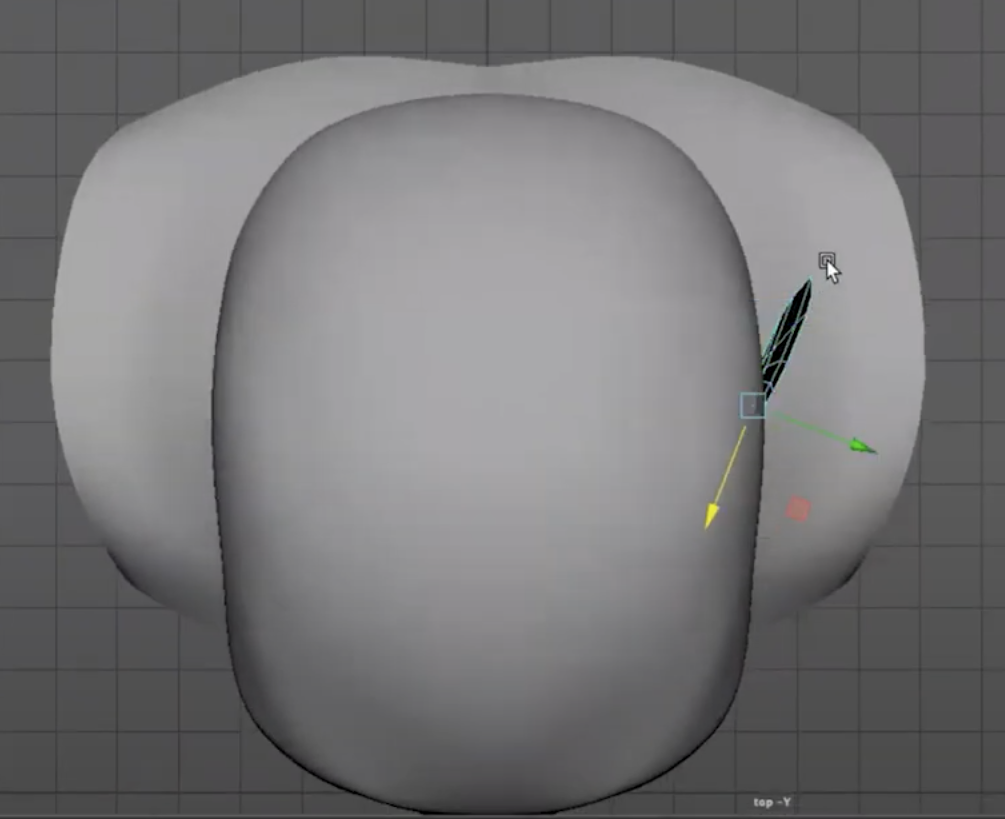
Begin by creating a simple plane to use as your starting geometry. This is the foundation for shaping the ear. Instead of extruding the geometry from the head, which can create messy topology, it’s better to model the ear separately and merge it into the head later. This method avoids disrupting the face geometry and ensures that both the head and ear can be worked on individually for precision. Block out the basic shape of the ear from the side view, then move the plane into the desired position and adjust the orientation as needed.

Extruding the Ear’s Structure

With the base shape established, start extruding parts of the ear to give it depth. The back of the ear is crucial to define early on, so pay attention to its curvature and the way it wraps around the head. As you extrude, focus on the ear’s thickness and how it gradually tapers at different points. Add edge loops as necessary to preserve the ear’s form and detail.

Shaping and Refining Details

As you continue to extrude and adjust the topology, take time to refine the ear’s unique features, like its folds and curves. Ears have many subtle shapes that contribute to their realistic appearance, such as the helix and the concha. In many 3D programs, you can slide edges and vertices to manipulate these areas more efficiently. Don’t forget to constantly check your reference images to ensure accuracy.

Final Adjustments and Optimization

Once you’ve blocked out the main structure of the ear, continue refining it by adding details like the inner ear folds and adjusting areas where the geometry is too thin or too thick. Afterward, check the ear’s alignment with the head and adjust the angles as needed.

It’s perfectly fine if your model initially contains some triangles. These will be hidden in areas where they aren’t visible, such as the interior of the ear, which doesn’t need to be highly detailed. Finally, add a few holding edges to reinforce curves and make sure the ear transitions smoothly with the rest of the character’s face.

Modeling an ear in 3D may seem daunting, but breaking it down into steps—blocking out the shape, extruding to form depth, and refining details—makes the process manageable. With practice, you’ll be able to model ears quickly and efficiently, whether you’re designing realistic characters or stylized ones for animation and games.


Watch the full clip from an AnimSchool lecture here: 

At AnimSchool, we teach students who want to make 3D characters move and act. Our instructors are professionals at film and game animation studios like Dreamworks, Pixar, Sony Pictures, Blizzard & Disney. ⁠Get LIVE feedback on your Animation from the pros. Learn more at https://animschool.edu/

3D Head Modeling Topology & Techniques

Establishing good practices in 3D modeling is crucial to ensure that the model deforms correctly during animation, allowing for smooth and natural movements of characters or objects. Additionally, clean topology facilitates easier modification and editing of the model, enabling artists to iterate quickly and make adjustments as needed. It not only improves the visual quality of the model but also streamlines the entire production process, making it an essential aspect of professional 3D modeling.

AnimSchool instructor Jackie Marion shows how she gets started in creating new 3D character models and discusses the workflow of a production modeler.


Creating a Head: The Forms
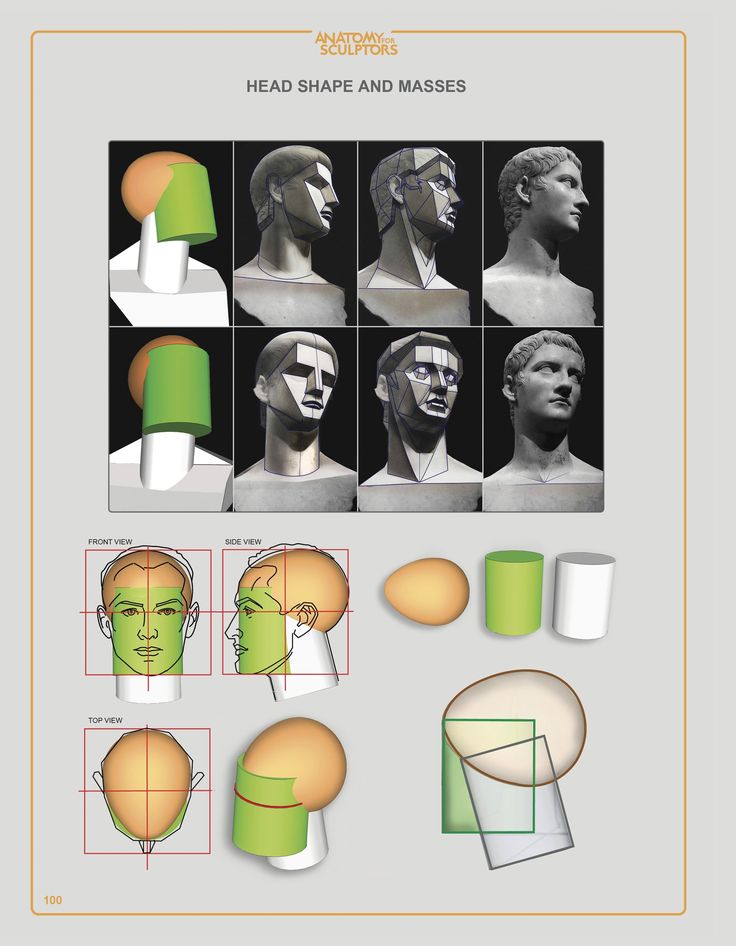
When modeling a head, consider what different forms make up the overall shape of the head. Jackie advises against starting with a sphere – though it may be your initial instinct to start with a sphere, the grid-like topology and edge flow of a basic sphere primitive in Maya will work against the design of a face.

The head is typically much more than a sphere (though some stylized characters can have a very spherical head). Generally, the top of the head is egg-shaped, while the face and neck areas can be formed with cylinders.


Start Modeling
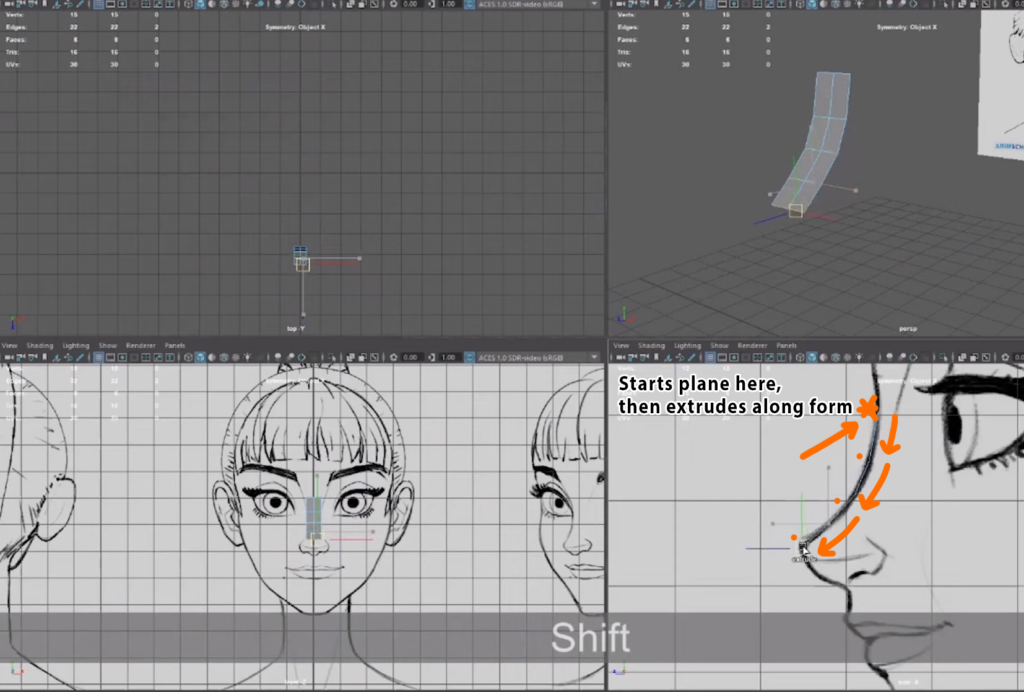
When patch modeling a head, Jackie explains that she starts with a plane (subdivisions width 2, height 1). This plane has an edge running down the center which will allow her to maintain symmetry across the X axis as she extrudes new faces and edges from the plane. She typically places the plane somewhere near the center of the face, such as along the bridge of the nose, and then starts to extrude new segments that follow the form and contour of the face.

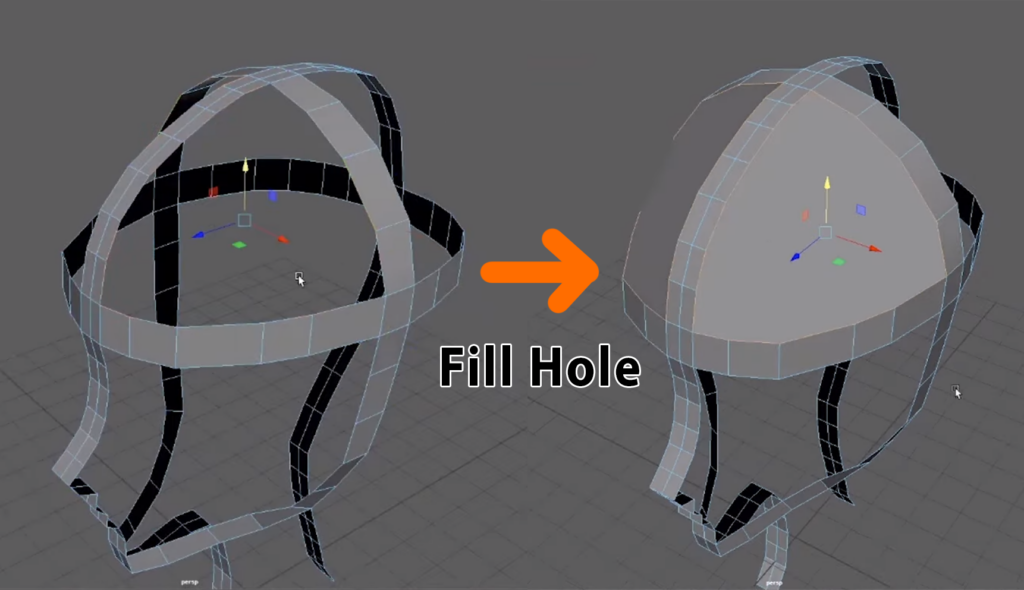
Jackie recommends to find a good rhythm as you place new sections – don’t go so far apart that you lose the form, but also don’t go too close together that you end up with too many edges and too much detail. Once she has formed a basic frame that wraps around the form of the head, she uses Fill Hole to start closing the gaps. 

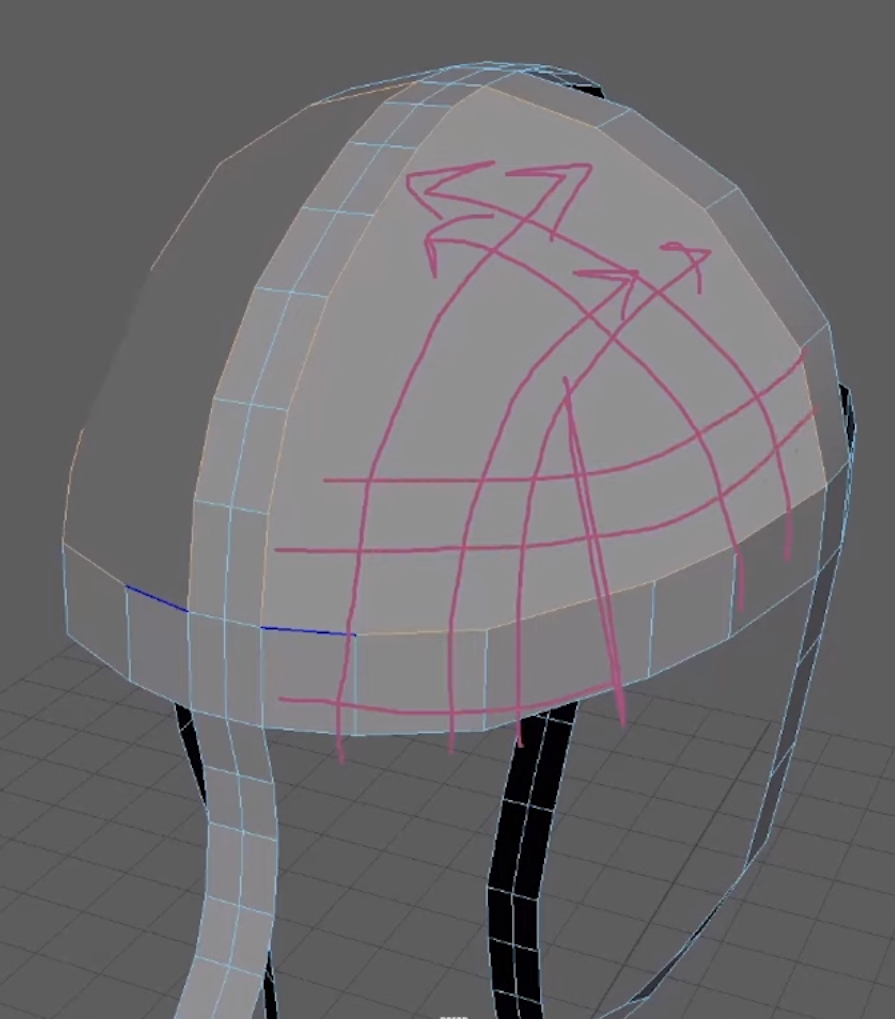
There are various alternative methods to closing these gaps, such as extruding the inner edges or using the Append tool, but Jackie mentions that she prefers to use Fill Hole so that she can add in the topology and edge flow afterwards with the Multi-Cut tool.

Jackie explains that the “rule” to follow here is to determine where the “corner” is, and build your edge flow from that. For instance, all edges on the left and in front of the corner might flow towards the back, while edges on the right and behind the corner might flow up and towards the left. Once you have established the rule for your own models, you can apply it to the other sections as well.

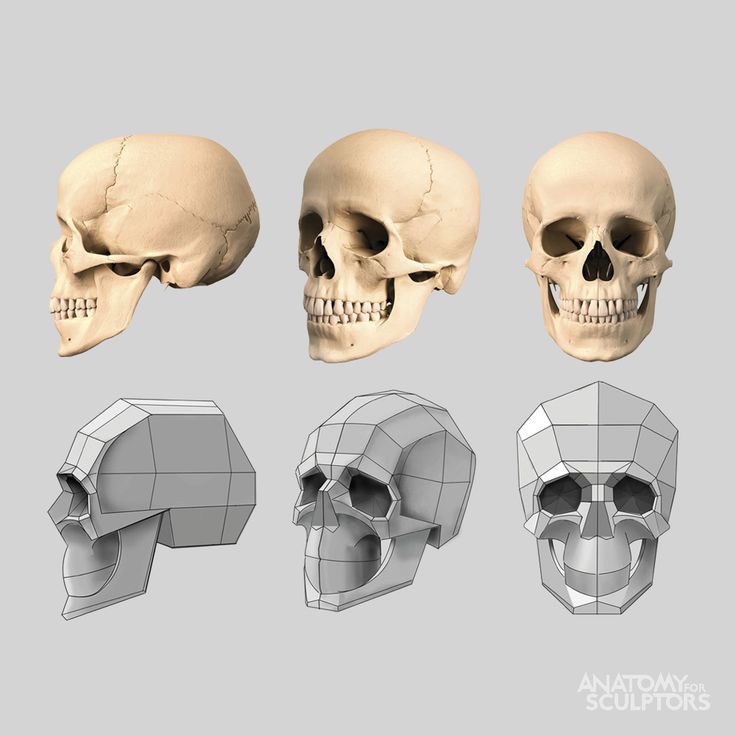
When building out the form of the face, remember that, even though you are only making the exterior “shell,” there is anatomy underneath that is informing the shapes you are building. This is what will help you achieve a realistic and believable look.

Watch the full snippet from an AnimSchool class lecture here:

At AnimSchool, we teach students who want to make 3D characters move and act. Our instructors are professionals at film and game animation studios like Dreamworks, Pixar, Sony Pictures, Blizzard & Disney. ⁠Get LIVE feedback on your Animation from the pros. 
Learn more at https://animschool.edu/