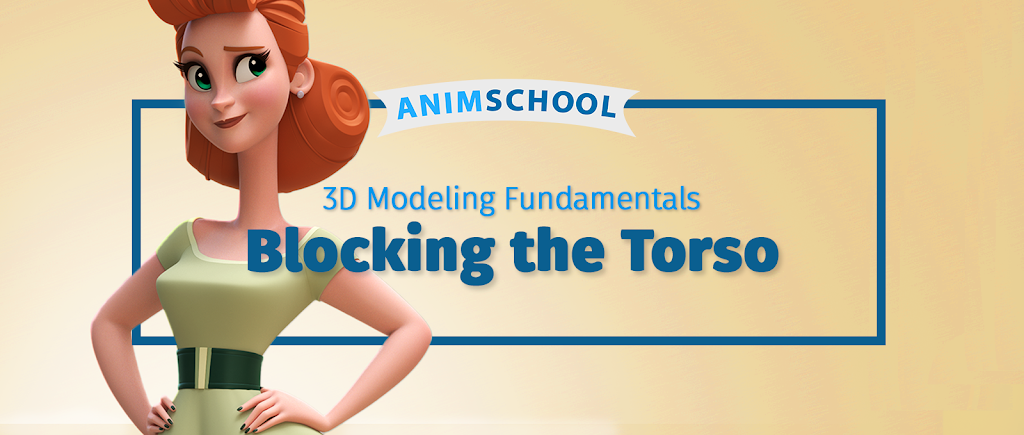
When first sculpting a character in Zbrush, it’s important to start with blocking! Beginners can get intimidated by sculpting when they see professionals start their sculpts using highpoly shapes. The blocking method allows beginners to start with low resolution shapes and work their way up, adding more and more definition as you go. It’s important to spend time getting things right during this beginning phase of building a character. Having an accurate foundation when you are in low resolution blocking mode will ensure that the character continues to be accurate as you add more definition..
In this lecture below taught by AnimSchool Instructor Christopher Wright, you’ll notice he mainly uses the Move brush tool. Christopher keeps things simple but very precise, ensuring he’s referencing the concept art along the way. Referencing the concept art as you go, ensures that you have the correct proportions for the unique character you’re building. As Christopher discusses, because the geo is low resolution, moving verts is easy and fast.
While in the blocking phase, it’s also vital to rotate and look at the objects from different angles, making sure that it resembles a human torso from all sides.
In this lecture taught by AnimSchool Instructor Christopher Wright, we learn about blocking the torso in a character model. Using mostly the Move brush, Christopher shows us the importance of starting simple, getting the proportions correct and adding more definition as you go.
For an in depth analysis on setting up hierarchies in maya be sure to watch Christopher Wright’s full lecture
Download AnimSchool’s Feature Level Rig for Free and start animating today!
Start your 3D Animation Journey in our next 11-week term at animschool.edu
Why should you care about having good hierarchy and staying organized in 3D modeling?
Having good visuals can seem to be the most important part. If it looks good, why worry about what’s going on in the back end, right?
Trouble is, a 3D asset is touched by man hands (and computers) in its route through the animation pipeline.
The first place to start is in naming.
Naming
Naming can vary from modeler to modeler but has to follow some key rules.
1. Names need to define the object
2. Names need to be unique
If there’s 100 bolts on a robot, each bolt needs to have a unique name. This is where padding comes into play.
Padding
Autodesk provides a great definition: Padded numbers are frame numbers that have a specified number of digits, where 0s are used to fill the unused digits
For example: Four digit padding is something like bolt_0003 or leaf_0010
Making sure names are easily readable is also important. This is where Camel Casing comes in.
Camel Casing
When there is more than two words to describe an object, lowercase the first letter of the first word and capitalize the first letter of the words proceeding the first.
Example: pinkyFinger or largeRedBall
Once naming is complete, it’s time for group.
Select Edit > Group or press Ctrl + G
Groups can be made when thinking what objects need to move together like the neck and the head or the arm and the hands.
Pivot Placement
Next task in setting up a good hierarchy is pivot placement.
One must consider where objects rotate from. The feet rotate from the ankle area.
Luis illustrates further why it’s important to place the pivot in the right spot.
For an in depth analysis on setting up hierarchies in maya be sure to watch Luis Labrador’s full lecture
Download AnimSchool’s Feature Level Rig for Free and start animating today!
Start your 3D Animation Journey in our next 11-week term at animschool.edu
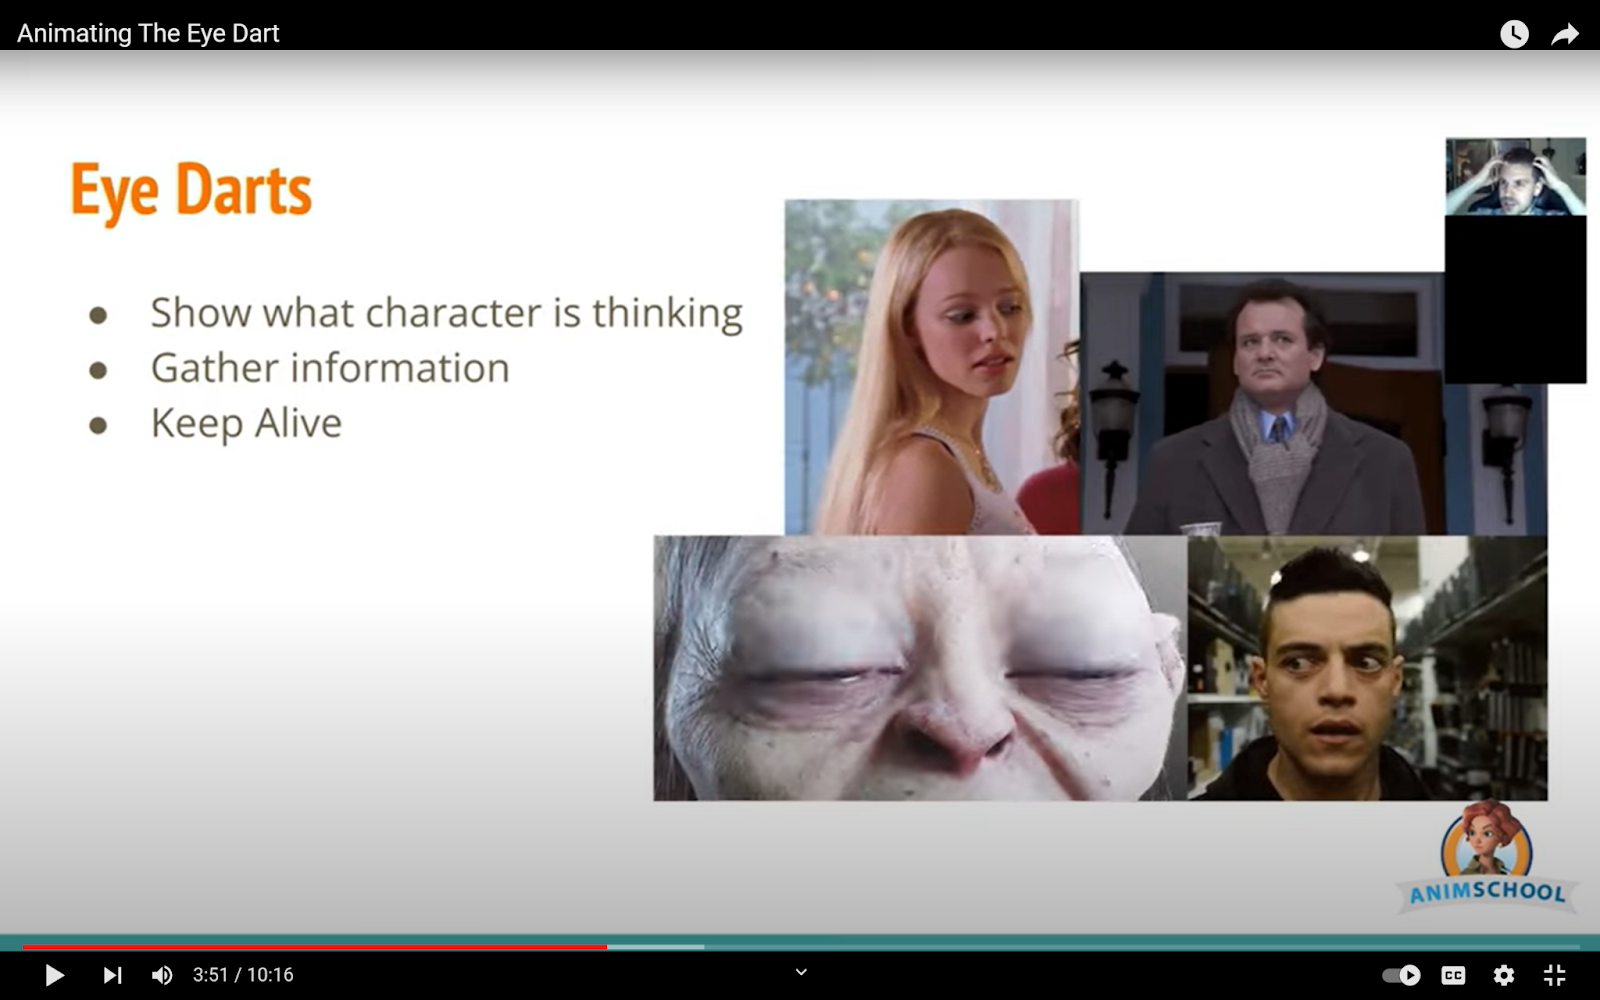
There is an old famous proverb “the eyes are the window into the soul” which simply means that a person’s eyes can betray what they are truly feeling at any given moment.
Our eyes, more than other parts of our body, make us feel “human”. As artists, they are the key to convincing the viewer that what we have created is real, emotional, and true. Eye animation is what takes an animated character from looking great to feeling real. Emotion and action begin in the eyes. When you turn your head, it is your eyes that lead the action. When you are disgusted and have to look away, it is your eyes that close first. Thought and feeling start with the eyes and then descend to the rest of the body. But how? How can you convey feelings and emotions through two small orbs of geometry? By understanding that eyes are not just seeing the world, but processing it. Take a moment and look at your eyes in the mirror. Do you see that? That small quick motion where your pupils travel across your eye and then darts to a new position. In animation, we call that an eye dart and it allows animators to quickly and simply convey that a character is truly alive.
Animschool instructor Ricky Renna in his class on Facial Performance makes it a priority to understand, analyze and execute a successful eye dart. An eye dart is not a one size fits all idea but rather the speed and frequency of an eye dart can actually determine how a character is thinking. Are they frantic? Are they scared? Are they exhausted? Maybe they are about to fall asleep and so their eyes slowly dart through the air, unfocused and hazy as their brain starts to prepare itself for oblivion. Maybe your character is searching for an answer under perilous circumstances and so their eyes are quickly darting around, searching for an answer just out of reach. If an eye dart expresses thought or action in a character, it can also be used to convey a lack of thought or control. Your character could be hypnotized, losing the ability for independent thought and so their eyes remain completely still and unblinking. An eye dart can be as complex as creating the illusion of a character attempting to perform rocket science but it can also be as simple as a technique to keep your character feeling “alive.”
But how can you animate an eye dart?
Eye darts are a series of small movements within the eye happening constantly. On a technical level these darts average between 2-3 frames and about 80 percent of the movement in an eye dart will happen in just one frame with some small settle on the rest. A two to three-frame eye dart creates a nice crisp movement to patch back into the rest of your animation. But an eye dart doesn’t just affect the geometry of the eyeball itself, it impacts and influences the flesh around it, or in this case the eyelids. To really give the impression of a character that is fleshy and real, after completing a full pass on eye darts, go back in and ever so subtly have the eyelid motion follow the eye. If your character’s eyes dart down, the eyelids should subtly follow that motion soon after. Keep in mind that animation is a tool to mimic real life and so since in real life your top lid would move more than your lower lid, use that in your animation. By taking the time to execute a thoughtful and intentional eye pass, your animation can transform from “student level” to industry professional level work.
For an in depth analysis of eye darts and eye animation on feature level scene be sure to watch Ricky’s full lecture
Every animator is different and every workflow is different – but there is something we can all agree on, hitting spline for the first time can be ROUGH.
It’s hard to see an animation that has been posed and blocked in so beautifully get destroyed by a computer. Suddenly your timing feels slow, your emotions flat and you fall into a “Spline Depression.”
Spline and Polish can be time-consuming and frustrating. Sometimes it can be hard to push through this ugly phase. For animators who work from stepped to spline, turning your curves into vectors for the first time rarely looks the way you planned in your head. But know that it will get better! Once you train yourself to see the small fixable details instead of the big floaty moments, you will be able to tackle your shot piece by piece and uncover the integrity of your work.
Simple tips for entering Spline:
When you start to spline, make sure to break your shot into manageable chunks. You can do this by breaking your shot into small amounts of frames, or by focusing on one small piece of the body at a time. No matter which method you choose, remember that all movement starts from the root, and by defining the movement of the root first you will avoid counter-animating down the line.
No matter where you are in your spline process, don’t forget the power of the arc tracker. Animation is all about creating fluid lines of movement, and by tracking your arcs throughout your animation, you will be able to quickly find and fix both timing and spacing. This can be done by using a built-in tool in Maya such as Animbot’s Motion Trail, but if that’s not for you, you can even track your arcs with an expo marker on your screen.
It’s easy when hitting spline to allow the computer to take over and to make choices for you as an artist. Don’t let that happen! Trust your eye as an artist and make sure that your character is moving the way YOU chose it to, and not the way the computer interpreted.
This might be the hardest tip of all, It’s okay to delete keys! Not only is it okay, but sometimes it can be necessary. If something doesn’t look right, and you cannot figure out why, delete your keys and see where things are going wrong. It may seem destructive at the moment but it will save you time and effort down the line.
Lastly, make sure to actually look at your graph editor after you hit spline. Sometimes the computer will take your keys and create curves that you never intended to create. By using your eyes and utilizing tools like auto and linear tangents, you can quickly find areas of concern and adjust your keys to create smooth motions.
For more animation tips, watch our video below where AnimSchool instructor Martin Scotto explains in depth the 6 tricks he uses to avoid losing momentum when entering the Spline phase.
It’s time to walk the dog…or at least the quadruped. Let’s be honest, learning how to animate a human on two legs walking is scary, much less a creature on four legs!
So how do you break a quadruped walk down so that it’s approachable? Well luckily, quadrupeds aren’t that different from bipedal or human characters. Essentially a simple dog walk cycle is just two bipedal characters walking slightly offset from each other. Sound confusing?
Animschool Instructor & Professional Animator, Daniel Paul, is here to “walk” us through the doggie steps.
It’s finally the day – you have worked hard for this. You cannot hold back your excitement. You. Are. Ready! It’s your first time working with an advanced feature-level 3D character rig, which can be both exciting and intimidating.
One mistake students and even professionals make when working with a new rig is to believe that an advanced rig will make anything you animate look feature film ready. But animation is not about the rig, it’s about the animator.
What is the biggest difference between a simple rig & an advanced rig?
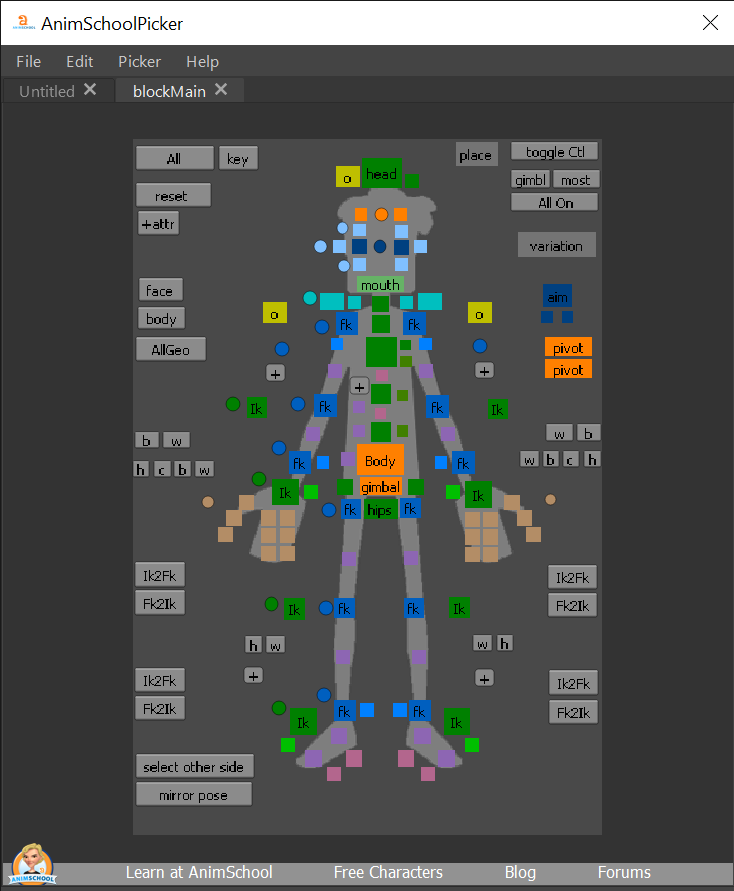
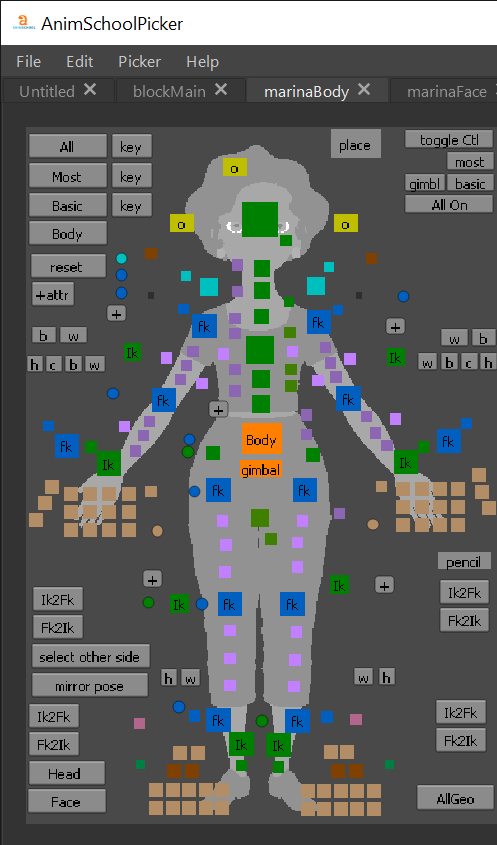
An advanced rig functions much like a simple rig but with a few more detailed controllers. All the most important features and mechanics of an advanced rig can be found in a simple rig. If you look at the Animschool catalog ofcharacters and rigs, one of the most popular simple rigs is a little fellow we call “Blocky.” Blocky has been used in shots as simple as taking a step, to scenes as complicated as dentists extracting a tooth from a patient. He is emotive, flexible, appealing, and most importantly easy to use. So what is it about blocky that makes him so much more approachable to start with than our Marina rig? It really boils down to one word, overthinking.
Here is a screenshot of Blocky’s picker and next to it a screenshot of Marina’s picker:
At first glance, Marina’s picker looks way more complicated than Blocky’s, but when you look closer you can see that the foundations, they are not that different. Both radiate from a central body node, both have three major spine controllers, both have IK/FK arms and legs and both have one central head controller. When students see an advanced rig for the first time they often think that they need to use EVERY SINGLE CONTROL. In reality, nothing could be further from the truth. All the additional controls that are added from a simple rig to an advanced rig are mostly for finesse work and facial emotion. The basic mechanics are the same.
At Animschool you are placed in a curriculum that strategically prepares you to animate with more advanced rigs. By the time you interact with an advanced rig, it is because you have proven that you are able to demonstrate the 12 principles of animation with a simple rig. Only then will you be granted access to the advanced rigs. This isn’t because you are suddenly expected to use every new controller, but rather because you have proven that you know how to utilize the major controls. These major controls will be in almost every rig you interact with for the rest of your career, and if all else fails – remember the bouncing ball. If you can animate a fully thought out, entertaining scene with just a bouncing ball, how many controllers do you really need to animate a compelling scene with an advanced rig? The answer is not many, so start simple and don’t overthink.
Remember when interacting with a new rig, simple or advanced, to give yourself a break, and have some fun with it. Instead of jumping into your shot and believing it will be a masterpiece from the beginning, spend a day and play around. Set up a few pushed poses or do a facial study. Treat learning a new rig like an improv class. Put a few ideas in a bowl, pull one out and give yourself 15 minutes to set your new rig up according to whatever it says on the piece of paper. This is a great way for you to get to know your rig. It enables you to gain a certain level of familiarity and comfort between you and the computer. As you do this exercise, remember, this isn’t for a shot, and it isn’t for an assignment, it’s just for you. So take the opportunity and have fun!
If you and a friend are learning a new rig together you can challenge each other to create the most ridiculous scenarios and then compete. Only after you have spent some time getting to know your rig should you then jump into actually animating for real.
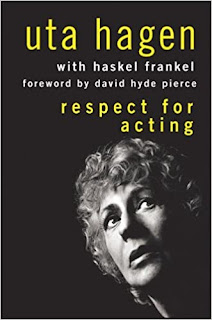
Character animation is a complex art form to master since it combines so many different skills. An animator needs to know body mechanics, the basic physics of motion, how to create visual appeal, be tech-savvy enough to learn Maya, and on top of all that, be able to act. They say that teaching a young animator how to create polished animation (aka clean arcs and spacing) is the easy part. The thing they’re really looking for when reviewing reels is good acting and unique, entertaining ideas. The primary skill that separates a good animator from a great animator is specificity. This is what your teacher or that recruiter is talking about when they say “be more specific!” after reviewing your reel. The ability to make specific, character-driven acting choices that feel believable comes from knowing your character inside and out. Legendary theater actress and acting teacher Uta Hagen outlines nine key questions an actor should ask themselves when developing a character in her book Respect for Acting. As an animator, answering these nine questions before you shoot reference will help solidify who your character is and inform the actions they take in your shot. Typically, an animator animating their own shot picks out pre-recorded dialogue and must come up with a situation and performance for the dialogue. Answering these questions should help narrow down what sort of situation you want to put your character in and what specific acting choices you can make for them to create a genuine performance that showcases their personality best.
1. Who Am I?
This first question covers all the basic details about who your character is: name, age, gender, physical traits, job, etc. Then you can go a little deeper and ask yourself who they are as a person: what are some things they like, what do they dislike, what do they fear, what are their goals, what are their beliefs, and what makes them unique. These questions simply serve to establish a baseline of who your character is.
2. What time is it?
You can take this literally to mean what the exact hour and minute are, or you can simply consider the season, the era, or whether it’s light or dark out. The important thing to think about is whether time has significance in how your character acts. A character would act and speak very differently in the 1500s compared to the 21st century. Likewise, someone who’s more of a night-owl may be more energetic in the evening and act more groggy in the morning.
3. Where am I?
What is the setting of your scene? Describe the country, town, building or even a specific room your scene takes place in. Consider how this specific setting makes your character feel and how this location affects how they act. Is the character cold or warm in this place? Does this place hold sentimental meaning to them, or are they just at their boring 9-5 job? The location can also play into what the character is doing while delivering the line and what props the character can interact with. The easiest way to make a shot more interesting is to simply give the character something to do. Put your character in a specific situation or place they can interact with and your acting options will automatically get more specific.
4. What surrounds me?
This fourth question continues a similar idea from the last question. It is referring to the people and things around the character. Ask yourself what is happening around the character and how your character reacts to this. If your character is making their way through a crowd of people, do they shove through others or try to squeeze past? If there is construction going on in front of them, do they plug their ears or simply ignore it? What are they doing while delivering their line and how do their surroundings affect their actions?
5. What are the circumstances?
For this question, you need to analyze your character’s past, present and future. You need to take into account past circumstances when crafting your character’s performance. For example, if your character just suffered the loss of a loved one, then they’ll probably be more solemn in your scene. They may not be hysterically breaking down like they did in the past, but they are still affected by this past experience. It is important to go into your scene with past circumstances in mind. Moreover, it’s also important to think about your character’s future and where they’re going. Continuing the previous example, your character is grieving now but if they’re working towards moving on, the character may convey bits of hopefulness in their performance.
6. What are my relationships?
What are your character’s relationships to people, objects, places, and events? How do these relationships make your character feel and, more importantly, act? Do they think of certain people or places fondly or is there tension and resentment for that specific person or place? By considering these questions, you can begin to think about how to best incorporate subtext into your performance. For instance, someone brings your character to a cafe that triggers a lot of negative memories. Your character then says, “this place is great” with a weak smile out of pure politeness when subtextually, you know she’s really saying that she would rather not be there. Knowing your character’s relationship to other characters and specific places and things is essential to building a believable performance. It will also give you the ability to create more specificity in your character’s acting once you know what they subtextually feel in that moment.
7. What do I want?
Consider your character’s goals and objectives. What is their immediate objective in the scene? What is their overall, long-term objective? Is this smaller, immediate goal working towards the bigger objects, or against it? Are these wants hidden or made obvious? Knowing your character’s motives will greatly affect their performance and will allow you to more genuinely explore the subtext of what your character is saying.
8. What is in my way?
In other words, what is preventing your character from getting what they want? These obstacles can be physical or mental. For example, if what your character wants is to be with this girl he loves, his obstacle could be that he lives too far away from her (physical) or he is too afraid to communicate his feelings to her (mental). When creating a situation for your character, consider obstacles that are authentic to the situation and relatable to the audience. Conflict is one of the most important pieces of any story, because it is the aspect that adds entertainment. A good story comes from establishing a situation and characters, then putting them into a situation that will showcase who they really are and in some cases, cause the character to change who they are. You need the conflict or disruption in the character’s everyday life in order for the audience to be interested in the story in the first place.
9. What do I do to get what I want?
This final question more or less is a culmination of all the previous questions you answered about your character. What actions (physical or verbal) does your character take in order to overcome the obstacle and achieve their goal. After analyzing who your character is, what they want, and what’s in their way, you can now make a very informed decision about how that character will act in your scene. You use what you know about your character, their situation, and their goals in order to make believable, specific acting decisions that will set your performance apart and bring it to the next level.
For more information about how to create top-notch acting in your animation, watch our video below where AnimSchool teacher Scott McWhinnie talks about what he considers “good” acting.
Join our next 11-week term at https://animschool.edu/
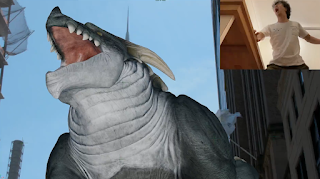
See How the Experts Animate Giant Monsters for Film & Games
Join Us for a FREE AnimSchool VFX Animation Workshop with industry veteran and AnimSchool instructor Tony Mecca on Thursday, November 4th, 2:30 PM (PST) 5:30 PM (EST)
AnimSchool Instructor Tony Mecca has worked on it all
He’s animated on video games, feature films, VFX, and currently, he is working at Universal Creative in their Ride Design and Show Technology department where he is working to create the next generation of storytelling and immersive experiences for new lands and attractions at Universal. In addition to his impressive career in animation, Tony also started the VFX Creature Animation course here at AnimSchool. In our interview with him, we go in-depth with what you can expect from the VFX Creature Animation course and who the class is best suited for. Tony also goes through what the day-to-day at a VFX studio is like and how it differs from a traditional CG animation feature studio.
Watch the interview on Youtube
Tell us your story! How did you get into this industry?
From a very young age, I have always wanted to work in special effects for movies. I used to build those Revell models all the time and after learning a bit about the industry from those 90s “making of the movie” specials, I assumed I wanted to be a model builder. Of course, things shifted to CG, and by the time I was in college I was learning all aspects of digital art for film. Even though when I started I assumed I would gravitate towards digital modeling or maybe lighting, I fell in love with animation and completely shifted all of my thinking and studies to bringing characters to life. After graduating, I got hired into a game studio where I worked for over 5 years and then started my adventure in feature films. I traveled the world working on many different feature films and eventually ended up at Universal Studios where I am able to combine my skillsets in animation, creative direction, and technology to lead teams and play a role in creating our future landscape of world-class attractions.
What were some of your first jobs in the industry?
The first job that I ever had was right out of college. I worked at a video game company called High Voltage, so I got to work on The Family Guy video game. I just jumped right into it. All hand-keyed animation working with the animators. Then I went on to America’s Army. So I went from super cartoony to combat simulation with Conduit and Conduit 2 where they were more of that Sci-fi adventure stuff. So I really started in games, right from the get-go.
How did you make the jump from video game animator to theme park creative producer?
I went to another online animation school while I was working in games, specifically tailoring feature film animation like AnimSchool does, and then I got hired right into Rhythm and Hues. I got thrown into VFX right away. Since I hadn’t used a plate before in my entire life, Rhythm and Hues did a training program where you spend two weeks in their training department learning the plates. And they don’t use Maya, they use Vudu. Rhythm and Hues, Dreamworks and Pixar all use their own custom animation software. So I learned Vudu and went right into Mr. Popper’s Penguins. I worked on a few movies there and worked up to a lead animator. Then I jumped over to Blue Sky and back to full CG animation where I worked on a few shows there (Epic and Rio 2). Then I went back to Vancouver where I worked as a lead at Digital Domain on Fast and Furious 7, X-Men: Days of Future Past, Lost River…and then went to Sony Imageworks where I worked on Hotel Transylvania 2. So I went from super hyper-realistic back to insanely pushed animation. I’ve been crazy enough to go back and forth between multiple animation styles. After Sony, I went down to Florida to work at Magic Leap which is a top-secret tech start-up. I can’t say a lot of what I did there, but it was a lot of behind-the-scenes next-generation animation stuff. And then I was able to make the jump to Universal because theme parks are awesome and never in a million years did I put two and two together. You don’t realize it, but all these attractions you ride are movie-based and they have a lot of media and technology and show syncing. Since Universal started with the Back to the Future ride and E.T., they’ve been at the pinnacle of technology for movie special effects when it comes to integration with theme parks. So I jumped into that role where I’m on a few of the teams at Universal Creative that are in charge of designing the next generation of rides, attractions, and lands. I work with Universal Media which owns Dreamworks and Illumination, so I get to work a lot with their IPs and animation crews. And of course, a lot of the other vendors we use are your typical AAA-level VFX studios for all of our attractions. So I get to be exposed to all different types of animation and animation technology.
Is it better to specialize or be more of a generalist?
In terms of animation itself, it’s still better to concentrate just on animation for now. You can know a little bit about modeling, a little bit about lighting—that’s fine. There’s nothing wrong with understanding what the other elements are in what you’re doing. But really hone in your skillset into animation if you want to be an animator. Don’t spend 50% of your time trying to light your shot. You really want to get your concentration focused on just the animation portion of it. It’s always about having that raw talent and understanding of being a storyteller and an entertainer. I always tell my student that if you have two identical reels and one reel is super polished and nails the 12 principles, and you have another reel that is pretty good, lacks some polish, but is hilarious or got a dramatic reaction or made the viewer feel something, ten times out of ten that’s the person that’s going to get hired. Learning entertainment and how to be a good animator is the hard part. It’s easy to learn the 12 principles and how to smooth arcs and things like that. It’s all about what you can do with the craft that makes it new and unique. And that’s all in your story and some of these shots are only a few seconds long. My advice would be to be interested in other things. Definitely be interested in things outside of animation. Walt Disney said it’s about the illusion of life, but if you don’t have one how can you create that illusion. Do things outside of animation because those are the stories that you’re going to bring into your animation. So step away from the computer, movies and games. Go try something else because that’s the experience you want to bring into your storytelling. In terms of AnimSchool, just concentrate on the animation. I’ve had students who want to do modeling and lighting and animation classes all at once and I’m just like “No, do the one and do a really good job at it.”
How different is the workflow for creature animation compared to character animation?
There are few major differences. One main difference is that in VFX animation you get what you get. Meaning, your set is unmovable and the camera is completely locked due to them well… shooting it with a real camera. There are always exceptions with things like set extensions or sometimes you get a full CG set but generally, you are at the mercy of what the set crew shot. What this means is that you have to reverse your thought workflow a bit. For example, when thinking about how to lead the camera on a camera that is already locked. The second, and there are always exceptions of course, but generally, directors for VFX movies come from live-action and not animation backgrounds. What this means is they are used to being able to tweak and react to a performance on set. They get almost instant feedback from the next take and are able to mold their shot how they see fit and explore it in a live-action setting. Animation of course is not instantaneous, so the odds of changing things over and over is very high to “try” and see different things the director wants to shape. When you show your animation you can’t show things in stepped mode because, generally, they won’t understand it. They want the animation to look smooth and they don’t understand why the character is “teleporting” everywhere. This leads to more of a splocking workflow to ensure agility in your shot as well as working on multiple shots at once. There’s also a lot of redos in VFX. A lot of the time the director will want you to show it a bunch of different ways (from the top, from the bottom to the left, to the right, with a backflip, without a backflip) and you’re doing like ten different versions because they want to react to what they like best. Usually in full CG, you have storyboards, animatics, layout, and just more time to explore video reference and acting. But then in VFX they just want to see it in 18 different ways and choose from it. So we learn a bit about how to get the fastest idea that you have out there and then adjust quickly. So in terms of workflow, they’re pretty different, but in terms of animation skill set, most of it transfers over.
Do all the same principles of animation apply to creatures?
Absolutely! The basics are even more important when breaking creatures down. We start blocking the shots out with spheres and basic shapes. It all comes back to the bouncing balls!
Is the quality of VFX animation lower because you are presenting so many iterations and ideas constantly?
You see some beautiful VFX animation and you think, Man it must’ve taken months to do that. And yeah, they did, but that was just version 17. It definitely still demands the highest quality because they have budgets that are the same, or even more, than animated films. You do have to hit that level of quality but usually at a much more condensed time frame because you’re doing three or four different things. That’s another thing; in traditional CG animation, you’re only doing one shot at a time (or if you’re lucky, you’ll get a sequence of three shots in a row). But in VFX, sometimes you’re working on three or four shots at once in different parts of the movie because usually, the directors aren’t on-site (they might only review once a week or once every two weeks). So in VFX animation, you really learn how to bounce between different creatures, characters, shots, etc. You learn how to animate really quickly at a high bar really quick in VFX.
How do you find or create reference for creatures that don’t exist?
The same way you create reference for any shot. Every new shot is a shot that has never been done before—VFX or not—and you cannot just google exactly what you want and get the perfect reference. You start with what you know and gather that. Even just parts of motions or timings or posing you are looking for. Study the known to create the unknown. In terms of creatures, I have my students rotoscope animals with bouncing balls throughout most of the class. The point is to create a muscle memory of actions and moves that help “fill in the blanks” so to speak on performances or parts of performances where you don’t have anything to go off of. It’s all about practice and knowing how to use the known, even if it’s in your head, to create or fill in the gaps of the unknown. It truly is about taking all the reference you can from the animal kingdom and yourself, filling in the gaps, and then adding the flair to it. Because you just don’t want to rotoscope over something that exists in reality, because it’s already there. We want to create something fantastic. We go over a lot of this in the class—how to take video reference, what to take from what, how to combine it—and students have a lot of fun with that. They love getting to take 20-30 different things and mashing it together into something awesome.
What pushed you to start the creature animation program at AnimSchool?
I taught body mechanics at Animschool for many years and some students seemed to really enjoy doing the dog walk assignment and wanted more. I also have seen the lack of schools teaching fantasy creature animation combined with actual real-world tracked plates. I learned how to use and work with plates on my first job at Rhythm and Hues during their 2-week training session for new animators to the company. Then you just kind of get thrown into the deep end if you have never worked at other VFX companies before in terms of how to use those plate skills you literally just learned to create shots in a movie. The point of this course is to better equip students for their first job and give them a leg up in not only creature animation performance, but also working with real-world plates in a simulated production environment they would be exposed to at a studio.
Who is the creature animation class best for?
It’s for anyone who’s interested in learning more about the VFX side of things. We’ve had some students that have already worked in the industry or were currently working who wanted to hone their skills to that next level. Because the class sizes are usually smaller and I consider this a graduating mentor-level class; you do get a lot more one on one time. I wrote the syllabus so I can alter the syllabus. We can move things around. We can shift dates. There is no amount of work we won’t expand on if you knock the first project out of the park. I’m only going to make the second half harder. We’re really going to push the students. I’ve had students that have worked with plates before and they ended up doing 15 characters. There’s no limit to the number of characters I’ll make you put in this shot if you’re ready for it. I will push you to the max. On the other hand, I’ve had students who have never used plates before and have never animated a quadruped before. They do the class and end up getting hired to work on a movie. It’s for all levels. It’s geared a bit more towards those who have never done creature animation or VFX style animation before, but we have had some pretty advanced students in here and we can gear the syllabus to them too. It’s great because students that are just starting out can see how complex it can be. And to the students who are more advanced, it’s always good to have a refresher of the basics to re-grasp some of those concepts.
What are the main differences between your creature animation and character animation classes?
With the creature class, we focus more on that muscle memory. Everyone thinks creatures are so complex and that you have to learn all these things about quadrupeds, but in the end, everything comes back to the bouncing balls. We start by planning your shot out with just spheres. How do we get the character from point A to point B doing the action that we want with the performance that we want? How do we break down that motion with the body mechanics of it just on spheres? We talk a lot about rotoscoping spheres over animals. I have my students do that for a majority of the class because it builds that muscle memory. If you don’t have the perfect piece of reference, how do you connect them? Oh, you do it like this. How do you know that? Well, because when I did the squirrel that way and combined it with the skunk and the lizard, my brain is just telling me it works like this. And yeah! It’s from practice and muscle memory and really learning how to connect those pieces together. And then there’s also a lot of video reference of yourself. This was done at the very very beginning, even on Jurassic Park, the first thing director Phil Tippett had his animators do was get away from the computer. He brought them into acting classes and said, “Everyone act like a raptor and look around.” There’s such great footage of them in the parking lot acting like gallimimus, jumping over ILMs parking lot, and you look at the shot in the film and it’s the same timing. It’s adapting that performance and that gusto and mechanics onto a character that doesn’t exist. So we go over a lot of that in the creature class. Not to say it differs too much from the typical CG method, but more so because the characters are typically not bipedal or have any human anatomy to them.
How do you push your students towards industry-level work? What are some key concepts you cover in your class?
I teach 2 graduating-level classes at AnimSchool and my mentality as an instructor at this level has always been to transition from a classroom-like environment to a studio one. In the creature course, we have lectures and informative classes, but as we progress I want the students to start getting notes from me as if they were a member on my animation team. We start out by talking about how to use a plate and how to use video reference, and eventually I shift into a studio environment. About halfway through the class, I start to run the classes as dailies to prep the students for the type of notes they would get in the industry (the same style notes I give to the animation teams I work with currently). I’ll stop giving notes about arcs and timing and instead say we need to bump up the aggression here or we need to ground the character more here and have him slip on something. It’s fewer notes about specifics from your animation lead/supervisor but more so notes that you would get from a director, which is not animation talk and more about the character itself. By the end of the course, students should truly feel like they’re having dailies with a director and know how to translate those kinds of notes into their animation. I want them to be prepped as much as possible for this industry.
Who/what are some of your biggest inspirations in animation?
Too many to list but I always look up to the innovators. The 9 old men, the Spaz Williams of the industry. Those who didn’t just take an established craft and master it, they literally discovered and wrote the rules. How do you get a T1000 to blend into a scene? – You literally discover and write Photoshop. How do you get dinosaurs to look and feel real in the latest Spielberg movie at the time? – You literally invent CG creature animation. It’s a space I enjoy being in. I am always working on the future of storytelling.
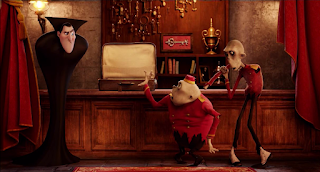
Do you prefer animating characters or creatures? VFX, games or film?
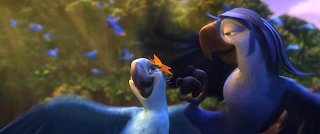
I’ve been fortunate enough in my career to touch all styles of animation in many different mediums. From monsters in Snow White and the Huntsman to the zany antics and style of Hotel Transylvania to cartoony games like Family Guy to sci-fi shooters like the Conduit. I’ve done a lot of different animation styles and have worked for many years in the top-secret media divisions of company’s like Magic Leap and my current role at Universal. Universal owns Dreamworks and Illumination and we feature attractions with IPs like Jurassic Park, Transformers, and King Kong so I am still exposed to a wide variety of animation mediums and styles. My favorite thing is being able to move in between them. I find it hard to get sick or burned out on a specific style or medium because I am lucky enough to work on them all at the same time!
Is it easier to get into creature animation for VFX/games compared to character animation for film/TV?
That really all depends on industry trends and your location. Sometimes there are 5 VFX heavy summer blockbusters going on at once and there is a shortage of good Jr’s for VFX, and sometimes there is a mass exodus from certain animation studios and new talent is needed ASAP. I’ve seen it go both ways but VFX studios tend to need to ramp up much quicker and some are more prone to giving Jr’s a shot in larger quantities. The point of the course is to make sure that the students are at an advantage for any VFX studio need should the timing be in their favor. There are two major things to getting hired in your dream job: skill and luck. Luck is going to happen because everyone has luck. Skill is not guaranteed. Would you rather be really lucky with no skill, or have high skill and when the luck comes, you can combine the two together. There are plenty of artists out there who are very lucky, who are born into Hollywood or have friends and have all the hookups in the world, and they still can’t get into the industry because they don’t have the skill set. What we’re doing here at AnimSchool, is we’re making it so that you do have the skill set. So that when the luck and timing align, it’s a no-brainer for you to jump right in.
What’s the best way to get better at creature animation? Most animation programs train us how to animate human, bi-ped creatures, but how do you learn how to animate different creatures such as birds, lizards and monsters.
Best way I can think of is to attend this place called AnimSchool and sign up for the creature course!
Can you talk about how to create a reel for creature animation jobs? Any tips?
I always tell my students to gear a reel to the studio they are applying to. Now at first, being a student, of course, you might not have a lot of content to make separate reels for VFX, games, full-feature, etc. But, you can order your reel appropriately. For example, if you did all of AnimSchool AND the creatures course, I would recommend putting the creature work FIRST on the reel if applying to a VFX studio. This way it showcases to the recruiter from the get-go that you have creature chops while supplementing it with other work later in the reel.
Aside from the technical skills, what are some soft skills that are essential to being a good creature animator?
I think the two most important skills in creature VFX animation are agility and patience. The ability to splock quickly EXPECTING change and know that you might have to present an animation 15 different ways before buy off. Knowing that there might not be storyboards or even animatics, you have to actually come up with the idea and pitch it to a team or director that might not know what they want right away. So much of VFX creature animation is the exploration of a monster or a creature while dealing with tight deadlines.
What has it been like teaching at AnimSchool?
I’ve been teaching at AnimSchool for over 5 years and it has been amazing! Working with Manuel, Dave, and the crew to develop this program has been very rewarding. My absolute favorite part about teaching here is meeting all the students from around the world. Seeing their culture come out in their acting choices and being able to learn a little about all walks of life from around the globe has been an experience I wouldn’t trade for anything!
What’s next for you?
Unfortunately being in the top-secret group in the top-secret division means I cannot share anything at this time… but… I can refer you to Universals official blog where they make public announcements like our new theme park Epic Universe! 🙂
Find out the latest about Universal Creative on their LinkedIn page or learn about alternative careers in animation and check out what careers Universal Creative currently has available.
Sign up today to learn from industry-leading animators like Tony in our online accredited courses (ACCSC). Apply today at animschool.edu. Tony is currently teaching Entertainment & Appeal and VFX Creature Animation.
We recently had the chance to interview AnimSchool instructor, Daria Jerjomina. Daria has worked as a technical animator and rigger for video games, stop motion (Laika), VFX and is currently using her skills outside the animation industry in tech. In our interview, we talk to Daria about what it takes to be a rigger, working in each field, why she made the switch to tech and robotics. We also gain insight into her rigging courses, including Rigging Automation, where students create their own rigging tool, just as they would at a studio.
Watch our interview with Daria on Youtube
How did you first get into rigging? Did you always know you wanted to do rigging for animation?
I didn’t know anything about rigging until I went to school (Academy of Art University). I wanted to work in animation and visual effects but I didn’t know about the difference between the different disciplines. After taking a couple introductory classes I learned about different parts of the industry and found that I enjoy rigging the most. I saw there was a combination of it being both technical and artistic, and that really appealed to me. And the rest is history!
Where have you worked?
I started working at some small video game companies. Then I worked at a company that did a little bit of everything. They did visual effects and theme park things. And then I worked for animation at Laika. And after that, I worked for some tech companies. I feel lucky that I’ve tried a little bit of everything.
Can you talk about what it was like working for Laika on a stop motion feature as opposed to 3D animated projects?
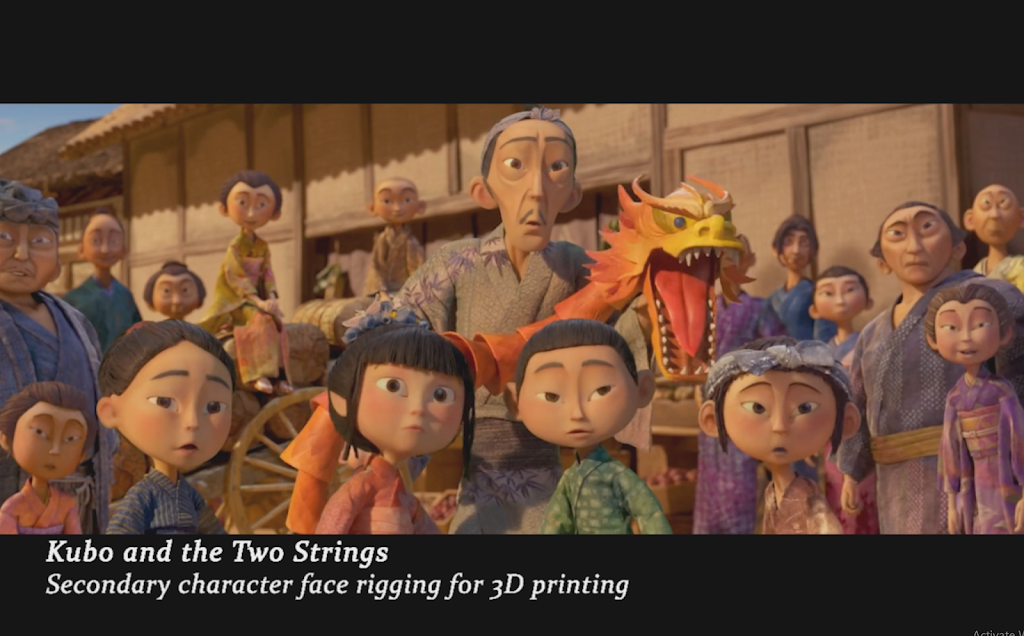
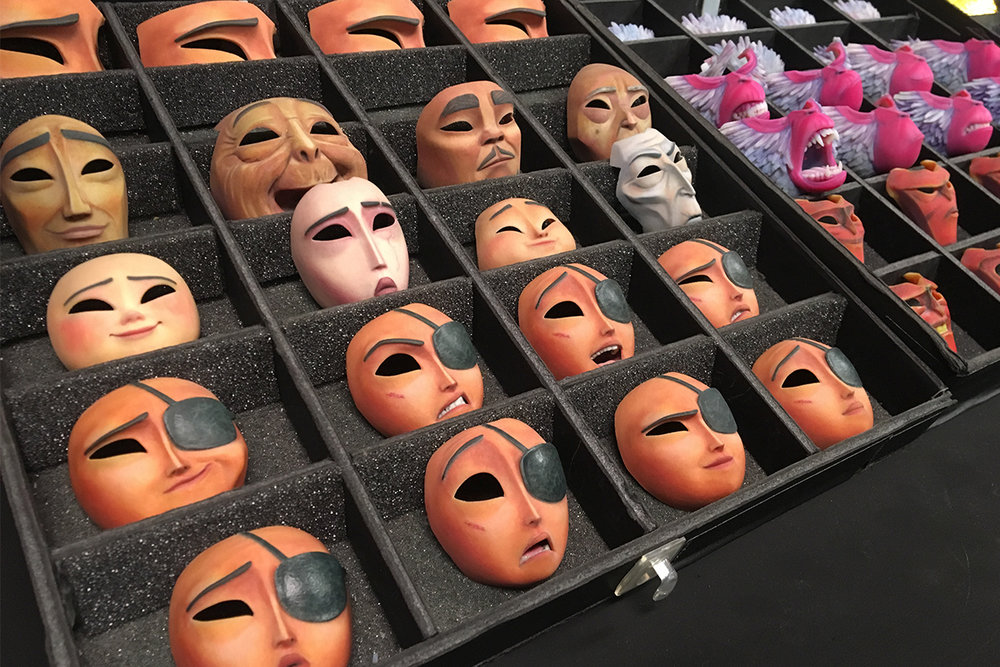
I enjoyed working at Laika a lot, and the stop motion side of it was part of the reason. It was just so great to walk through hand-built sets when walking towards my desk and collaborate with so many extremely creative people, who do the kind of work very few others can do. Working with 3d printing was very exciting, and it was so cool to be able to hold the face you rigged in your hand after it was printed out.
Laika is a stop motion company, I’m surprised they need riggers. What kind of work did you do for them?
I came in when they were working on Boxtrolls, but I mostly worked on Kubo and the Two Strings. They have a department called Graphic Prototyping Department and they work on just facial animation and facial rigging. So what happens there is that all the body is animated by hand, in a very classical stop motion way, but then the faces are animated in CG. Kind of the same way they would be animated in any other CG studio. All those faces that are animated CG are then printed. The old-school stop motion way would be to sculpt different faces and replace them on the character in the scene. But Laika is taking that a step further and what they’re doing is 3D printing those faces. So almost every frame they print out and place on the characters. That way it feels very seamless and fluid. If you look at the older stop motion films, you’ll see the facial animation is a bit choppy because they hand-sculpted all of those faces.
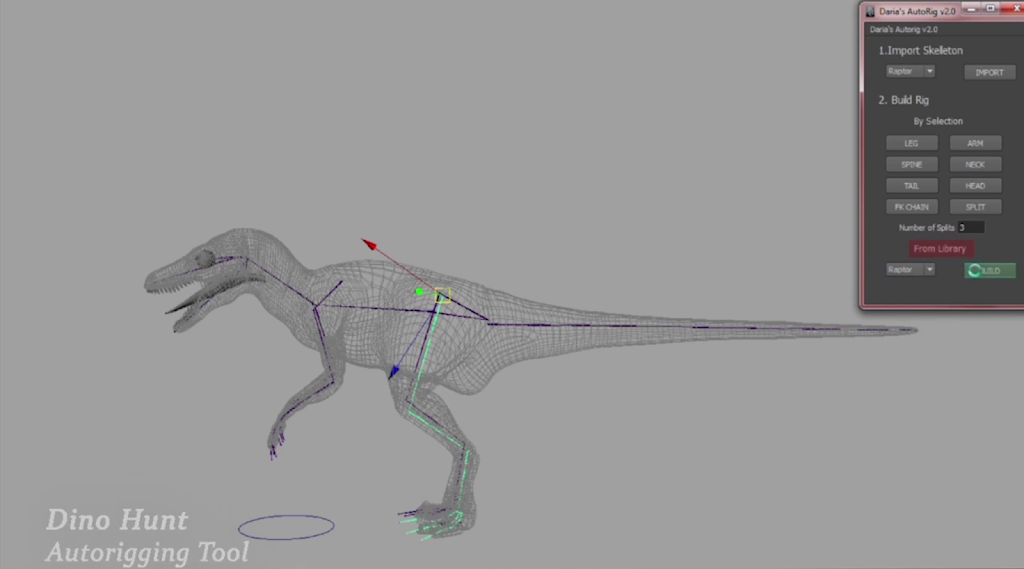
What kind of tools did you create there?
At Laika, I switched from doing rigging into doing more programming. I started there as a rigger but then went into the engineering department. So I was writing tools for 3D-printing-related pipelines. All of the tools I created related to how rigging is happening and how the models are being passed to the rigger and how the rig character is being passed to the animator. One of the tools helps pass information about the rig onto the servers so the rigging can happen on the farm. Some tools were for creating ways to automatically check for model intersection. A lot of things to help review the model before it gets printed, how we can rig it faster, or review the models before their animations.
Who and/or what are some of your biggest inspirations in animation?
For technical work a lot of what we do is behind the scenes, and you realize the intelligence with which a tool or a rig is built only when you yourself work on a project. For that reason, most people that have inspired me are the people I’ve worked with. Seeing the amazing work that they contribute to a mutual project inspires new ideas and pushes me to learn more.
Do you need to be able to code in order to be a rigger or technical director?
It’s different per company, but nowadays in most cases – yes. You need to be able to create tools that would help with rigging. Which is why I’m happy to be teaching a Rigging Automation class at AnimSchool and help students learn those skills.
AnimSchool teaches modeling and rigging together in their Character Track program. Do riggers need to be able to model as well?
No, not really. It helps though. At some places, riggers do a lot of blendshape and corrective shape sculpting, with that it really helps to know modeling. I’m not very good at modeling so I’m an example of being on the more technical side of it. Animschool teaches modeling and rigging, but they also have a rigging automation class where we do all that tool writing.
Can you talk more about the Rigging Automation class?
I like this class a lot because I see how much students improve in that class and all the great work they do. In that class, students write a tool of their own design from the beginning to the end of the term. They work on the tool at home, and in class, we review how they’re working on it. It can be any tool they want, but it has to help automate some part of the 3D pipeline. Most choose to make an auto-rigger, which is a tool that automates the rigging of the character, but they can choose any other aspect as well. And in the class itself, we go through important programming concepts. So they don’t need to know any programming when they start the class. We talk a little bit about mel but mostly about python and we talk about all the concepts such as writing loops, variables, classes, functions, all those things they learn in that class. We do a lot of practice and small exercises in class to help them write their own tool. A lot of the tools people create in this class are really good tools. They can put them up on GitHub and then companies can notice those tools and bring them to their company.
Do you need to know programming in order to take rigging classes at AnimSchool?
No, not at all. It’s not expected. If you know too much programming, you might be bored in the class. But If they know a little bit, that’s fine too. The concepts we learn are applicable to all parts of the 3D process. And it’s not just riggers who can benefit from the class, modelers and animators can too. There are cases where animators write tools for their company. It’s a very valuable skill.
You found rigging work outside of the animation industry. Can you talk about this more?
When I started I was the same way thinking it was just for animation, games or VFX. But that’s actually a pretty small field, and there aren’t enough animation companies for everyone. Other fields are very interesting. At the robotics company, we had a team of animators animate a robot in Maya that was modeled and rigged in Maya. We then exported that animation onto the robot. My position there was tools engineer. So I wrote tools for maya to help animators create their animations and export their animations onto the physical robot. That was really fun for me because I never before thought about how rigging and scripting could be used to fill the gap between 3D and the real world. It was so much fun.
I understand that you are working in the tech industry now. Why did you switch? How does this differ from the animation industry?
I used to work in robotics at my previous job, for the past two years I’ve been working at an AI company that creates realistic digital human characters. I switched because an opportunity came my way, and I wanted to try something new. It ended up being a great decision, working in tech is very exciting, and I have a chance to work with very innovative people from different industries. I definitely don’t regret switching, but I don’t think it’s superior to the animation industry or vice versa….different things work for different people.
Were your skills from animation rigging transferable to your tech jobs?
A lot of the work I do is very similar, the differences are usually very specific to each project and company. A lot of the skills are transferable though because it’s still working with the same software and there’s still rigging and type of programming involved.
What is your advice to students struggling to decide which industry (film/tv/games/other) to pursue?
There are some people who want to get into feature films or VFX. And there are some who just want a job and don’t care where. I think both are fine. I think it’s fine to have one goal in mind and strive for it, but it’s important to remember that not meeting that goal may not be dependent on you, it may just be dependent on luck. It’s good to have an open mind, but it’s ok to have specific dreams.
What are some key concepts you try to emphasize to your students in your class?
I think it’s important to be open to other ideas and different approaches. In my intro to rigging class, I teach them how to do it my way, but then when they go into intermediate rigging class and they learn it a different way, I don’t want them to just stick to my way. People would come into my intermediate rigging class and they would come to me and be very stuck on how they were taught something differently in the previous class. I think it’s important to see the different approaches and try them as well.
Also, I think one important thing, especially when starting a new job, is to understand that not everything will not be perfect at the studio. A lot of times when people start working they expect the big, fancy animation studio to have perfect tools and rigs, but it’s not like that. If they’re hiring you, they’re probably in crunch time and just want to get the movie done. So of course there are going to be duct-taped things here and there. You can’t have perfect code and rig. It’s important to remember that when you go into a new studio or project, you shouldn’t come in and say “This is not how I learned it in school.”
What kind of person do you recommend going into rigging? Do they need to be more technical or creative?
I think anyone can go into rigging. And definitely, everyone should try it to see if that’s something they might enjoy. The combination of technical and creative usually works the best, but the bigger problem is that people often don’t see themselves as technical and get afraid of doing tasks that they might be good at if they were to learn the method or get more familiar with the software. I think if someone is just very technical and not artistic at all, they can pick up the artistic side and vice versa. It’s good to have a bit of both, but I don’t think it’s a requirement.
Aside from the technical skills, what are some soft skills that are essential to being a good rigger?
It’s good to be flexible, to be able to adapt to different workflows at different workplaces. When people are less experienced they usually want to find some flaws in the new pipeline or new codebase they see. But with time I think you learn to adapt yourself, rather than try to change the project or workflow to be “the right” way.
What are your biggest demo reel tips for rigging and TDing?
Put your best work first and don’t make the reel too long. Also, it’s a good skill to have to be able to put together your work and make changes to your reel quickly, especially when starting out. That way you can cater your reel to different workplaces, and create new ones if companies ask for examples of other work.
With that said, we all have a finite time to spend on our work, and I would prioritize getting better at what you do, being rigging, animation or tools, than spending too much time working on your reel.
Is it easier to get a job as a rigger compared to an animator?
I think it is easier to get a job as a rigger, just because fewer people are doing it. Another good thing is that if you’re getting into the programming side of rigging more, and you decide later on you want to switch industries, it’ll be a lot easier as a rigger than an animator. I think this discipline is a bit more flexible in terms of jobs.
What’s the best piece of advice you’d give to someone just starting out?
See the different methods with which different people work and try them out. If you rigged a character one way, try to create another rig a different way. This way you will try different methods and can see what works better for you. I would also say that it’s important to not be afraid to fail or be “bad” at something. We all start at the bottom and we all make mistakes. Students that I see succeeding are the ones who work on their projects despite the fallbacks, who are not afraid to redo the work, and don’t get discouraged by negative grades.
What has been your experience as a female in the animation industry?
You do definitely find yourself being in male-dominated groups. At my current job, I’m the only woman on my team. So that happens. I think even not that long ago, 5 -7 years ago, it used to be felt a lot more. I felt there was under the rug sexism going on, but now to be honest I’m not seeing it. Maybe I’m just lucky at my current job. I’m not seeing any different treatment; I’m being treated very well. It might also be because I’m getting higher in my experience. But yeah, I have to say I have noticed some of it, but I’m not really seeing it for myself right now. It doesn’t mean it does not exist or that there are people who are not experiencing this mistreatment. We hear stories from various companies of course and that’s horrible and we should do everything we can to prevent that. But again that hasn’t been my experience recently. If we have more women, we’ll have a more diverse and more comfortable environment for everyone. In my experience, at teams and companies where you see more women and just diversity in general, it just creates more ideas and comfort for everyone.
Can you talk about your experience watching your student’s skills develop through AnimSchool?
That’s my favorite thing! Just to see how people improve from knowing nothing to creating rigs and tools. That’s just great. I think it all boils down to how much time and effort people put in. The people who put in the most time and passion for something, improve a lot, and seeing that improvement is amazing. For rigging automation class, people come in that know nothing about programming. They ask these questions that can be considered very simple, but it’s always very good that they ask questions if they don’t understand something. Then you see those people who were worse than their peers in the beginning, and by the end become better than everyone else.
Why should students that are interested in rigging and programming for animation attend AnimSchool?
I think AnimSchool is really good. All classes in general are a nice system where you can listen to the lecture. It Is nice that the lectures are being read for students so they can interrupt the instructor whenever they want. The deal I make with my students at the beginning of the term is that if you don’t understand something, interpret me and ask the question. I tell them they can even interpret me mid-sentence. I think that’s the big benefit of AnimSchool because other online schools use pre-recorded videos that you watch. And of course the reviews as well. We have one lecture class and one review class each week. Those reviews are very beneficial for students as well. It’s a critique of their work. And then just the professionals who work at AnimSchool are just great too. I love to watch some of the videos from the other classes, it’s just so educational.
How do you like teaching at AnimSchool?
I love it a lot. I didn’t expect to like it as much as I do. I like to see how people grow in the class. I really like to learn things from students. Because when students have a question, it will make me think differently about a concept or design pattern that I’d normally do automatically. And they stop you and ask why you do it that way and it makes you pause and ask yourself “Yeah why do I do it this way?” Sometimes they even bring up that Maya has this new feature that I’ve never heard of, which then forces me to research and ask others about that feature and determine whether I need to talk to my students about this feature.
Where do you see your career going in the future? Do you think you’ll ever go back to animation or are you happier in the robots/engineering world right now?
Only time can tell! At the moment I’m very happy working in tech, but I am not opposed to going back to feature animation, games or VFX in the future.
Watch on Youtube: A Day in the Life of a Pro Character Animator
We recently had the chance to sit down with AnimSchool instructor Scott McWhinnie and chat about his adventurous career as an animator and the things he has learned along the way. Scott has worked at Moonbot Studios, Sony Animation, Bue Sky Studios, and most recently, Illumination Mac Guff in Paris. Scott gives us an insightful look into the day-to-day life of an animator and illustrates how to balance working hard for those top-level industry jobs with your own happiness.
Tell us about your journey. How did you get into animation?
I started out as a teenager wanting to do comic strips for newspapers, but after a while, I realized it would be even cooler to make those drawings move, so I started wanting to do 2D animation. Eventually, I realized that I would have more opportunities to animate in 3D, so I attended Ringling College of Art and Design. During my time there I spent a summer as an intern at Sony Imageworks in LA. After graduation, I started working at Moonbot Studios in Louisiana. After a year of working there, I jumped around between animation studios in NYC and Dallas. I eventually landed at Blue Sky Studios where I worked for about 5 years on Rio 2, Ice Age 5, Ferdinand, and Spies in Disguise. Then in 2020, I started working remotely… before it was cool 🙂 …so I could live as a “Digital Nomad”, where I would travel around and work from wherever I was staying. A studio called Little Zoo, which is fully remote, gave me that chance, but we all know what happened in 2020. Later I made my way back to Sony and animated on Hotel Transylvania 4. Currently, I have just moved to Paris where I am working at Illumination Mac Guff.
It is incredible how your career has taken you around the world. Would you say moving around a lot like you have is normal for a career in this industry?
I think if you want to stay put you can find a way. If that’s your priority, there are plenty of jobs that allow you to stay relatively stable. It’s just a matter of whether it lines up with what you want to do in animation. For me, I always wanted to do feature films so that was a big part of moving around and figuring out where to go. Also, for me moving around was sort of my life. My dad was a pastor so we were moving every two to three years on average; moving for animation jobs wasn’t a big deal for me. It actually feels weird to stay in one place for more than five years. It is very common to move around in this industry, but I don’t think it has to be if you don’t want it to be.
As someone who went to a four-year art college, can you talk about the pros and cons of doing an online program like AnimSchool compared to a traditional four-year university?
I think the biggest pros of a traditional school are the classmates and the environment it provides. I learned so much from the person sitting next to me during late-night discussions about animation and art with friends. For me at least, those interactions taught me so much and are much easier and more organic to come by in-person versus over the internet. A big con of course is the cost, but I would recommend to any new student is to really understand what the true cost of your schooling is and what that might mean for your future and try and take advantage of financial help. I think a lot of students don’t understand and might not even realize what the cost of the school is and what that will mean. I was lucky because my grandmother worked in banking and made sure I understood and taught me ways to manage this cost and save as much money as possible on school. As far as pros and cons for an online school, I would say the pros are one: the price, they are very affordable. Also the flexibility so you can take classes at your own pace, which opens it up to so many people…oh, and the ability to take the classes from anywhere on the planet. It is so cool to have students from all over the world. A potential con for me would be having to build relationships over the internet. For me, it is not a thing I did really until 2015, (I didn’t even have a cell phone until 2012) so I find it a little extra challenging. I think a lot of students today have probably spent their entire lives interacting via the internet, so it is probably very normal for them.
As far as recruiters and supervisors looking at your work, they could care less where you went to school.
Does the type of school you go to factor into getting a job?
No one cares. At Blue Sky, I don’t think they even looked at my resume when they hired me. Years later I started talking about how I worked at all these places and they were like “Oh…we thought you came from straight out of school or something?” So a lot of the time they don’t know. They just look at your work and that’s all they care about. I’d say the one advantage is—it depends on the kind of person you are—but the connection you make with people, especially in person. For me, it was a lot stronger in person. When I started working here I went to school with someone for only one or two years, but we had known each other in person. We hadn’t spoken since school, but we still had that immediate connection where we recognized each other and knew each other. Compared to the online school where if no one turns on their camera you may not feel like you really know your classmates. As far as the recruiters and supervisors looking at your work, they could care less where you went to school.
Should you consider online animation school even if you went to a four-year university?
I think it’s just going to come down to what your priorities are and what you’re comfortable with. If you’re going to a traditional four-year school that makes you do everything, you have to spend all your extra time focusing on animation if you want to be an animator or modeling if you want to be a modeler. If you don’t do that, just assume you’re probably going to have to sign up for AnimSchool after you graduate. There’s a lot of stuff you can learn at the four-year schools but if you want to specialize and you don’t focus on it at the four-year schooling then you’re probably going to have to take another year doing online animation school. I was too stubborn and just worked on my reel privately. I probably wasted three years that I didn’t need to if I had just gone to an online school after graduating. I probably would’ve gotten better a lot quicker.
I chose AnimSchool because it’s the school I always said I would take if I were to take a school. I saw what they were producing and I thought, I want my stuff to look like that.
Why did you choose to teach at AnimSchool?
I chose AnimSchool because it’s the school I always said I would take if I were to take a school. It really just came down to seeing the work the students were producing. I saw what they were producing and I thought, I want my stuff to look like that. When I was at Blue Sky, I knew a few animators who were teaching there and they only had positive things to say about it. As far as compared to the other schools, I don’t know enough about the other schools beyond looking at their reels. I just think the AnimSchool animation that comes out is cooler and better. I like what they do and what the students are producing, so it seems like we’d be a good fit.
What are some of the most important concepts you try to emphasize in your own class that you feel like missed out on in school?
I would say the main thing I try and emphasize in my class is the idea of learning concepts that can be applied to every shot you will animate in the future and not just specifics for a specific shot. I’m not going to teach “here’s how to make an angry face.” Instead, I’ll talk about how I can structure my face to read clearly and look appealing. Of course, I’ll go over basics stuff like, “angry brows go down,” but we’re going to spend more time on how to make an appealing face pose that looks good and feels believable. Instead of teaching that a blink is always two frames down and three frames up, I’d say just make sure to get some variety in your blinks so it doesn’t feel mechanical; we’re going to go faster down and slower up. I’m teaching more conceptual things so that the knowledge can bend and change depending on the need. Sometimes we’re going to have blinks that go up a lot slower, but if they’re going up and down at the same speed, it’ll feel very mechanical. I try to teach things as concepts and ideas, instead of “this is how it’s done: step a, b, c” because that’s only going to help you on that one shot instead of down the road on other shots.
Do you need to be good at drawing in order to be a good animator? Do you have a studio art background yourself?
Short answer: no. But I think it can be very helpful. Drawing can provide exercise and practice of a necessary animation skill: critical observation. Anyone who draws in a representative style is required to be highly observant in order to recreate the world around them, and those skills are also essential to animation, but you can develop these skills in other ways as well. Yes, I do have a studio art background; at Ringling your first year is all traditional art. In fact, in addition to animation, I landscape paint (with real paints :)) and do a bit of pottery as well.
How does animating differ between feature film, TV, video games, and VFX? Should you stick to one medium, or is it normal to jump around?
I can only speak for film, TV, and video games because I have not animated on a VFX project. But the basic animation skills are all the same. The main difference is going to be workflow stuff and, of course, speed. So I don’t think jumping around is that crazy of an idea, you just have to be willing to accept the change to your workflow to adapt to the production. I would say jump around if you want, but if you don’t want to do video games then there is no need to be doing game-related animations.
If you ask almost everyone in the industry what their favorite project they work on is, it’s almost never the coolest film. It’s just the one they felt was the most smooth and enjoyable. Once the honeymoon phase of the job wears off, your day-to-day ease will really be essential to your enjoyment of the job.
How important is it to find a studio you get along with versus working at a big-name studio?
If you ask almost everyone in the industry what their favorite project they work on is, it’s almost never the coolest film. It’s just the one they felt was the most smooth and enjoyable. For me, it was Ferdinand because Carlos and I were just mentally on the same page. I’d just show him something, and he’d say two words and I knew what he meant instantly. Alternatively, there were other people who didn’t like the production because they had no idea what he wanted. So it depends on creativity if you have that or not. I’ve had that at other studios where I was struggling so hard to figure out what the heck they want from me and I see these other guys who love it there and are having so much fun because they know exactly what everyone wants. Once the honeymoon phase of the job wears off, your day-to-day ease will really be essential to your enjoyment of the job.
If you’re looking for a job that you really connect with and enjoy and don’t feel like you’re struggling at, just do what animations you like to do and put that on your reel.
What are your biggest demo reel tips?
My tip for demo reels is to just do work you like. Do the work you want to do for your job. Do the style and kinds of shots you want to do and do them well. And then just apply for all the jobs. The people who like your reel are going to be the people who are creatively in the same boat as you, so you’re going to enjoy the job more than if you’re creatively in two different worlds. That’s one thing I was surprised to find out. At Pixar, they make amazing films, but not everyone’s going to like it there. Not everyone’s going to like every studio. Some people are going to feel like they fit in better, they work better, fit the style better, connect with the director better at certain studios over others. So for reels, I always recommend putting your best stuff in there, and don’t…well, this sort of contradicts what a lot of people say about tailoring your reel to the job you’re applying for. If you just want a job and you don’t care if you’re going to like it or not, then yes, tailor your reel. But if you’re looking for a job that you really connect with and really enjoy and don’t feel like you’re struggling at, just do what you like to do and put that on your reel. But definitely try to make sure all your shots are the same quality. I know some supervisors when they watch your reel are only looking for your worst shot and will ignore everything else. The director is thinking that you’re going to give them nothing less than the worst shot, but if they only look at your best shot, they think this may not always be their best work. So some sups like to find the worst shot and base their decisions off of everyone’s worst shot on their reel. So don’t give them the worst one. Make it hard for them to decide which one is your worst one.
Aside from the technical skills, what are some soft skills that are essential to being a good animator? For instance, as an artist, can you talk about best practices for communicating with your animation supervisor?
I think it is super important and took me a while to find what works for me. The best thing is to be positive to the feedback and open to ideas. When you’re next to get your notes, sit up in your chair, get your little pad out, and just let them talk and just say “cool….yeah…awesome” and write all the notes down. And if you have any notes to clarify, you can ask. The worst thing you can say is “okay, yeah….but”. Try to avoid saying things like “but”. When you say “but” after receiving a note it has the implication that you don’t agree with the note. I like to let them say all of their thoughts and then come back and ask questions to make sure I understand everything they have said.
The worst thing you can say when getting notes is “okay, yeah…but”.
Another thing I’ve learned is don’t be afraid to get up out of your chair and talk to people. You’re just going to learn from what they have to say. By going up and talking to them, you’re going to see what they’re working on or they might explain something to you or you might all of sudden realize you have a question. By developing some sort of social relationship with the people around you, you will open up doors and opportunities to discuss animation and get help from people. If you just sit in your chair and never get up, you’re never going to get help from anyone else…. or vice versa, helping someone else out will give you a lot and show where you are with your own animation. And that same kind of concept goes for your supervisors as well. I think it is great to make sure you establish a bit of a relationship outside of getting notes from a sup. In animation we are all much more laid back than say an accounting firm, so don’t be afraid to have conversations with your sup just like you would with your friend. This can make receiving notes less of a to-do list but more of a discussion between peers, which will be more enjoyable as well as breed better animation.
What was the most unexpected thing you encountered when going from being a student to working professionally at a studio?
That it is a lot less work. When I was a student I stayed up until 2, 3, 4 in the morning and now I’m done at 6pm. Maybe I’ve been very fortunate with all the studios I’ve worked at, but over time has never been mandatory. They’d say if you want to do 5 or 10 hours extra a week, you’re more than welcome to, but it’s not required. Only a couple instances they’d say, “Do overtime just these couple days we need you to finish this up.” Whereas school it was every day. I was always falling asleep. When I’m finished with work, I’m done and I don’t have to think about it until the next day.
How important is it to be a super clean, organized animator? I know some animators animate strictly in the graph editor and keep their keys super clean while others manipulate the rig freely in the viewport and slide keys around without much thought.
Well, I hope it isn’t super important because I am not organized at all. For me, if I am thinking of anything besides that image in front of me that is wasted thoughts. Art is not about the tools or the technique; it is about expressing the ideas of the artist. I want to say it’s good to be organized, but it feels weird to say that because I’m not organized at all. I don’t worry too much about technical stuff because I don’t like technical stuff. I think it can be helpful if you’re organized, but my mentality is that if I’m worrying about technical stuff, then that’s energy that I’m not using on the image in front of me. And I want to put all my care and thought and concerns into the image in front of me and nothing else. If I’m thinking, well if I do that pose then it kind of breaks the rig, now I don’t have the best pose, and what’s more important: breaking the rig or having the best pose? I’m sure some artists in the tech anim department would have a different answer though 🙂
My mentality is that if I’m worrying about technical stuff, then that’s energy that I’m not using on the image in front of me. And I want to put all my care and thought and concerns into the image in front of me and nothing else.
One of the bigger things student animators struggle with is making the jump from stepped to spline? What’s the best way to get out of the “floaty phase” and into the polish phase? Does this floaty phase get less time-consuming as you get better at animating?
Ah yes… I actually have a whole lecture about how we can avoid this. If you are working in stepped and want to avoid that terrible first spline floatiness you need to make sure you have enough blocking keys and that they are the correct blocking keys. The computer is stupid. So we need to make sure that the keys we put down give the computer the best information to give us the result we want. So if your animation after hitting spline is very floaty you either need to add in more information (keys) or your information (keys) you gave the computer was not the correct information.
How do you think working in the industry will be in the future, post-COVID?
I think the biggest thing will be the opportunity for people to choose if they work from the office or from home. I hope it is a hybrid, but I think a lot will go back to normal.
What are some of your favorite activities to do when you need a break from animating and looking at screens?
Oooo, I love breaks! Just ask anyone who has sat next to me and they know I get up from my desk like every hour. Typically the longer I sit in front of the computer the less productive I become, so I always get up take a walk outside or go say hi to a friend, or grab a snack about every hour or two. I think it keeps us more focused. Some people say having a life outside of animation will make your animation better, but I don’t know if it will definitely make your animation better. I will say though, if you are not in a good place with your life, it will 100% affect your animation for the worse. Back in the day, I did painting, drawing, sketching… art forms that weren’t animation-related. But now I’ve started to do some non-art-related things. When you start animating for a while—when you do one thing for a long time—it’s good to get out and branch out into different aspects of the world. It can open your mind to new ideas. Just branching out and doing things that aren’t animation or even art can help with your animation by having a broader scope of the world and life. And also, you don’t want to get burned out. Going out and doing things that you like outside of animation that doesn’t have the same stress as trying to be the best animator ever, can alleviate that potential issue of burnout which is super important if you plan to animate for thirty years.
What’s next for you? Are there any other facets of animation you want to try out or are you happy with animating for now?
I really enjoy animating so I think I will keep animating how I am for the moment. But I have always been amazed by stop motion so maybe one day I will try and make that transition and try and work on a Laika or Aardman film. I also love teaching so maybe more of that too.
Thank you so much for sitting down and chatting with us Scott! If you’d like to see more of Scott’s work, click the links below.