Category: 3D animation Page 3 of 4

Introduction to Animation Layers – Tony Mecca


One helpful animation workflow method that many students don’t learn about until they take more advanced courses in animation is the use of Animation Layers. Animation layers are extremely useful for making non-destructive changes to parts of your shot while maintaining the animation that is working well. Animation layers are used mainly in the spline phase when you’d like to (or are directed to) make adjustments to certain portions of your animation, or you want to try out different poses and motions. They can save you a lot of time and effort when you’re making changes, and help make you a more efficient animator overall. In this clip from a Body Mechanics class, which is our third introductory course in 3D character animation, instructor Tony Mecca does a great job of explaining the fundamentals of how Animation Layers work by relating them to layers in Photoshop, and showing an example in Maya.


The following are covered in this video:
  • How animation layers work
  • How to set them up
  • How to tweak your animation with keys in the animation layer
  • How to adjust how much the animation layer affects the base animation
  • How to merge the new animation with your base animation


For more information about AnimSchool and our online animation programs, visit us at www.animschool.com

Blocking Lecture 2- Layered method


In this lecture, Animschool instructor, Hans Dastrup explains the “Layered” method of blocking. He provides the pros and cons of the method and situations where this blocking method can be used efficiently.

For more information about AnimSchool and its animation program, visit www.animschool.com

Blocking Lecture 1- Pose to Pose

In this lecture, Animschool instructor, Hans Dastrup explains the “Pose to Pose” method of blocking. He provides the pros and cons of the method and situations where this blocking method can be used efficiently.


For more information about Animschool and its animation program: visit www.animschool.com

Facial Anatomy- Wesley Mandell

In this lecture, AnimSchool instructor Wesley Mandell explains how important it is to understand facial anatomy in order to animate well.

For more information about animation, join us at www.animschool.com

5 Acting Tips for Animators with Examples

Acting for animation is an important but a very tough step for an animator to take. The choices one makes for the story, make or break his/her animation piece. There is no denying that doing animation well is very important; no one wants to see a badly moving character with jerks and knee pops but if one makes cliched choices, misses the beat or goes for an acting choice that lacks interest then no matter how good the animation is, audience just won’t pay attention. As a storytelling artist, this would be a nightmare.
Acting for animation is also a very broad subject. In this blog post, I would, therefore, like to present top five acting tips shared by our AnimSchool instructors. I hope that these will help you make better acting choices for your animations may it be a pantomime or a dialogue piece.

1. Keep It Very Very Simple

One of the things new animators tend to do is to over-complicate things. Some do it because they think:
a) it will make their animation more interesting;
b) it will help them flaunt their animation skills and
c) doing a simple motion would not help them impress their recruiters.
They want to do something different and thus often make complicated choices. As our AnimSchool instructor points out, simplicity sells the story most, not the over-complicated steps.

Following is the work of an AnimSchool student that explains this point well.


2. The Personality of A Character Drives Acting Choices

Before you start shooting reference for your character, build up a personality for him/her first.

  • Who is the character? 
  • What is the goal? 
  • How is he/she feeling at the moment? 
  • What is the history of this character? etc.

 After you figure it out, you need to start making your acting choices on the basis of that personality.

It is important to understand that it should not be “YOU” acting as “YOU” in front of the camera. It should be the character doing what he/she is supposed to be doing at that particular point.

Our AnimSchool instructor, Garrett Shikuma describes this point best with an example in the following video.

Here is an AnimSchool student who demonstrates this point in this following video.


3. Don’t Make A Generic Character

If you are making a dialogue shot, chances are that it is only going to be 10-15 seconds long. In these few seconds, you will have to define not only a character but also the situation the character is in, to the audience in the best possible way. If you truly want to stand out from the other animators, it is very important to flesh out the story element and the scene before shooting reference. One of the best ways to do so is to think not just about that scene but also make up a story outside the scene; maybe something has happened before the shot and that’s why the character is acting in a certain way or something is about to happen. This will help you make better acting choices as the character won’t be just going through motions but would have intent behind every action and that will help you get the best possible acting choices for your scene.
Our animSchool instructor, Terence Bannon describes this point eloquently in the following video.

This whole idea is encapsulated very well in the following work of AnimSchool graduate.


4. Know Your Rig Well

Before shooting reference, it is important that you understand the limitations and strengths of the character rigs you are going to use. Not every character has humanoid proportions. Sometimes there are characters with huge chest but very small hips and legs. There might be limitations over how much you can control face of the rig. So, try to understand the weaknesses and strengths of the rigs before shooting references. Even if you shoot a brilliant acting reference, it would be of no use if you fail to translate it properly onto your rig. Our AnimSchool instructor. Thom Roberts explains this point in the video below.

Here is the example of such reference shooting by one of our students.


5. Be Visual

As our AnimSchool instructor points out below, animators are visual people. We like to understand story through visuals so don’t be coy; be as much visual as possible. Remember, the animation shot is only a few seconds long so use props, costumes, stage your character as much as possible. From the first frame, it should be apparent as to what is going on. Don’t hold back!

Following video of the AnimSchool student illustrates this point very well.

I hope this blog helps you with your next animation project. Keep animating!

For more such lectures and tips, apply for AnimSchool’s online 3D animation classes at www.animschool.com

AnimSchool Interview: Milian Topsy

We’d like to welcome Character Animator Milian Topsy. Tell us a little about yourself, what is your background? How did you get into character animation?


I discovered the animation world by visiting a small 2D Animation Studio in Paris when I was still in High School, and it was kind of a revelation! It looked so cool to work on fun projects, with passionate people. 
I entered a school in Lyon, called Emile Cohl, where I focused for 2 years on traditional animation, drawing, painting, sculpting, etc. Then I entered a new school for 3 years, Supinfocom Arles, where I specialized in CG Animation.
This allowed me to put together my love for animation with my love for technology and computers. It was also a way of not being handicapped by my “not so good” drawing skills, and really focus on pure animation. 
I’ve graduated 1 year ago, and I’m now working in London, trying to keep improving.


What are you currently working on?


I work at Passion Pictures, where I’m an animator on different commercials, I also do some freelance work here and there. I keep animating personal tests, in order to work, hopefully, on feature films at some point.


What is the “Croco” project about? What was your part in it?


So “My Little Croco” is the graduation short we did at Supinfocom Arles with Etienne Bagot-Caspar, Yohan Cohen, François Mancone and Maïckel Pasta. It’s about a crocodile who adopts a green bean (looking like him) and will take care of it, like his own baby; it should be online soon. The production took us 9 months, and I was responsible for the main part of the animation. There were a lot of characters (crocodile, sheep, otter, monkey, fox, rabbit) and we tried to find a different way to act for each one of them. For example the sheep is an old lady, the otters were a bit dumb, the foxes crazy kids, etc. So it was really fun to play with all theses characters. We also had to animate a lot each day, so it’s really great to have now the time to plan and polish my personal shots.


You have an interesting reel with some shots from the popular Nike Soccer commercial, what was your job there?


Thank you! Yes this commercial was really interesting to work on, especially straight after school! I was a junior animator on this, so it was very challenging to work amongst more experienced animators, and to receive great advices from them. I hope I’ll have the opportunity to work on another project like this one soon! 


You have also worked with a cool Malcolm Mod. Who made it? What was it like to work with Malcolm?


A friend of mine did it, Maïckel Pasta (who studied at Supinfocom with me). He’s an amazing artist, from drawing to CG Sculpting. He managed to create a very appealing character, and it was a real pleasure to give him life. I didn’t have as much flexibility as on the genuine Malcolm (the face and the shoulders were quite different, so the rig wasn’t matching exactly). It required a bit more work to find the right shapes, but nothing too dramatic. 

Malcolm is a fantastic rig, the best I’ve used so far! Very appealing, amazing facial rig; you can do everything you want with it! That’s really great AnimSchool allows everyone to use it, and I can’t wait to work with it for my next animation!
The next shot I’ll be working on (still using the Malcolm Mod) it’s going to be kind of a tribute to “The Incredibles” that I loved so much! And it’s also a way to practice a more dynamic shot and body acting too.


Thank you very much Milian and all the best in your animation career!

Check out Milian’s demo reel here:


Animschool Classtime: Facial Animation with Chris Bancroft

In this clip, AnimSchool Animation Instructor Chris Bancroft talks about facial animation and gives useful tips on creating appealing expressions. Watch it below:


This is a clip from AnimSchool’s class Character Performance, the 5th term of the 3D Animation Program. To find out more, go to AnimSchool.com and apply now!

AnimSchool Classtime: Working with Lattices in Animation with Trevor Young

In this clip, Blue Sky Animator and AnimSchool Instructor Trevor Young shows a quick demo on how to create lattices, how to animate them and some ideas on making them clean. Watch it below: 


This is a clip from AnimSchool’s class Body Acting, the 4th term of the 3D Animation Program. To find out more, go to AnimSchool.com and apply now!

AnimSchool Student Spotlight: Andrew Stovesand

Today our interviewee is AnimSchool Student Andrew Stovesand. Andrew is now working as a character animator at Moonbot Studios.


Hi Andrew! Can you share a bit about yourself and experience with animation prior to AnimSchool?

Hi there, yeah for sure! Prior to Animschool most of my animation experience came from working as a Maya generalist. I did a lot of camera animation at a prior studio and that really helped me become aware of the graph editor and how it works. I had a few 11 Second Club attempts, most of which I am not super proud of (haha). Also I made a short animation while I was in school.

Do you have any favorite artists that inspire you?

I love watching those old Disney animators, Frank Thomas and Ollie Johnston and how they did it. I mean, they were just going with what felt right and they did amazing work! Nowadays there are so many ideas and theories on what to do and what not to do. Of course Glen Keane is very inspiring as well…

A clip I recently saw that inspired me:

I also like to paint and am very inspired by painting. Somehow I think they all link together, I feel like the more I grow as an animator the more I grow as a painter/artist in general and vice-versa.

Your facial performance shot is very appealing – mind to share your process with us?

Cool, thanks! Yes, that shot was fun. I knew right away when I heard the sound clip that it was the one I wanted to use. I mean, if you get a good sound clip where you can see the character easily in your head, then things fall together much more smoothly. I sketched a bunch for the shot and I believe it was Stewart who taught that class, he had us spell out the subtext for the shot which helped me get into her mindset. I also shot a bunch of reference of me and my wife acting, I got a lot of good ideas from that. I knew right away how I wanted her to start off in the shot but transitioning her to the end when she blows up was really the challenge.


Andrew’s sketches and notes for his facial performance assignment (click to enlarge).

Your character performance assignment features two animated characters and a complete modeled set. How many hours per day did you work on this shot to get it done in time?


Ha, yes that had some love put into it. My generalist background helped me there. I can model basic stuff pretty quick, so once I knew what I wanted I modeled it in there fast and kept updating as I would go along. Once I see something working in a shot and it inspires me, I feel like nothing will stop me from getting it done. I did spend a lot of time on that shot, and this is where getting laid off had its benefits. Haha!

Back to the question, I think I worked a couple hours a day give or take on that one.


Andrew’s sketches and notes for his character performance shot (click to enlarge).


How do you think your skills as an animator evolved since you joined AnimSchool?

Wow, great question. The biggest change for me, even after working in the industry for a few years, was getting it through my head that it really does take a lot of work and time to make quality animation. Honestly, it was a relief once I could do this. It kept me from being way to hard on myself. I mean really, anyone who has no experience would not think it takes so many hours to make something move in a pleasing way. We take it all for granted, don’t we (I mean isn’t this what the whole industry is trying to get the public eye to see?!)?
So really the biggest change was learning how to respect each step of the animation process (planning, reference, blocking, splining, polish) and the amount of time needed to do each one well.

Lastly, do you have any pointers or tips for your fellow animation students that are struggling to get their shots the way they want it?

Ok, yeah… Well, one really simple saying that Thom Roberts said in my very first Animschool class was “kill your babies!”, meaning, be willing to start fresh and delete something that just isn’t working. For example, the way the character is turning his/her head bugs you and you can’t figure out why? Kill your babies. I find this also applies a lot to simplifying keys. So many times I realize I just needed to get rid of a few keys and it cleans up a movement. I still am amazed when this happens. Killing your babies is not easy and still difficult to do, but usually I find it always helps (that sounds terrible)!

Thanks Animschool for all your help and for having me!

We thank Andrew for this interview. Check out his reel below:

AnimSchool Student Spotlight: Brian Rashcko

We would like to present Brian Rashcko, student of the Character Animation Program at AnimSchool. Hello Brian! Can you start telling us a bit about yourself and what animation and 3D experience you had before AnimSchool?

I sure can, haha!

After High School, my goal at the time was to enroll into roughly eight more years to become a Biochemist. 
I can already see some of the baffled expressions from readers wondering why, since animation is such a neat field to be in.
Bio chem sounded cool… At the time… But after talking to some people in that line of work, it didn’t feel like my cup O’ Tea. 
Like dealing with flesh eating viruses and other nasty bits, any one hungry?! 

The next best thing for me was software engineering. It was simple enough, write this, publish that, stumble upon infinite loops by accident that require a hard computer reset… Good times. 
It was that very job which led me into the world of animation, on a lunch break perusing the internet.

I’ve always had a fascination with visual effects and stop motion, and would periodically read “How they did it” articles around the inter-tubes.
A blurb comparison between 3D software’s caught my eye, as it mentioned a completely free authoring environment for animators. 
It wasn’t long before I could fiddle with joints, tangent handles, and key frames with zero knowledge of what I was doing, but I loved it!
Rendering out something bobbing about randomly across the screen was a rewarding experience!
The Illusion of Life“, and a few other animation books promptly replaced all my office programming literature. 

Soon after, I stumbled upon a nice fellow by the name of Keith Lango, who at the time, was selling animation training videos for around $18.00 a pop… I bought most of them, hahaha!
(AnimSchool did not exist at this time).
Producing two tests, my first ever animations! 
What inspired you to get started in animation?
Animation is a great medium to inspire the imagination! With a few sheets of paper we can transport an audience into a world of talking animals, super heroes, suspense, magic, drama… You get the picture.
I could have a hand in creating those worlds, and to me that was the clincher; knowing whatever I worked on could entertain people of all ages.
My nephew (5 years) was a big helper in that too, a simple bouncing ball threw him into fits of laughter, which kept me going, and keeps me going to this day. 

Old works he liked were:


What are your favorite animators? What do you love about their work?
Glen Keane from Disney, and whomever animated Wallace and Gromit back in the day. They did so much with so little, and made it look easy!
If you look up Glen Keane you can find video clips of his working process, and it’s fascinating!
There is one particular clip in which you can watch him animate straight ahead a swimming sequence of Ariel from the Little Mermaid.
His drawings are nice and rough, he stresses the importance of “give” and “power”, and while he flips through the drawings, your mind is blown by how each pose ties in to the next one. 

For those who are curious:


And Wallace and Gromit is just a work of art, “Cheese Gromit, Cheese!”
Which of the assignments you completed at AnimSchool you found to be the most challenging? Why?

It has taken me almost three years to mold my process into something that can be used to produce decent work. Before that, all my assignments felt like lessons in trial and error, but full of moments of growth and understanding.

The optional rigging course posed it’s own series of challenges, but was well worth all of the effort involved. I can tell you that knowing what constraints would work for different situations and how to apply them is a real benefit! Especially if you are a one person operation on a small scene; It doesn’t hurt to be a little multifaceted in this industry either.

The running jump was difficult due to it being my first ever attempt at moving a character forward through a scene. I also had issues with turning a character around, which was done twice in my particular shot.
Being said, I might of bitten off more than I could handle at that particular stage, but if I hadn’t, I would of not learned as much.

It is easy in animation to take the simple path, especially when learning, but if you don’t push yourself, how else are you expected to develop your skills? 

End result:


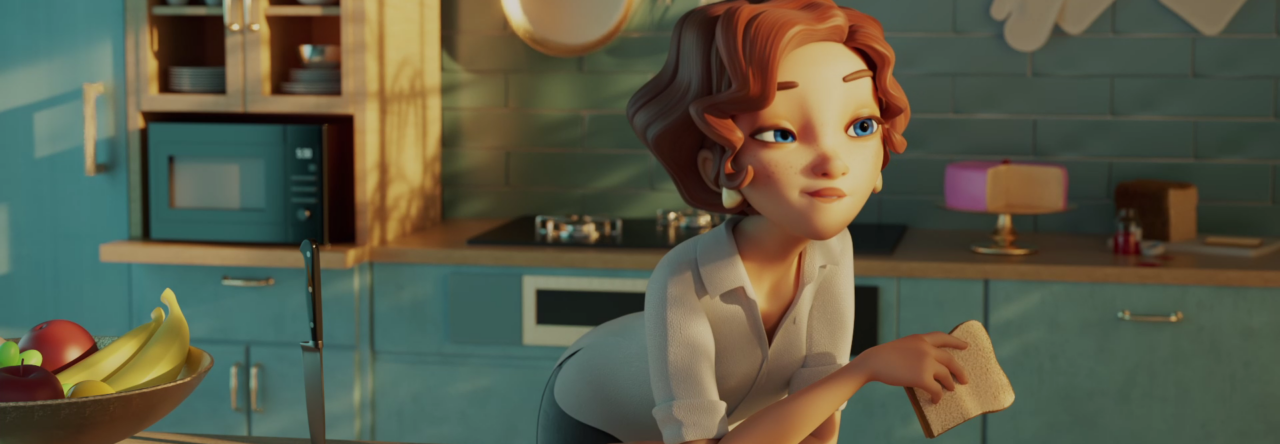
Can you describe the process of your Class 6 Facial Performance piece and share some of the feedback you had with your instructor?

When the facial performance class started I was still developing my working methods. Some of what I did in prior classes didn’t help me in this particular assignment.
Speaking alone, brought together more technical issues than I was anticipating.
My process thus far is:
PREP WORK:
Listen to audio, if any, over and over and over until I can recite it exactly. Even to the point of mimicking the cadence, tone and overall feeling of the performance.

Thumbnail out ideas, or emotive poses that help me delve into how a particular character will act on screen. And how I want the audience to feel towards that character.

I will also record myself acting any ideas out that I have drawn on paper to see if they would be even feasible. But not copying it, just to preview how things might look.
I mostly use reference as a memory dump, the same goes for thumbnails, they are both tools, but nothing that should be taken literally. Otherwise we would be asked to rotoscope, and that’s not fun.
When I am able to solidify an idea, I’ll draw poses out in sequence, save each image as a PNG, then import them into Maya as image planes.
To animate them, I will turn on and off their visibility throughout the time line, so I can playblast a video to watch in Quicktime (I’m working on a script to automate this process).

BLOCKING:
In passes, starting at almost no detail, I will straight ahead my scene. Usually only two or three poses in the beginning.
Then with each pass, adding more poses straight ahead, refining earlier ones until things are on 4’s, or have enough detail so splining isn’t a headache.
It is crucial to flip through your animations forwards and reverse to get a good feel for movement hitches.

LINEAR FACIAL:
I will then switch my splines and working method to linear and begin working out my facial poses for speaking, if the animation calls for it.
I also look for errors in movement like wobbles, pops, and gimbal lock.. which will get worse when in full spline.
Errors are easy to spot given Maya is not adding in eases, or overshoots into my work.

SPLINE:
Switch everything to spline and playblast. Take notes for the overall scene; open Maya again but shrink the timeline to only render in portions, as I only want to focus on little bits at a time to avoid fatigue.

I will push things even further as spline curves put motion on 1’s, which tend to make shots appear not as punchy as their stepped counterparts.

I try to put enough detail into my blocking so splining is a quick process; offsetting keys causes nothing but problems, so I usually avoid doing so.

DONE:
Nothing else to do but move on to another shot.


My feedback for this piece was on appropriate acting choices and on how to give moments of pause, so the audience can understand what is going on.
We also focused very strongly on appeal, which can include head angle, brows, pucker, gestures, camera distance, scene composition… Etc etc.

I had difficulty with my acting choices, as my reference was a bit over the top… I have yet to get over being on front of a camera, even if it is my own dinky Kodak, hahaha!
It took a lot of feedback to arrive at the above animation, and my instructor was not lacking one bit in ideas, suggestions or wisdom.

If it wasn’t for that, who knows what this would of turned out to be.

AnimSchool also provides students an opportunity to speak with other instructors outside of class in what are called “General Reviews.” If you get the opportunity to have multiple eyes on a project, go for it, I certainly did!

Heck, post your work in outside school forums like Creative Crash or 11second Club, for an extra punch!


How is your experience at AnimSchool being so far?

I am thankful for the existence of AnimSchool and for its founders goal of providing this fine resource to those that want it. If it wasn’t for their pricing programs I would of not been able to afford schooling.

AnimSchool cares quite a bit, and will work with you to find a payment option that fits, which by no means is a tag line… They really do! Every student here is considerate and kind as well!

I remember during my first few classes, a few of us would meet afterwords in Google+ to discuss our work and give each other feedback. Not without network connections drops and software bugs, but it was fun!

I am sad to leave here after class seven, but it’s been quite a ride, and I won’t forget it.
A bittersweet ending, but an exciting beginning.


Do you have any advices for students just starting out?

Push yourself with each assignment, and avoid the easy route.
Create the best work you can, and If you receive a low score, try again, don’t give up.
Take suggestions outside of class with a grain of salt, but focus on ones that seem to be consistent.

If you are afraid to act in front of a camera, get a friend to do it!

I can’t stress enough the importance of “rig testing”. With every new rig you are handed, set aside some time to pose, break, morph and comprehend the limitations and strengths of that rig. If you don’t, you can have the best idea imaginable, begin working in 3D, only to find your rig is not capable of that “cool move” you wanted.

Learn to script, or at least have a basic understanding of both melscript and Python; whatever language your current platform can understand.
Just look at the popularity of autoTangent or Tween Machine, I can’t believe they aren’t a part of Maya yet… Well Maya 2013+ has auto curves, but it’s just not the same.

Page 3 of 4