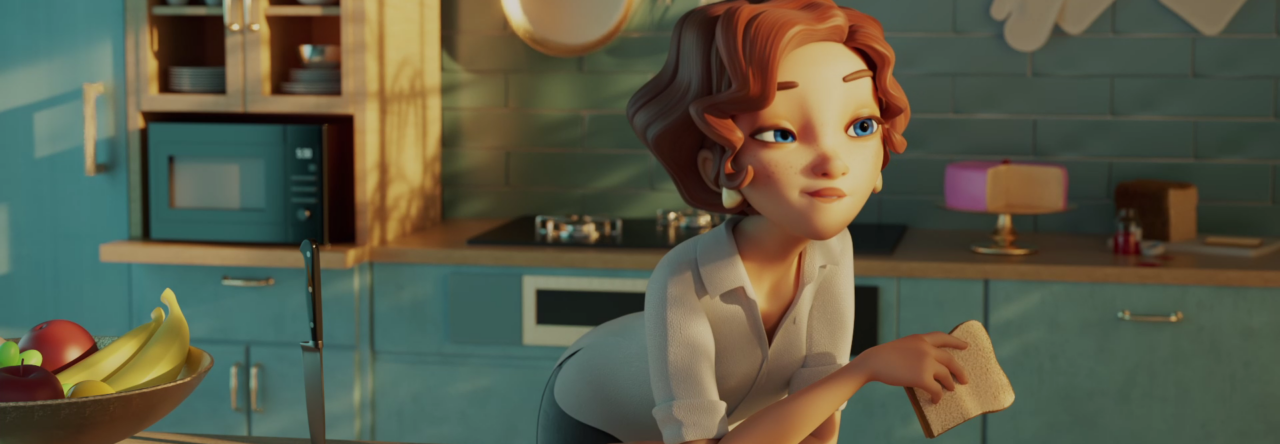
In animation, the significance of well-executed poses cannot be overstated. Posing is the foundation upon which character expression, emotion, and storytelling are built. A carefully crafted pose communicates the essence of a character’s personality and intentions, providing vital visual cues to the audience.
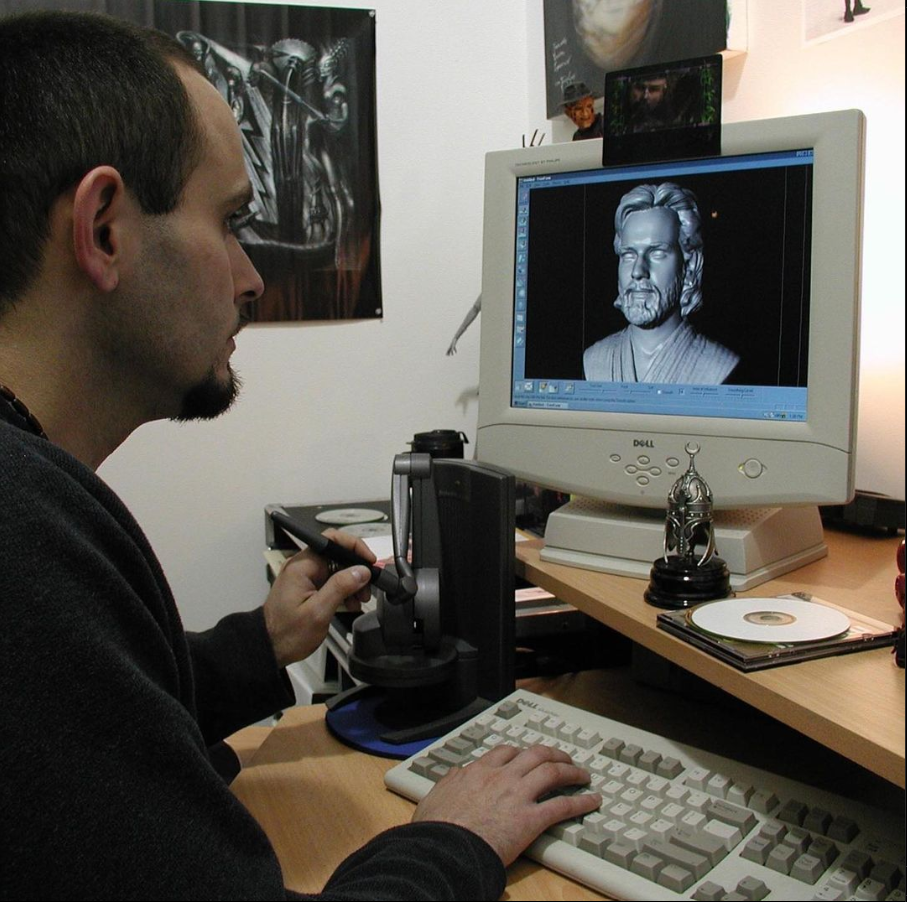
AnimSchool instructor Aleksander Kolev explains how to find appealing poses, and how they can be used effectively in your shots.
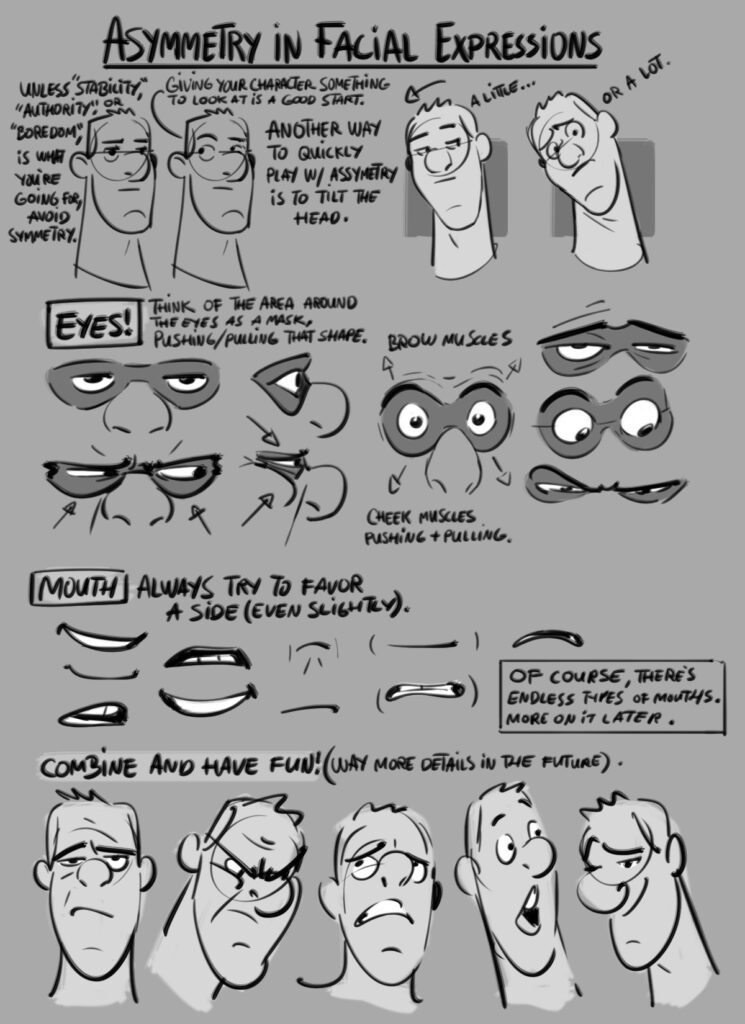
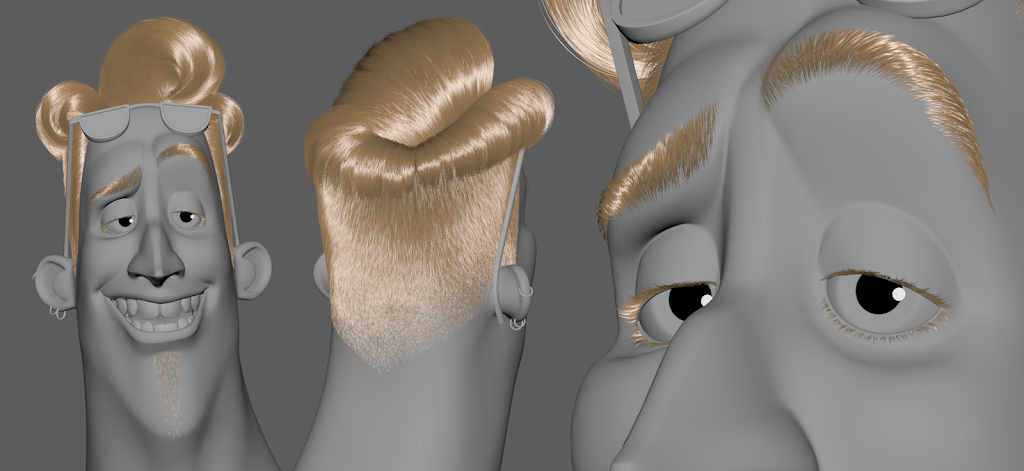
Asymmetry Having both asymmetry in the face and body will keep your poses interesting. Depending on how realistic or unrealistic your shot is, you can push and pull exaggeration in certain places to create asymmetry. This can include subtle changes like raising an eyebrow and tilting a hip, or more extreme changes like stretching the eyes and head.
Aleksander also mentions that he uses > and < as a guide to dictate directional poses, such as where a character is looking. For instance, if a character looks to the left, the facial features and head will be positioned so that implied angles form in a > shape to drive the character’s action. (See pink draw-over lines below)
Shapes Shapes help to define and simplify poses. While it may seem like more of a 2D concept, thinking with shapes can be helpful to create contrast throughout different poses, in both 2D and 3D. Aleksander shows an example of a scene he worked on from Hotel Transylvania, in which a round mummy character, Murray, dances. He explains how he pushed the stretching and squashing of the character to imitate vase-like shapes, and posed the arms in such a way to create flow throughout the form.
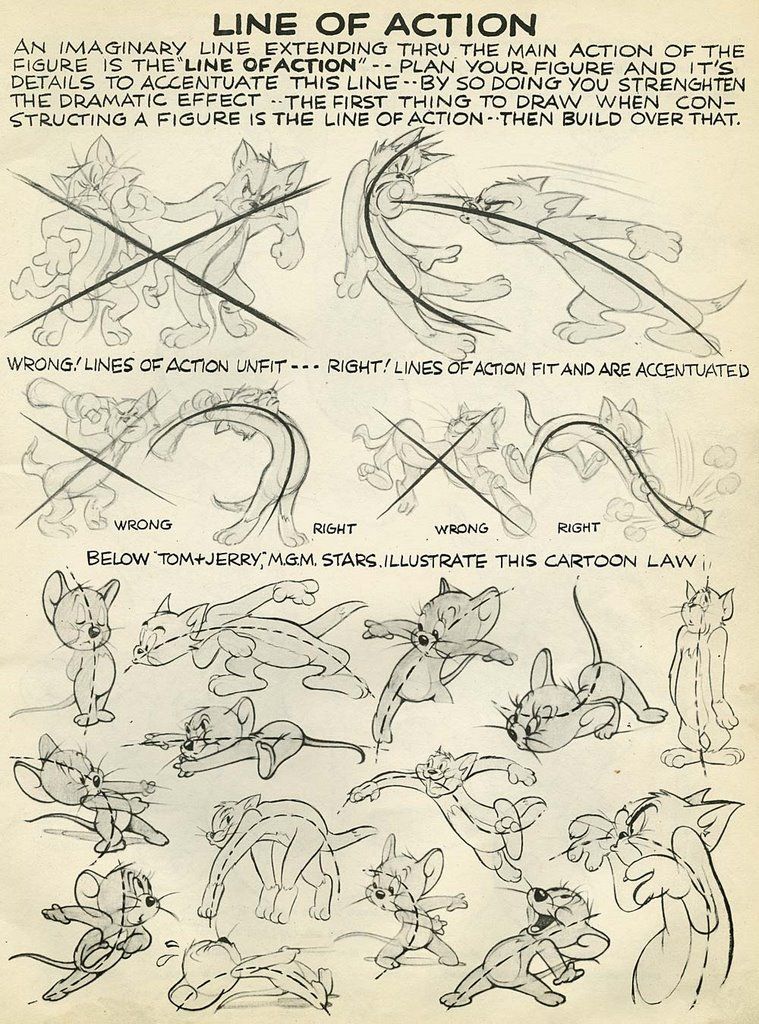
Line of Action The line of action is the most general line of flow through a character’s body. It helps to focus the audience’s attention, give the character energy and flow, and clarify the character’s pose. Tom and Jerry offers some great examples of utilizing the line of action to depict how energy is transferred with clear posing and action.
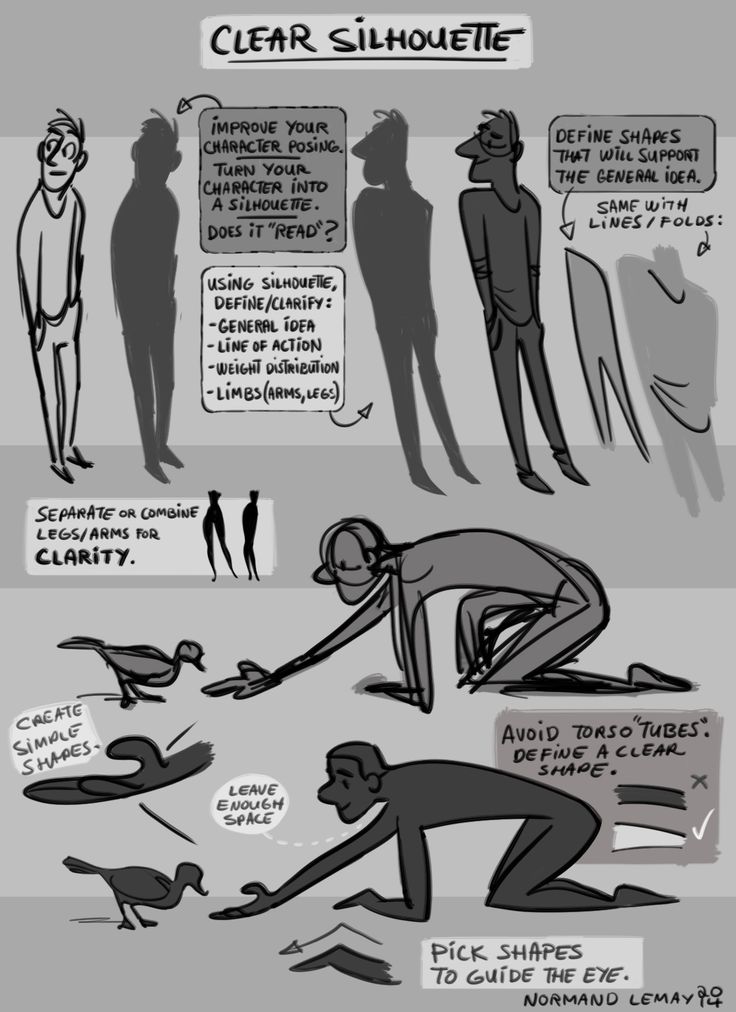
Silhouettes Silhouettes are essential in defining a clear idea of who the character is and what they are doing. When the audience can identify the character and action just from looking at the blacked out shape, it means you have a good pose. Oftentimes silhouettes can be simplified into a general shape that defines the flow and overall form, but more complex and less cartoony animations may result in more complex silhouettes as well. Watch out for tangents as poses and silhouettes get more complex with overlapping objects! Keeping readability in mind is key for crafting any pose.
Watch the full excerpt from a live AnimSchool lecture below:
At AnimSchool, we teach students who want to make 3D characters move and act. Our instructors are professionals at film and game animation studios like Dreamworks, Pixar, Sony Pictures, Blizzard & Disney. Get LIVE feedback on your Animation from the pros. Learn more at https://animschool.edu/
Smear frames bridge the gap between individual frames, contributing significantly to the illusion of smooth, lifelike movement. These subtle, elongated, or stretched frames create a sense of speed, impact, and energy, enhancing the overall visual experience. By strategically distorting shapes and lines, smear frames add finesse and character to the motion.
AnimSchool instructor Mitchell Jao explains why smear frames are necessary in standard 24fps film animation. Oftentimes, 24 frames per second simply isn’t enough to capture quick motion, and can result in a choppy-looking animation. However, animators can find ways to use this to their advantage and exploit the frames by adding smears and multiples.
Smear Basics Smears are used to connect shapes that are spaced far apart, mimicking the idea of a motion blur between them. The degree of motion blur occurs as a result of the shutter speed of cameras; at 24fps, the shutter speed is roughly 1/48th of a second. For something like sports photography, the shutter speed would be much faster to capture the shot clearly and with little to no blur for a “freeze frame” type of shot.
The quick action of smears can also be used to hide mechanics that don’t always logically make sense – Mitchell points out a scene from Ice Age: Collision Course, where a Dino Bird quickly shifts his arm behind his back in a seemingly impossible movement, hidden by the smearing circular movement of swinging another character around.
Multiples and Ghosts Ghosting can be used like smears, but, when used improperly, can feel like a stuck frame. Ghosts are best used when the movement is so quick that the motion is illegible without them, such as a limb scramble.
Mitchell explains that he prefers to use multiples in a rapid repetitive movement, rather than a singular wipe.
Be careful! While it is important to utilize squash and stretch, using too much can result in the loss of form, especially if the character or object is meant to be more solid.
Watch the full excerpt from a live AnimSchool lecture below:
At AnimSchool, we teach students who want to make 3D characters move and act. Our instructors are professionals at film and game animation studios like Dreamworks, Pixar, Sony Pictures, Blizzard & Disney. Get LIVE feedback on your Animation from the pros. Learn more at https://animschool.edu/
AnimSchool instructor Scott Guppy discusses the most common forms of storytelling structure, and how you can use it in your animation to convey a complete story.
By distilling your narrative to its basic structure, you unlock a compelling journey that resonates with your audience. Keep it concise, and focus on key elements. In simplicity lies the magic that makes your tale unforgettable.
Stories typically follow a three-act structure: Setup, Conflict, and Resolution. As with animation, these rules can be broken; however, we must first understand the rules
Act 1: Setup
Establishes a scenario that the audience can identify quickly. Ensuring that the audience can identify the situation quickly is essential for animators.
These are typically stereotypical settings (i.e. a western is set in a desert with older, rundown buildings)
The setup helps to relate important information about the story to the audience.
Act 2: Conflict
This part contains the story; the obstacle that the character overcomes in an escalating fashion.
It needs to be interesting and intriguing; otherwise, you will lose the audience’s attention – the ending won’t matter if the audience does not stick around to see it.
Act 3: Resolution
Contains the “gag” – the whole point of the story
Does the character win? Do they solve the problem and fail dramatically?
Story Tips
Archetypes and stereotypes are important in storytelling – while they may not be entirely accurate or correct, they contain generalizations that are helpful in conveying information quickly to the audience so they know what to expect from the story. Utilizing these generalizations can help keep your story simple and easy for the audience to follow. If you are not purposefully trying to confuse your audience, ensure that your animation is readable and clear!
Who is your main character? Dive into the mind of your character: gender, age, race, intelligence, emotional state, goals, dreams, etc. Visualizing your character can give you inspiration for what you want to convey with your story.
Juxtaposition: two things being seen or placed together with contrasting effect Juxtapositions are useful in creating a joke with the incongruity of two ideas. They can also be used in establishing an idea with a predictable outcome, then deliberately misdirecting the audience to an unexpected outcome.
Watch the full excerpt from a live AnimSchool lecture below:
At AnimSchool, we teach students who want to make 3D characters move and act. Our instructors are professionals at film and game animation studios like Dreamworks, Pixar, Sony Pictures, Blizzard & Disney. Get LIVE feedback on your Animation from the pros. Learn more at https://animschool.edu/
AnimSchool instructor Janel Drewis breaks down the basic steps, and how video reference is used as an aid to achieve believable character movement. Achieving a natural and convincing walk is deceptively simple. A successful walk cycle animation requires a keen eye for the intricacies of human movement. It involves mastering complex details such as weight distribution, timing, balance, and coordination all while ensuring the character’s movement matches their personality.
Walk cycles do not employ any one specific Principle of Animation – a good walk cycle incorporates each principle in some manner. Because walks are so familiar to the human eye, audiences are extremely aware and can easily identify when a walk looks off or is not believable.
Main Poses of a Bipedal Walk Cycle
Contact: front heel makes contact with the ground
Down: hips are at their lowest; “bottom” position
Passing: back leg passes the front leg
Up: hips are at their highest; “top” position
Walk Timing In a standard walk cycle, the four poses above are spaced evenly throughout. Most people walk “on 12s,” which means they take one step every 12 frames, or roughly two steps every second at 24fps. Animating walk cycles on 16s or 8s was more popular in older 2D animation because animators did not have to split the drawings on thirds like they would have for animating on 12s.
Other Tips When looking at a reference video, make note of how much the hips drop/rise and how straight/bent the legs are. Additionally, pay attention to the spacing of the feet between frames; this will affect the ease in/out between steps. To loop your walk cycle, ensure that the pose of your final frame matches your initial frame – you can do this by copying and pasting the initial frame. This will ensure seamless looping. To play this loop continuously, select everything and activate Curves > Pre Infinity > Cyclewith Offset and Curves > Post Infinity > Cycle with Offset.
Watch the full excerpt from a live AnimSchool lecture below:
At AnimSchool, we teach students who want to make 3D characters move and act. Our instructors are professionals at film and game animation studios like Dreamworks, Pixar, Sony Pictures, Blizzard & Disney. Get LIVE feedback on your Animation from the pros.
AnimSchool instructor Masha Juergens explores the process of getting into character from behind the camera.
Acting for animation is a unique art form, where animators bring characters to life not just with the use of technology, but through the use of their own physical and emotional performances. With boundless creativity, they craft compelling personalities that resonate with audiences of all ages, making animated worlds come alive on your screen.
Animators vs. Actors
Animators focus on externals in characterization and caricature (facial expressions, body movement, emotional reaction, etc.)
Actors, by contrast, learn specifically notto focus on these things because they are “results” – you cannot act results.
As an animator, you must understand what your body is doing, what your emotional status is, etc., and translate all of that into a digital space and onto a model.
The challenge comes from making your audience feel like your character is alive, not because they are moving around onscreen, but because they are thinking and have a personality that makes them unique!
You don’t have to be a physically great actor to be a great actor in your mind, and in turn a great animator!
Becoming a Better Actor
To get better acting in your animations, you must become a better actor. Get into the head of your character – try to figure out and better understand where they are from, what their personality is, what their motivations are, etc. It’s not just about portraying a clear external (happy, sad, etc.) – try to look deeper for an internal feeling, or consciousness. Identify the character’s emotional state and use the thought to drive the action, not the dialogue. When there is a change in the character’s emotional state, change the character’s main pose. Be careful here: don’t change poses simply because there is a new emphasis in the dialogue!
Adding Beats in Animation – Emotional Hang Time
When a character is feeling one emotion and something happens to make the character feel something else in the same shot, the character needs to have a moment to process before the emotional change can take place. Building beats into the animation can show that the character is mentally absorbing and processing the events that are occurring in the shot. These moments can be quick, but readability is key.
Watch the full excerpt from a live AnimSchool lecture below:
At AnimSchool, we teach students who want to make 3D characters move and act. Our instructors are professionals at film and game animation studios like Dreamworks, Pixar, Sony Pictures, Blizzard & Disney. Get LIVE feedback on your Animation from the pros.
AnimSchool instructor Ricky Renna explains what Phonemes are and how to employ them in your lipsync to create a believable and natural performance.
Phonemes are the building blocks of human speech and are fundamental when learning to effectively communicate. As animators, one of our goals is to find a way to convey thoughts, feelings, and in this case, language. Mastering phonemes is an important step towards this goal.
Phonemes are defined as the perceptually distinct units of sound in a specified language that distinguish one word from another. In animation terms, we can think of it as the different “mouth shapes” that create words. As you animate, it’s crucial to understand how to break down a word into the correct phonemes to allow it to read correctly.
Lipsync Tips
Use every sound to your advantage: listen closely for each and every enunciation.
Don’t over complicate: achieve your mouth shapes in the simplest way possible.
Listen to the sound, not the letter: sounds can be different than how they are written.
Generally, when animating the mouth, less complex shapes are present on the bottom lip, while more complex shapes are on the top.
In an example from Disney’s Ratatouille, Ricky points out how many of the sounds get “mashed” together into one phoneme, and that it typically takes two frames to go from one phoneme to the next. He explains that two frames is his “magic number” when it comes to animating mouths, especially when a character is speaking quickly.
As part of a live AnimSchool lecture,
At AnimSchool, we teach students who want to make 3D characters move and act. Our instructors are professionals at film and game animation studios like Dreamworks, Pixar, Sony Pictures, Blizzard & Disney. Get LIVE feedback on your Animation from the pros.
Our alumni currently enjoy a 92% placement in the industry within 6 months of graduating.
Start your animation journey in our accredited online animation program at animschool.edu (ACCSC)
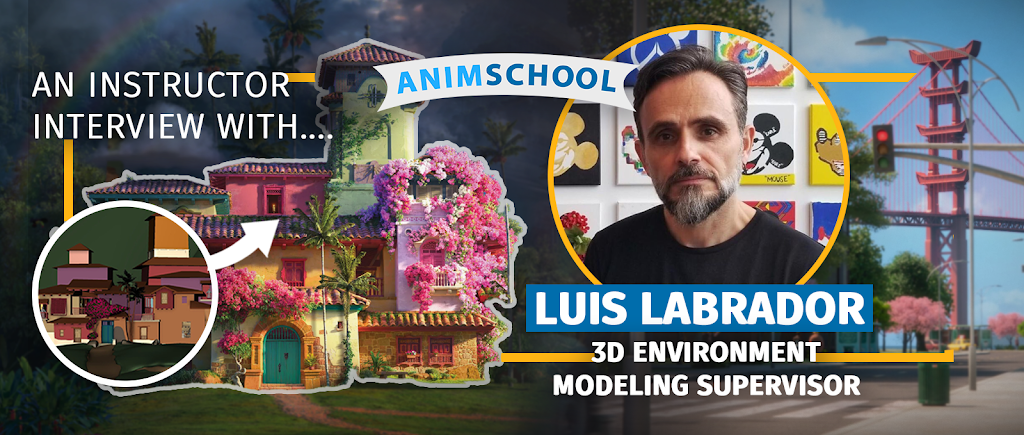
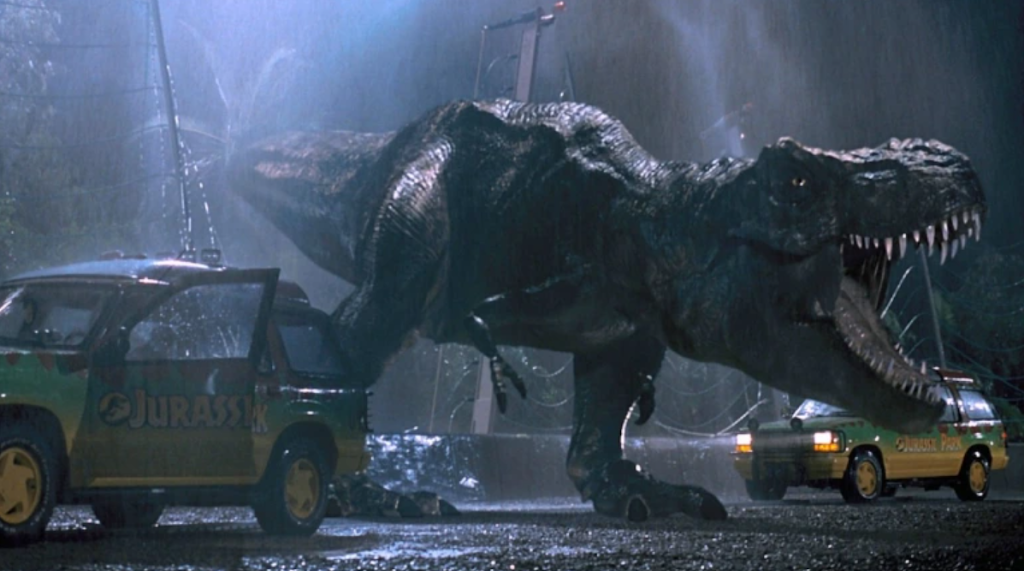
For over two decades, Luis Labrador has established a prominent reputation in the 3D visual effects and animation industry as a skilled 3D modeling artist. Luis began his career as a special makeup effects artist in Spain in the early 1990’s. His professional path took a new direction after he watched “Jurassic Park” in 1993. Seeing the CG generated dinosaurs sparked his interest in pursuing a career in 3D.
He got his start in 3D character scanning at Gentle Giant Studios in 1999, where he contributed to noteworthy films such as “Spider-Man 2,” “Van Helsing,” and “Pirates of the Caribbean: The Curse of the Black Pearl.” In 2003, Luis joined Sony Imageworks and contributed to a range of films, including “I Am Legend,” “Open Season,” “Watchmen,” and several others. In 2008, he got bit by the animation bug and moved on to work at DreamWorks Animation Studios. There, he served as a 3D Character Modeler and contributed to several successful films, including “Puss in Boots,” “Kung Fu Panda 2,” and “How to Train Your Dragon.”
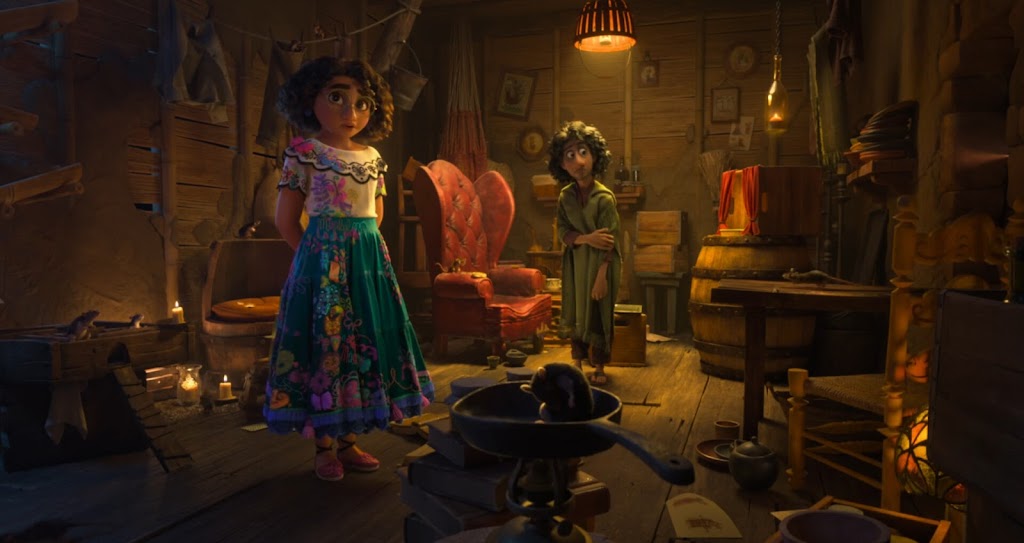
Currently, Luis works as a 3D Environment Modeling Supervisor at Walt Disney Animation Studios where he’s been since 2011. During his time there, he has been involved in notable projects such as “Frozen,” “Big Hero 6,” and “Encanto.” In his free time, Luis also dedicates himself to teaching 3D Modeling to students from around the world through AnimSchool and ANIMUM Creativity Advanced School. His virtual classroom has seen numerous students pass through its doors, many of whom are now working in the industry today.
AnimSchool recently had the opportunity to speak with Luis Labrador about his experience and journey in the animation industry. He also provided valuable advice for aspiring artists navigating the industry today.
Tell us about yourself and your journey into the animation industry.
My name is Luis Labrador. I’m originally from Spain and I moved to the United States when I was 20 years old. I started my career in film in Spain as a special makeup effects artist. I used to do makeup, animatronics, and monsters. In Spain, in the 90’s for visual effects there was
not that much work. I worked for two and a half years with Colin Arthur, he worked in special makeup effects and did “The NeverEnding Story”. In the 1990’s, there’s a movie that some of you might have heard about called “Jurassic Park”. That changed everything for me. Meaning that I saw the dinosaur or the part of the dinosaur that was done in CG and I thought to myself “Oh my God, I’m out of a job here! I need to learn how to do that.” That is when I decided to move to the United States in 1996.
There was no teaching of this type of discipline at that time. It was just a bunch of crazy people trying to figure it out. Most of the people were located at ILM at that time or some other studios. There was no setup for schools or teaching. There were some modeling classes around in really prestigious schools but there was nothing oriented to animation. For that reason, I’m totally self-taught.
I bought a computer, I got software and I trained myself. I had never started a computer before I moved to the United States to tell you the truth. I didn’t know how to start a computer. My twin brother, he’s really into computer science and he’s the one who guided me to what computer to buy and I started learning by myself. Working normally weekends 9-5 every day and then after 5, I used to go with my friends. But every weekend I would work 9-5, Saturday and Sunday because I worked during the weekdays. That’s how I started really learning 3D, it was all self-taught. That’s still what I do if I want to get better at something.
Can you give us a summary of studios/film projects you’ve worked on?
Students get excited about the studios that I worked at but I always have to add this at the very beginning: It’s a really rare case that a student starts right off the bat in a big studio. It takes some time. You need to build your portfolio. That is the same case with me, I started at a smaller studio called Gentle Giant Studios. I stayed with them for four and a half years. At the beginning I was just a traditional sculptor there and then I moved into the digital area when they knew that I knew how to run Maya. Nobody knew how to run Maya in the studio at that time.
I started working in 3D scanning, digital doubles for film and that’s when we worked with Sony on “Spider-Man 2”. They saw my work and asked me to join Sony. I stayed with Sony Imageworks for five and a half years. Sony had Sony Picture Animation at the time. One of the first movies was “Open Season” and “Monster House”. I got bit by the animation bug so I knocked at DreamWorks Animation’s door and I stayed with them for three and a half years.
Then I knocked at Disney Animation’s door and they said “Yea, I come in!” I’ve been with them for 11 years. I’ve worked on different projects as a 3D Artist and some as a 3D Environmental Modeling Supervisor.
What are some of your favorite movie projects you’ve worked on?
The one that I had the best experience with was “Frozen 2”. Not just for the movie or what we built, which was great and fun, it was for the experience with the people that we were working with. All the supervisors and the artists and everything on that movie. We were having so much fun. It didn’t matter how many hours you had to put in, it was a great group of people, and a great group of Supervisors. They had no ego. You learned a lot from them and they were the best people to work with. I always make this joke about when I work on a movie: I don’t really care that much after all these years about what the movie is about, it’s a plus if you like it. I always said if we do the most horrible story ever but we had the greatest people doing it and it’s fun to work on, get me into that movie. Frozen had everything. I made the joke that the planets align at that time.
My second favorite one was “Encanto”. “Encanto” was actually pretty nice to work on. Not as good as “Frozen 2”, but still pretty good. I worked on those two as a supervisor.
As an artist, I really enjoyed working on “Monster House”. I really like it and it was a lot of fun to work on. There are movies where we get a lot of freedom to do things, becoming more like the art department. On “Watchmen”, one of my last movies at Sony, I had to build things with no art. “I Am Legend” was also another movie that I really liked. Even though people don’t like the resolution of the zombies at the end. Our zombies had viens and detail but they changed the sequences so much we couldn’t render such high resolution. We had to release everything at a little bit lower resolution. My whole point is that it was a fun project though.
In visual effects you get to interact with some of the actors sometimes which I don’t do in animation right now. I miss that a lot. I went to travel to Argentina and also met the actors of “The Lord of the Rings” or Hugh Jackman when he was in “Van Helsing”. Or when I was having lunch with Johnny Depp, who was the nicest guy at that time. That’s the part I miss the most too. Van Helsing is a movie that I worked on where I spent two weeks in Prague, scanning actors and walking around Prague and meeting Hugh Jackman and having tequila shots with him. I will never have that at another time!
What are your thoughts on traditional Schools vs online schools?
A lot of students come to me at the end of my class of 11 weeks and I hear this a lot. It makes me feel good but at the same time it makes me feel bad for them which is this: “Luis I learned more in 11 weeks with you than four years in college”
It’s always good to have teachers that are production ready meaning people that really work in the industry. That’s not that easy to find. Students that normally work online and look at schools like this one, they’re lucky because I didn’t have that.
Student work by Charles Lee in Luis Labrador’s class
Student work by Erica Hetherington in Luis Labrador’s class
I would find something online but you never knew if it was good advice or bad advice or if it worked for real production. Students have somebody that can guide them. I always tell them to be really picky and do research on who is going to be teaching the class. Do your research on places like IMDb and find out what movies they worked on. Just to give you an example, I took classes in UCLA Extension when I came here, I had some teachers that were amazing. I had a teacher who worked on Star Wars doing the matte paintings in the background. You have to be really careful when you put your money, your knowledge and your time into it. The good thing is that students have access to that online. Having a teacher at UCLA was really lucky at the time. Another good thing about online classes is they can take the class from anywhere. You don’t have to live in California anymore. The only thing that I would say is not as good is just the loss of interaction between students. It’s good to have students connecting in person. There’s forums and stuff like that but I think they miss that personal touch, which is the only negative part that I see. Being able to take a class in your pajamas is also a big plus!
You teach a lot of international students from many countries. What advice do you give to them in regards to breaking into the industry?
The key or golden ticket for these students is their portfolio. That’s the only thing. If a studio wants what they see in your portfolio and they want you to work with them they will move the Earth just to give you a Visa. They don’t care, whatever it costs. I see cases like this at
Disney all the time, artists that have been in Europe for a long time and have an amazing portfolio. I have my friend Manu Arenas who is one of the best 2D art directors that I’ve seen in my life. Studios chase him like crazy just to get him into the studio. For two years, they were after him. What I mean by this is if you have an amazing portfolio to show, they will do anything to get you to work for them.
That’s the key. Get an amazing portfolio. If you’re kind of equal to somebody that’s here in the United States, guess what, they’re gonna go for the person. It’s going to be cheaper and take less time compared to you. Unluckily for everybody, all of immigration is becoming more and more complicated every year for every country. I know that even from where I’m from, in Spain. Trying to get a Visa is more complicated so it is happening everywhere.
Other than the portfolio, what other qualities do you look for in a candidate for hire?
The portfolio is 60 percent and this is the other 40 percent: they need to be clean with their work. They need to have clean topology and they need to be good at transferring from 2D to 3D. Normally when I ask to see someone’s portfolio, a lot of people tend to just show their models. The beautiful part and that’s it. With only that, I just know 40 percent of what you know how to do. You’re not showing me your models. I don’t see a wireframe pass so I can see your topology and if it’s ready for animation. Is it ready for texturing?
Student work by Charles Lee in Luis Labrador’s class
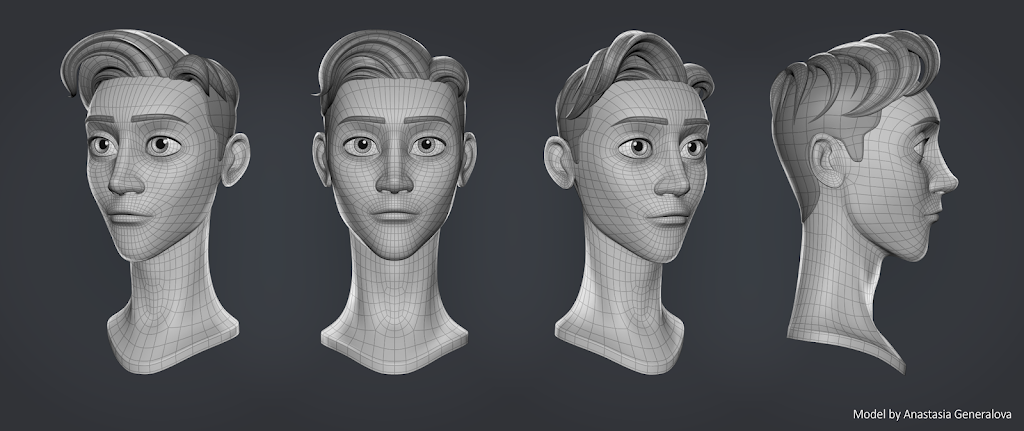
Student work by Anastasia Generalova in Luis Labrador’s class
You need to show me topology and it has to be correctly done for all the other departments. Our models not only have to look pretty, they need to be functional. I know a lot of models that look pretty and then I turn on the mesh and it turns out we cannot work with it. They need to add a turntable and need to credit the concept artist and show what the design is. You need to put the 2D image. I want to see that image first and then your model so I can see it related to that. How do I know that you did a good job of translating that from 2D to 3D?
Apart from the technical part, next is, is how is the person? How does he collaborate? How are his social skills? Does he have an ego or not? You see this through the process of asking questions and seeing how they interact with other people. Are they collaborative with other people? Because working in a bigger Studio, you need to have that part down. Do you know how to collaborate with other people or do you just do whatever you want? If so, good luck, you’re not going to last for too long. No matter how good you are.
What excites you about this generation of up and coming artists that you’re teaching? What unique challenges do you think they hace compared to your own experience?
The challenges that they’re gonna face, it’s that there’s more competition now. There’s more people actually doing this but also there’s more places to work for. So on the other end, it kind of balances out. What excites me for them is that they have a lot of new things coming up that I didn’t have at that time. Things like VR, AR. Augmented reality and VR are still in diapers running around and sucking the thumb. People don’t know what’s coming in the next couple of years. I know that at the end of 2023 and 2024, this is gonna explode. They have all that possibility there, which we never had. I think that all these new technologies are something that is really cool and now it’s not just modeling for animation or for video games. There’s more stuff out there and more coming.
VR lores scout model
VR lores scout model
VR lores scout model
What are your thoughts on AI Art?
I don’t like it, let’s put it this way. I understand the use of it for some specific things. If you are a visual development person and you have a portfolio already and you have years of experience, you can use that as a tool to generate some quick ideas. Then do your own thing completely. I like the inspirational use of it, I think that’s good. The bad part is a lot of people are gonna be cheating with this. Meaning, if I had to hire somebody for 2D, how do I know their portfolios will be AI generated? How do I know if they’re good or not? How do I know if I put them in production that they’re not going to know what to do? That’s because they’re cheating through the whole process. So I see it as a tool to inspire and as a tool to build from.
Have you seen and/or experienced a culture shift over the last 20 years with the rise of communities such as “Women in Animation”, “Rise Up Animation”, Latinx in Animation, etc?
Yesah I’ve definitely seen it. Which is good, I’m diversity, look at this accent! Diversity is always good. Diversity with quality, we need to have both. Let’s make sure that we get quality at the same time that’s key. If you’re trying to find somebody you need to give yourself a little more time to be more specific about what you’re looking for but they’re definitely out there. Take your time, find them and most of the time, they’re better than any other people that you want but you need to do your research.
What’s it like being a supervisor at Disney?
I have from 8 to 12 modelers working for me depending on the show. I always say, they don’t work for me, I work for them. I work by this metaphor: They’re driving Ferraris and it’s a road that is in the mountains and I’m going first with a gigantic tractor, plowing all the snow for them so they can go super fast. That’s what supervising is for me. It’s also about being respectful with other people. Don’t have an ego. I work for them to allow them to have the best chance and clean their paths so they can be fast and precise at what they do.
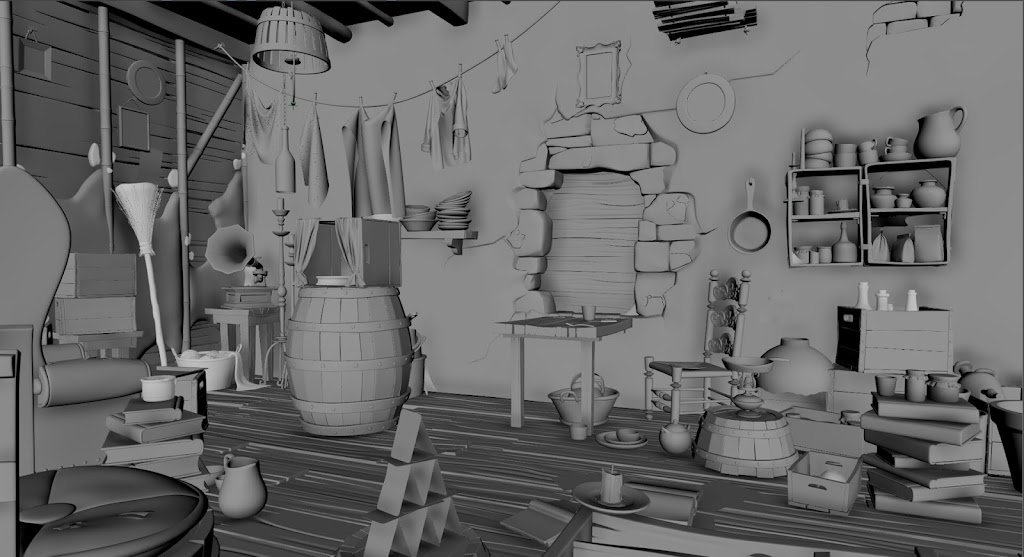
How do you add character to 3D environment pieces?
We’re really oriented by the art so we can not deviate too much from that. For us, it’s having a good relationship with the 2D Department. If you don’t have a good relationship and you start doing your own thing then you’re gonna be in trouble. Apart from having reviews that you show to people in the studio, you also have working sessions with the art department. You can build a foundation in those working sessions almost like a playground for kids. The art department sometimes can be a little bit tense working around Artist and that’s not a good thing. If you collaborate and build a friendly environment, those meetings and working sessions can be really relaxed and you can laugh and even joke sometimes. Throw a joke so people relax and think “oh this is not really so serious”. If I’m with the production designer or the art director modeling in front of them I would want them to feel like we can do things together. Even though there’s collaboration there’s going to be times where they’re going to tell you “No”. Even saying no, they need to tell you in a way that by the end when they’re done telling you “No”, you look at the person and you get it and you say thank you. They need to be nice. That’s one of the things I learned from one of my supervisors Sean Jenkins. He’s an amazing supervisor. Even when he tells you “No”, you realize why it’s a no.
That’s good supervising right there.
What are some of the important concepts you try to emphasize in your class that you feel students need to learn before going into a studio?
Collaboration and understanding that they’re not just creating a model and then throwing it out there. Whoever is getting the model needs to not have to finish your work. They shouldn’t be fixing your model. I see that happening alot. You’re always gonna get some feedback no matter what. You might have minor changes but I don’t want people sening their model out and somebody has to redo most of the job. I run my class like it’s a studio and the reason I do that is because you want to work in a studio. The quality of topology for animation is really different to topology for games. Here we’re doing topology for animation. This includes subdivisions and using only quads. But if you model for animation to start with and you model everything in quads, your foundation in topology as a modeler once you do games it’s gonna be so much easier. It’s always easier to go from something that perfect and clean to something for games than the opposite. The cleanest modelers in the world come from the era of NURBS because everything needs to be patches and when everything moved to polygons everything stayed super clean
The same thing goes for animation. When you learn animation techniques of topology this will allow you to move into games where you are allowed to do triangles and it will be easy to model.
What’s next for you? Are there any other facets of the industry you want to try out?
I’m always learning by myself. I’m getting more into Unreal right now. I’m building my own art pieces right now, grabbing some design from somebody that I like and then modeling the whole thing in Maya, texturing in Substance and presenting in Unreal with lighting. I think it looks beautiful. What I think is coming in the future is AR and VR. Nobody knows what’s going to become the Metaverse. Someone asked me the other day in a conference “What is the metaverse?” My answer was “Whoever told you what the metaverse is, is lying to you because nobody knows what it’s going to be. It’s going to be something amazing but for now it is not. With the technology getting better you can look forward to the metaverse.
What do you say to those who stop growing and learning?
You need to keep evolving. The industry is evolving so if you don’t evolve with the industry, you’re going to be out of a job. There’s a lot of new things coming out every single day from photogrammetry modeling and procedural modeling. We need to keep learning.
More in person events are coming up, Lightbox expo, CTN, etc. What advice would you give students when it comes to in-person networking?
Things are becoming a little more complicated but you get into the network and mostly if you want to sell your portfolio as a student to other people but companies are getting a little bit picky with showing portfolios and making it harder. It used to be a bit more free. It’s still good to go to those events because you get to know people and show your work so definitely going is a plus. I went to Lightbox instead of CTN and I really liked Lightbox. For students that’s the place to go because you see where the industry is going and you meet other people, you make friends in the industry and other students in other schools.
I use it as an excuse to see friends from other studios that I haven’t seen in years and we go out to dinner too.
Why do you like teaching at AnimSchool?
I like it because they’re serious about what they do. It’s a school that also has a tradition which is good. It’s one of the first ones. You only have to look at the panel of teachers and can see that these people mean business. It’s also legal in a way that everything is accredited. You have other schools that are not really number one. They don’t have the teachers or they don’t have the qualifications. I treat the students with a lot of appreciation and a lot of respect and the school treats me with respect as a professional and not just as a teacher.
We have fun and everything but seriously when we mean business we’re doing a good business. We’re actually teaching people that are actually working now. That makes you feel good. Mutual respect is the key and professionalism that’s number one so for me that’s why.
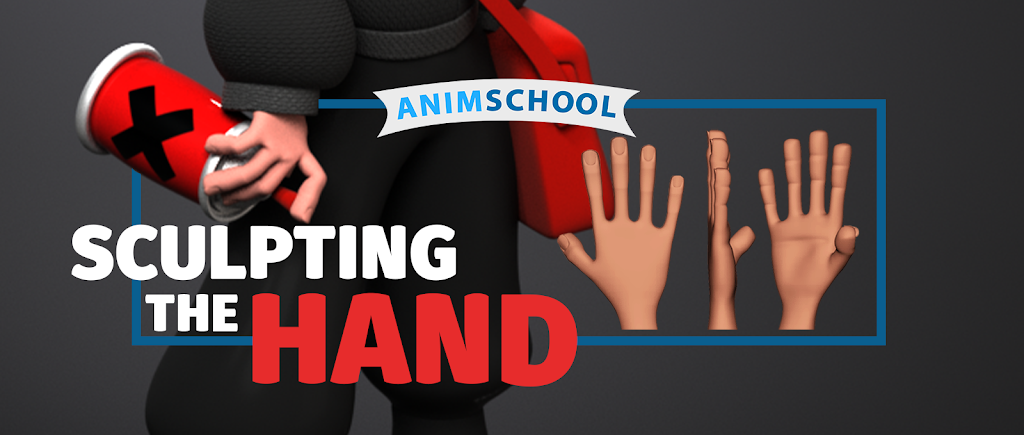
Charles emphasizes the importance of having good reference at hand before starting your model.
Many times during his lectures, Charles references the book “Anatomy for Sculptors” by Uldis Zarins. Many sections of the book can be found in their sample online.
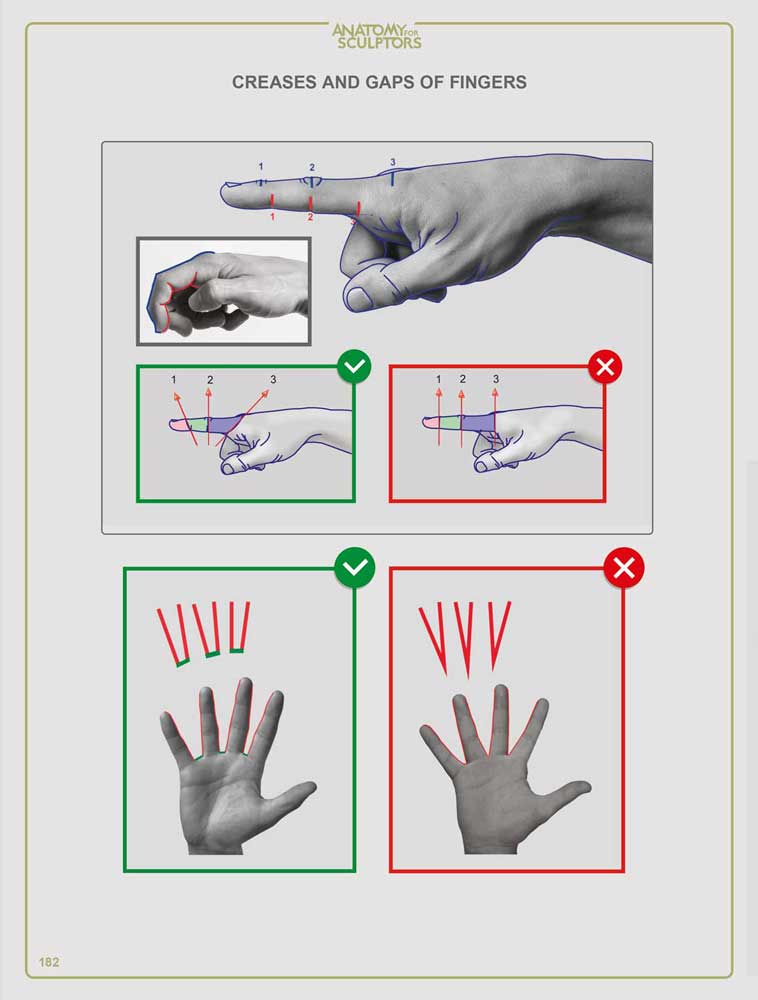
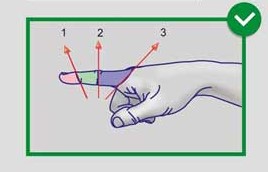
But if all else fails, you can always use your own hands to help guide you in this process.
Just like the human finger print, every hand is unique and has individual characteristics. But fundamental forms and shapes persist.
Notice the way your hand forms a wedge where it meets the fingers. Notice the “V” shape present within the 3 sections that form your finger. Notice how the ring finger and the ring finger are relatively the same size. All these details and more are fundamental to recreating a human hand in 3D space.
Charles shows us the importance of starting simple, getting the shapes and forms correct and adding more definition as you go. This method allows beginners to successfully sculpt a hand from scratch.
As part of the class, Intermediate Modeling/ZBrush, Charles shows students how to create a hand in Zbrush from scratch. Starting from a simple palm and ending to all 5 fingers, please enjoy this condensed clip of his lecture on hands.
At AnimSchool, we teach students who want to make 3D characters move and act. Our instructors are professionals at film and game animation studios like Dreamworks, Pixar, Sony Pictures, Blizzard & Disney.
Our alumni currently enjoy a 92% placement in the industry within 6 months of graduating.
Start your animation journey in our accredited online animation program at animschool.edu (ACCSC)
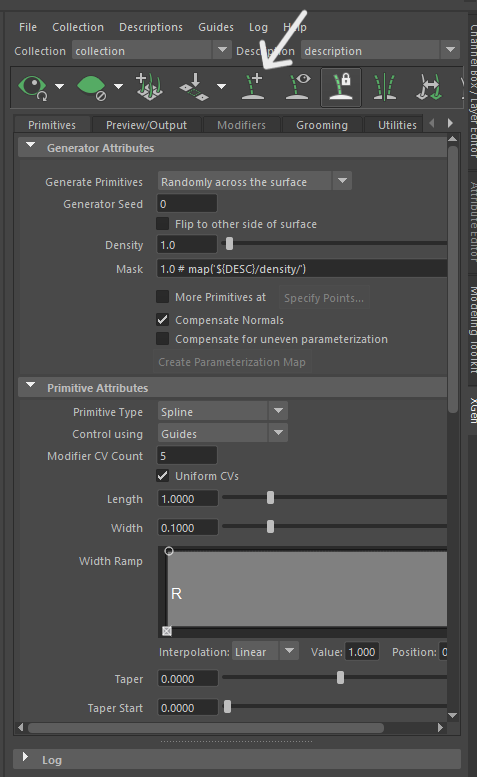
Whether it’s to make grass or hair, XGen is a powerful tool within Maya that can help take your models to the next level. In the tutorial below, AnimSchool Instructor Koji Tsukamoto shows us how to get started in XGen.
XGen can be an intimating tool. A tool that is well known for crashing and not playing nicely with artists.
Getting started with such a tool is a daunting task. With Koji’s guidance, we can get a better grasp of XGen, breaking down his method step by step. Before we pick up with Koji, take a look at the instructions below!
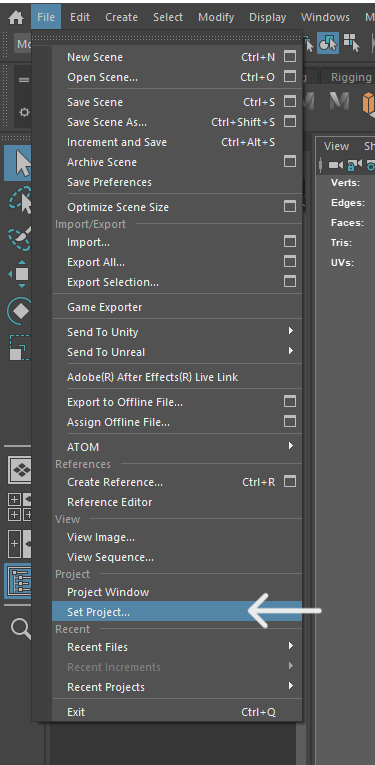
First thing to make sure of, set your Maya project.
Without your Maya project being set, you will have many issues and glitches down the line.
Now you would head on to the XGen Shelf. Where we will then click on the XGen Menu Icon, this will start up XGen within Maya.
Make sure to have your Mesh selected & click on Create New Description.
The description name will be the portion of the head (or other object) that you will be covering with XGen material.
The Collection Name on the other hand is the group of hair types on one object.
For example, a description would be “Back of Head” but the collection would be “Main Hair Style”.
For this tutorial, Koji elects to choose “Splines” for the primitives options in order to have more control over placement.
Go ahead and click Create to get going.
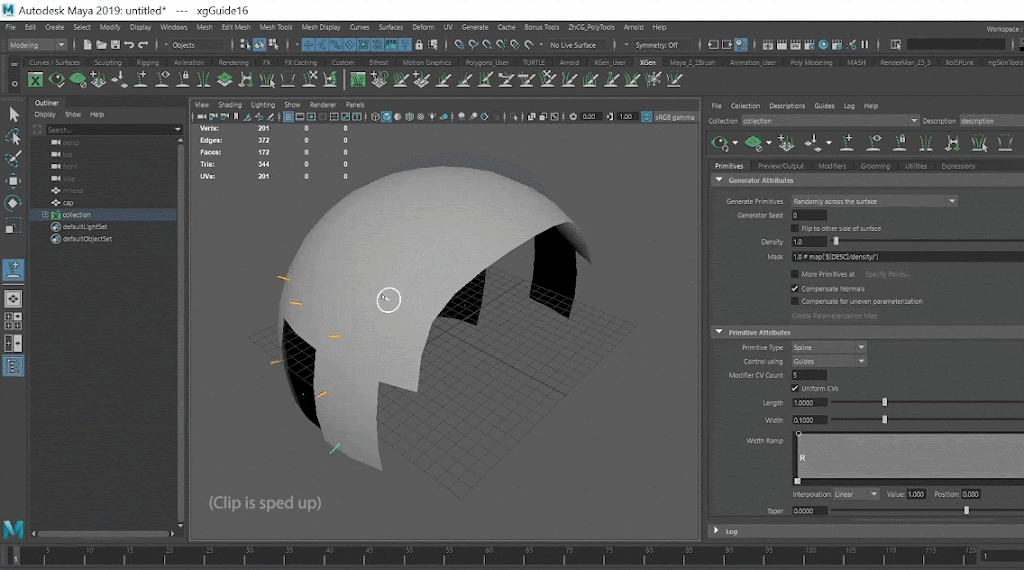
Use the “Add or Move Guides” tool found in the middle of the menu icons.
Start by outlining the object with guides.
Once you’ve done this, now you can move on to using the “Sculpting Guides” Tool in order to have more control over the guides’ flow and positioning
He then goes back to the “Add or Move Guides” tool and places more guides.
As you give XGen more information with the more guides you place and sculpt, XGen will approximate each new guide by averaging out the guides around it. This happens as you place more and more guides on the object.
Right clicking, copying and pasting guides also helps expedite the process.
Watch Koji’s video below for an in-depth look at his technique for XGen.
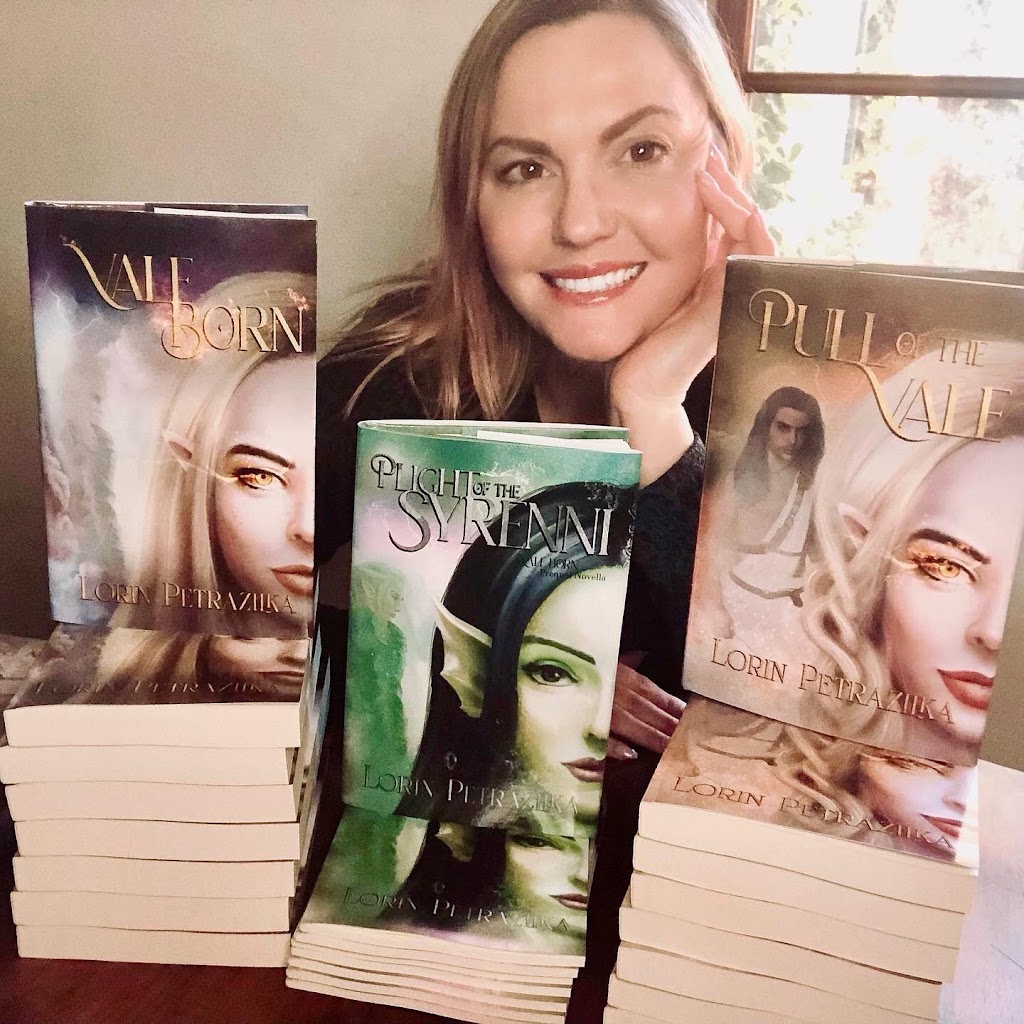
Lorin Z. Pillai is an experienced and accomplished artist who has worked in a variety of roles in the animation and VFX industry. With a background that includes work on big-budget VFX features, commercials, gaming, and animation, Lorin has a diverse set of skills that have helped her succeed in the industry.
Lorin learned VFX, texturing and modeling at Gnomon School of Visual Effects. After graduating, she worked in VFX feature, then quickly transitioned to gaming where she shipped three titles. She then moved on to Nickelodeon for almost four years and then worked at DreamWorks for nearly seven years! Currently, Lorin works at FuseFX as an Asset Lead. She serves as a mentor and committee board member for the organization, Women in Animation.
We recently had the opportunity to speak with Lorin about her experience and journey in various industries she’s been a part of.
Hi Lorin! Tell us about yourself and your journey into the Animation/VFX industry.
I’ve jumped around a lot! My first job was working on a big-budget VFX feature, then I did some short contracts in commercials, onto gaming as an environment artist–which was my intended area of the industry. After a few years and three game titles shipped, I was ready for a new experience. I moved over to animation, between Nickelodeon and then Dreamworks, I had the opportunity to work on hundreds of animated episodes and fourteen shows. I was tremendously fortunate to have a direct hand in creating many of the main characters and sets for some of these shows, as well as leading the look and feel. After ten years in animation, I felt the need for a new experience, I wanted the opportunity to stretch and learn more. I switched over to live-action VFX episodic, and I’ve had the distinct pleasure of working on many shows for Hulu, Disney+, Marvel, and others.
As someone who went to in-person art colleges, can you talk about the pros and cons of doing an online program like AnimSchool compared to traditional universities?
Personally, I lost a lot of time (and gas money) driving to school. And I still had a home system to work on as I couldn’t always be at school. Sometimes teachers could only meet with me when I wasn’t scheduled to be at school, meaning extra unplanned trips. When completing
projects for a reel and finishing classes, time counts. The ability to stay connected while seamlessly switching over from class time to project time (and also not transferring files between my home machine and the school lab also makes a big difference) The main con would be lab access, if a lab at school was empty I could commandeer multiple machines to render out my finished frames.
Who/what are some of your biggest inspirations that influence your work?
Mary Blair is a huge inspiration for me. She was one of the first female artists in animation to really be recognized. Though she was more of a concept artist, she worked in several areas in animation and was one of the first women to be given creative freedom in our industry.
Can you tell a little bit about your experience as a woman in the Animation/VFX industry?
I’ve seen it evolve to be less about my gender over the years. It felt prevalent when it was early in my career, but has seemingly balanced out a lot more.
Lorin discusses more of her experience as a women in the animation industry with ABC 10 News.
Have you seen and/ or experienced a culture shift over the last 10 years with the rise of communities such as “Women in Animation” and “Rise Up Animation”?
I’ve definitely seen and personally experienced it. I was a bit disheartened to see when I first started in the industry that though there were women employed, mainly they filled out the lower ranks. Very few women were in decision-making positions. And it was not evenly balanced either, it was still mainly men. Now there are more opportunities for women, and choices for who moves up in the ranks feels more merit-based overall.
You’re also an award-winning fantasy writer! Tell us a little about this passion as well as why it’s important for working artists to have passion projects.
I always start my term by explaining how I love the art of visual storytelling because that’s
partly what lookdev is. And I love transitioning that to the page! Storytelling in its various forms is a lot of what many of us do in animation. If you’re nearing completion in school, getting that job, or joining that team … may be the biggest, most consuming goal for many of us. After a few years though, it starts to become apparent that we are working on someone else’s ideas many times, which is great! I learn from other visual storytellers, and I’m excited and motivated for the various projects I work on. There are so many talented people I’ve collaborated with. But I also need something that is all mine, my ideas made real, the things I’m interested in exploring. Personal ventures are a great way to keep these skills evolving and growing.
What are some of the most important concepts you try to emphasize in your class that you feel like you didn’t learn in school?
I don’t remember it really being discussed how critical the note process is in production when I was in school. Learning how to receive notes, and how to listen objectively, it’s not easy by any stretch but I like to encourage learning how to navigate it early on. It’s a production mindset that is applicable regardless of the exact spot you fall in asset development.
What was the most unexpected thing you encountered when going from being a student to working professionally at a studio?
How much I thought I knew, versus how much I did know. For instance, I didn’t understand how important pipeline was, I couldn’t completely wrap my head around that until I was actually thrown into it. The importance of file formats, version continuity, save locations, etc. The understanding of what it took to work in a production took some time to learn once I started working.
How do you think working in the industry will be in the future, post-COVID, especially now that companies are being encouraged to go back to business as usual?
Since WFH has proven successful, it is opening the door for more remote work, so though studios are opening back up, a hybrid situation is currently going on. People are contracting to
remain remote for the duration of their project, which is great if moving is not an option. It does seem like even for the studios that are opening, most employees only work 2 or 3 days in the office, the rest are from home.
What are some of your favorite activities to do when you need a break from animating and looking at screens?
Going for a walk or run. Fresh air and letting my eyes get assaulted by the sun (just kidding, definitely wear sunglasses and protect those peepers!) But really, getting outside and getting some exercise.
What is your favorite asset you’ve worked on that’s in your portfolio today?
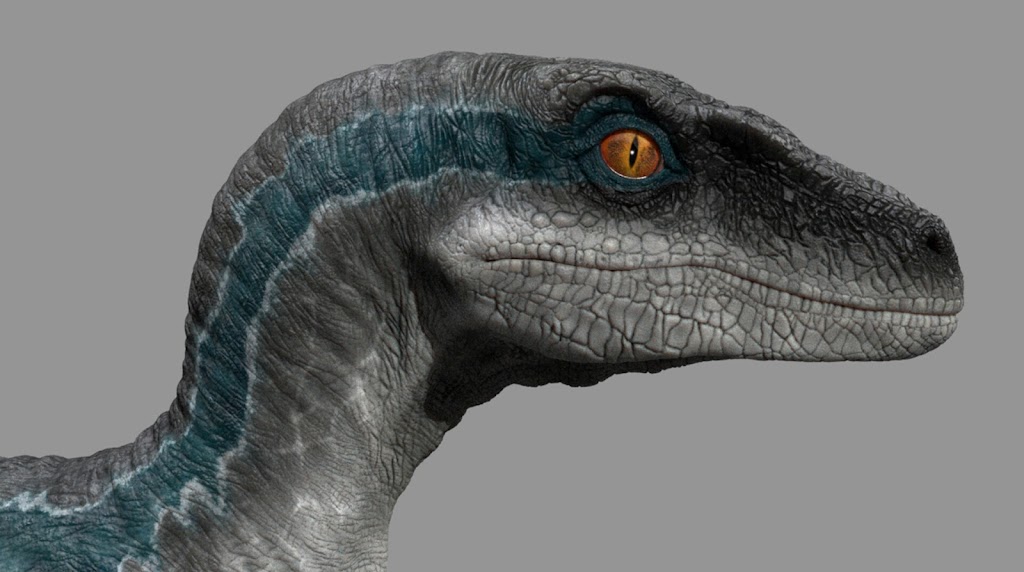
The Jurassic World Raptors. They represent what is to me the epitome of being a production artist, back and forth with ingesting notes from executives, trying out different iterations for months to land on an approved look. In the end, the final look was sent to Steven Spielberg for his approval. That was a pretty big win in my book, and I was so proud of how they turned out!
You start your lectures with brief professional advice, so by the end of the course, your students have heard about 10 pieces of important advice. If you could pick your favorite piece of advice, which would it be?
I talk a lot about notes, I have 3 different related Business Advice segments about notes, and
pretty much they all culminate in taking notes from your supervisor. It’s probably the best advice I can give artists on how they can continue to be successful in production. Taking notes openly, not arguing them or fighting them, and seeing the “needs of the show” rather than their own feelings about an asset is probably what will do the most for their longevity on a team.
What’s next for you? Are there any other facets of Animation/VFX you want to try out?
I think to stay inspired and fresh, I’ll always bounce around. It’s been exciting to transition from animation to VFX episodic, I’ve worked on a ton of high-budget shows because of it! I don’t know exactly what I’ll do next, because opportunities are always changing and different sectors flourish at different times, keeping my options open will probably mean I’ll potentially do something interesting and different. Maybe I’ll combine my knowledge of games and Unreal with animation, and venture down a real-time or virtual production opportunity. Time will tell!
Sign up today to learn from industry-leading CG Artists like Lorin in our online accredited courses (ACCSC). Apply today at animschool.edu . She is currently teaching Materials and Texturing.