Month: January 2025

Push Your Animation Poses

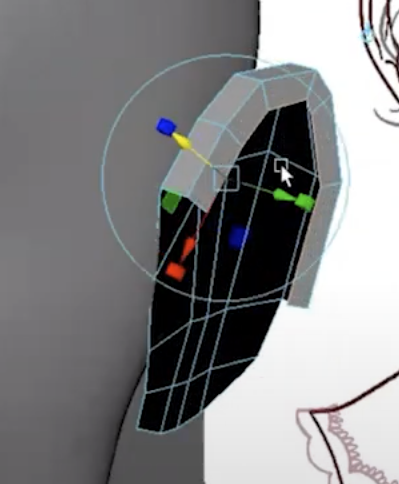
Creating clear and dynamic poses is essential to conveying character and emotion. In this clip from a live AnimSchool lecture, instructor Garrett Shikuma demonstrates how to move away from rotoscoping video reference and push the character’s silhouette and line of action to be better than the reference. He also emphasizes the importance of remembering to make intentional acting decisions while posing the character.

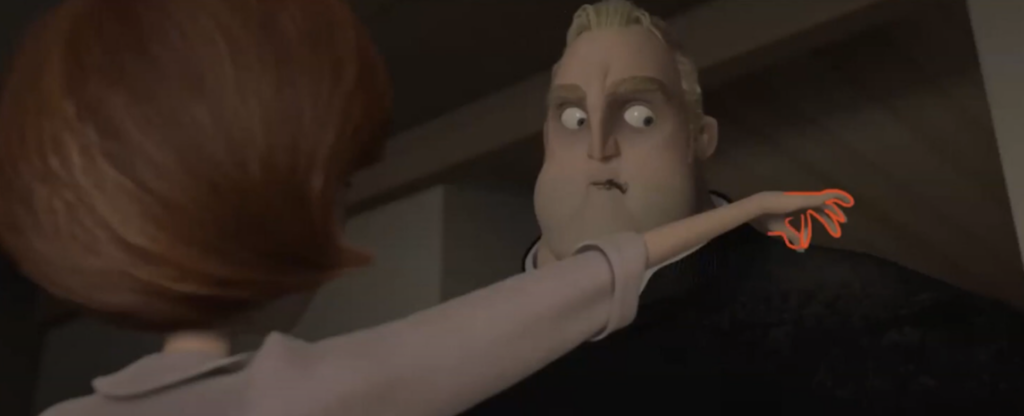
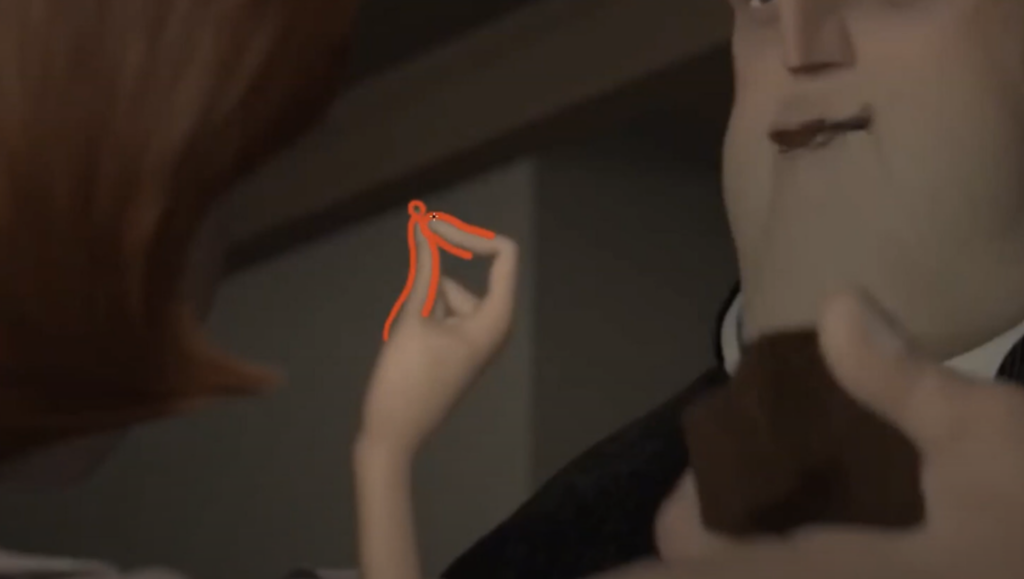
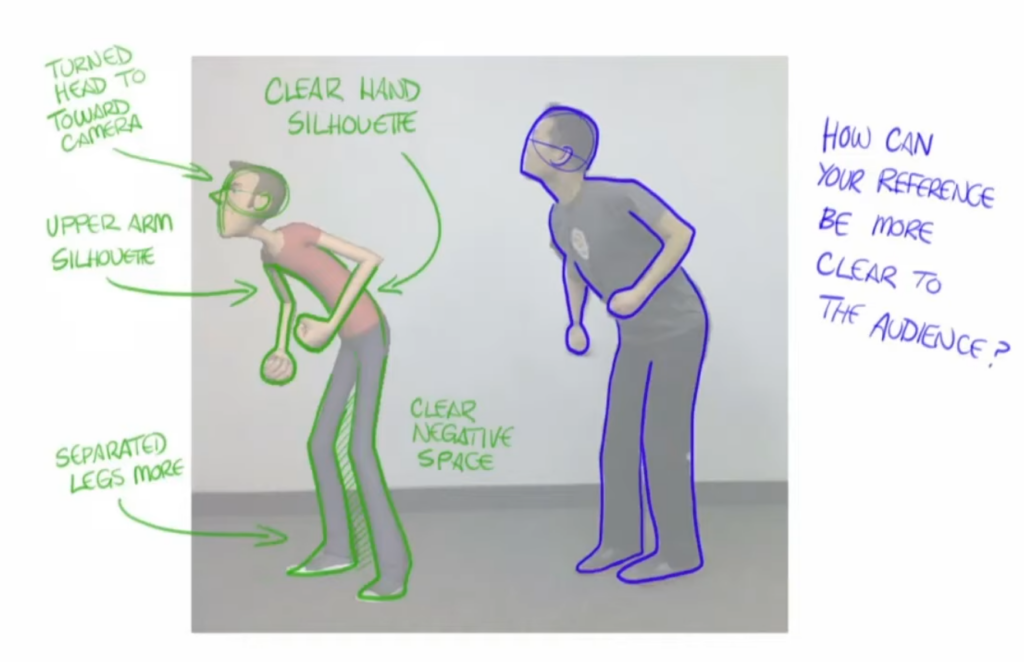
When refining poses and moving beyond rotoscoping, one critical element is improving the silhouette. A pose can be adjusted to make limbs and the body more distinguishable—particularly by adjusting the position of hands or arms that might otherwise get lost within the character’s body. Equally important is the angle of the character’s head. The way the character is positioned relative to the camera should communicate the right emotions and make it easy for the audience to read the character’s intentions. The right head tilt can direct the audience’s attention and set the tone for the scene.

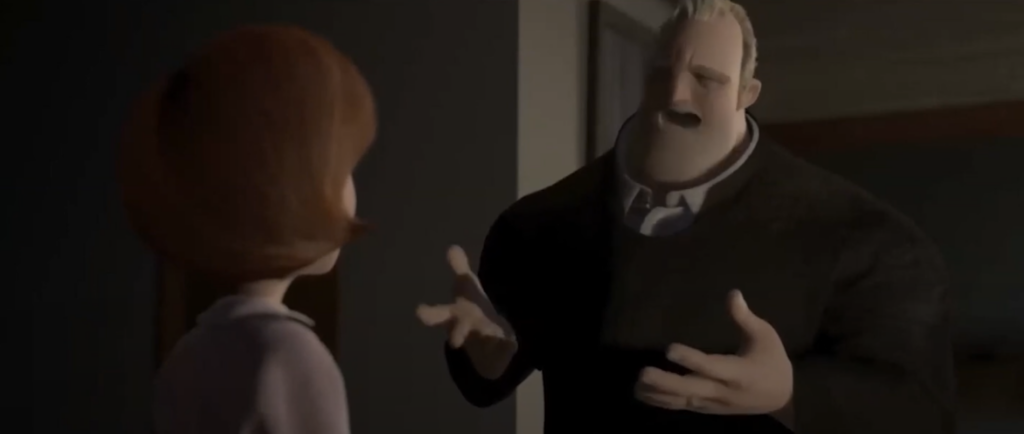
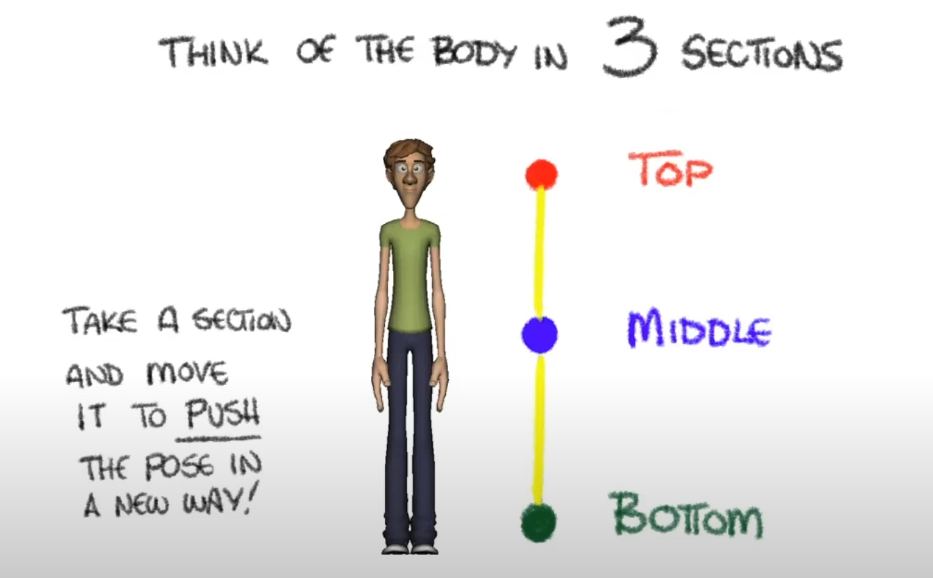
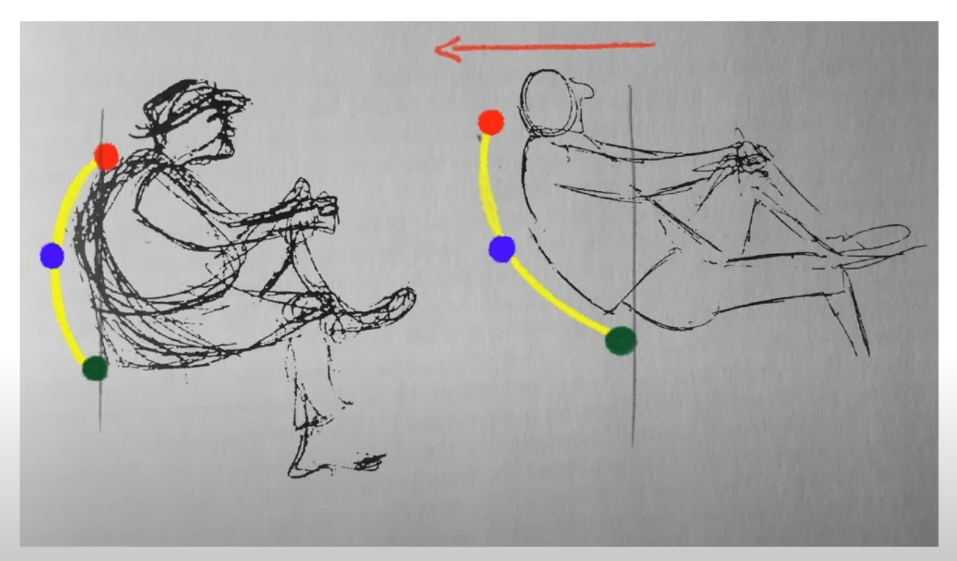
Shikuma also touches on breaking a character’s body into three zones: top, middle, and bottom. By shifting these parts intentionally, animators can emphasize certain actions. For example, pushing the head or torso to imply a character’s internal state, like anticipation or conflict, can transform an otherwise static pose into one with deeper meaning.

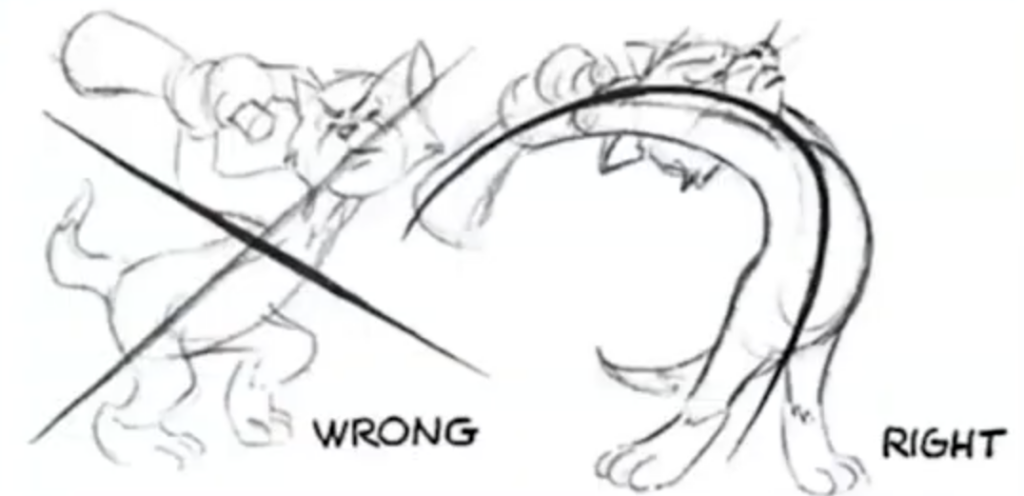
From Walt Stanchfield’s Drawn to Life series

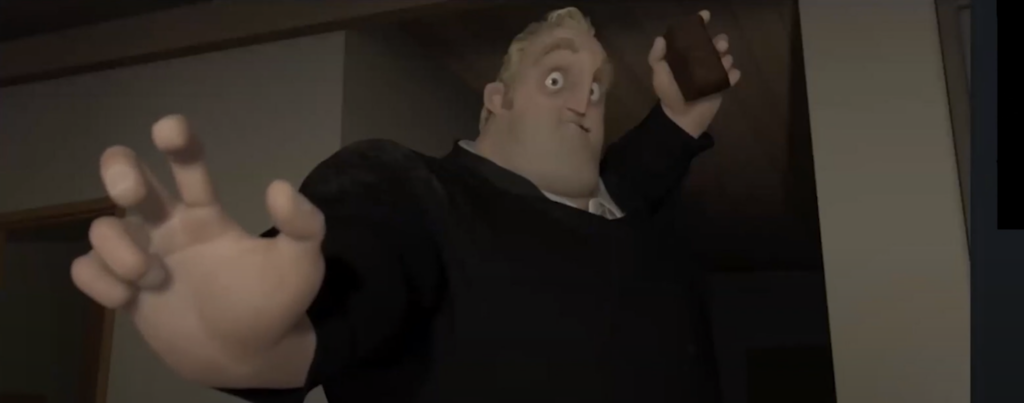
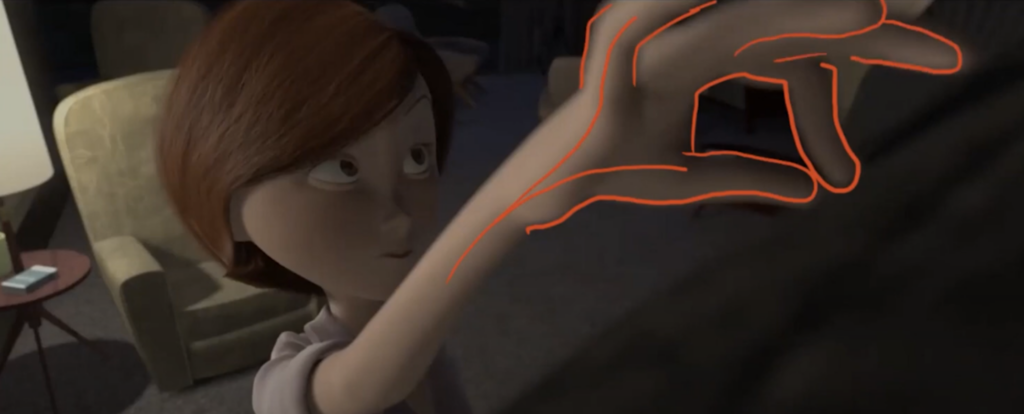
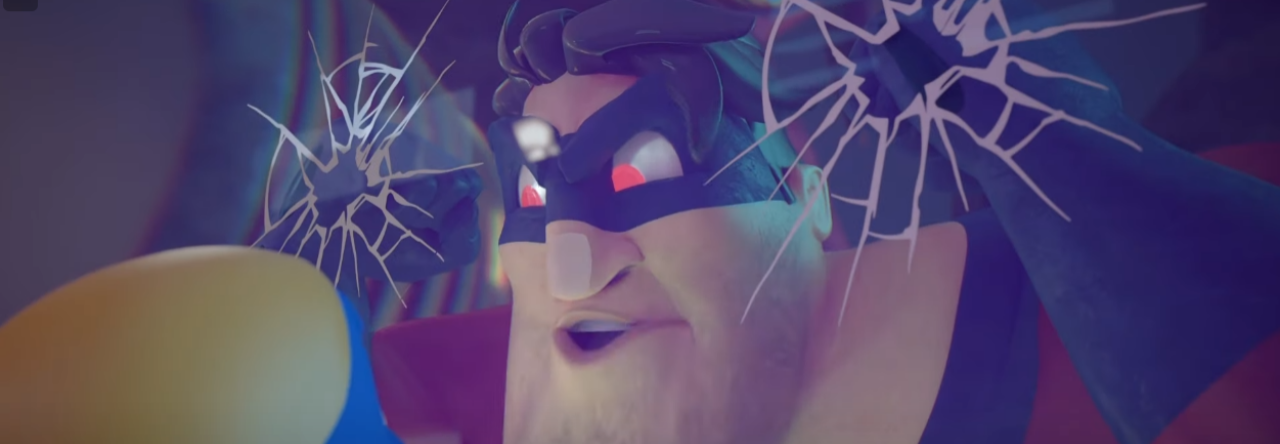
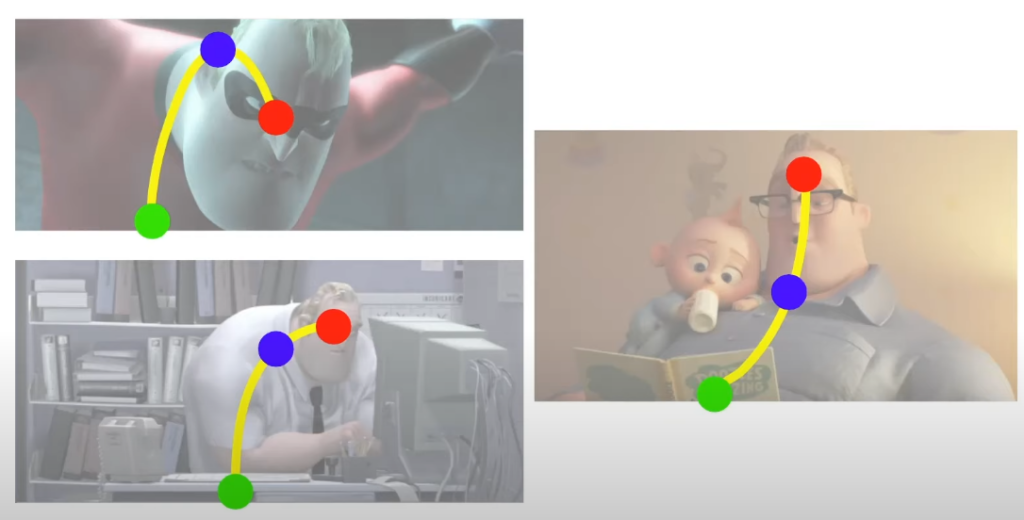
This principle also extends beyond full-body poses. In close-up shots, the same “push and pull” method can apply to minor movements, like a character’s head tilt or subtle gestures. For instance, in The Incredibles 2, Mr. Incredible’s poses are minimal yet powerful. While his body remains relatively still, small movements, such as a slight head nod, hold significant weight, which adds a layer of emotional depth to his character’s journey.

Ultimately, when designing poses, the goal is always to improve clarity, silhouette, and line of action, ensuring that each pose communicates exactly what the character is feeling or about to do. By pushing poses thoughtfully, animators can enhance not only the visual appeal of their work but also the emotional resonance it delivers to the audience.


Watch the full clip from an AnimSchool lecture here: 

At AnimSchool, we teach students who want to make 3D characters move and act. Our instructors are professionals at film and game animation studios like Dreamworks, Pixar, Sony Pictures, Blizzard & Disney. ⁠Get LIVE feedback on your Animation from the pros. Learn more at https://animschool.edu/

Adding Stiches in Substance Painter

Substance Painter can be a daunting program to learn, but it is a very rewarding one. The power of Substance Painter lies in the amount of details one can paint on. Adding details like stitches can give the model the final touch it needed to bring it all together. In this snippet from a live class taught by AnimSchool Instructor Lorin Z. Pillai, learn about painting on stitches. Adding stitching details to digital textures can be time-consuming, but the Auto-Stitch feature in Substance Painter helps make the process much faster.

Auto-Stitch

Start by creating a black fill layer with a black mask, then apply the Auto-Stitch generator. Auto-Stitch will automatically place stitches according to your UV layout. If you don’t want stitches in specific areas, simply mask them out. This makes it easy to handle areas like sleeves or shoulders where different parts of a garment or texture might meet.

Customizing Stitches

Once the stitches are in place, you can customize their look. The Auto-Stitch feature lets you adjust the stitch path, distance from seams, and even the stitch size. For larger stitches or panel lines, you can increase the stitch length. This is great for creating a more prominent stitch that mimics a thick, reinforced line. Additionally, you can adjust other properties, like roughness or height, to control the appearance of your stitches. For example, increasing roughness will give the stitches a less shiny, more realistic appearance. If you want to tweak the lighting on the stitches, modifying the height will help you control how much light the stitches reflect.

For more precise control, you can use a paint layer to add hand-placed stitches. When doing this, be mindful of the layer settings. Once stitches are applied, they become part of that layer and cannot be edited directly in terms of size or shape afterward, so it’s best to work on a temporary layer for adjustments.

Stitch Brushes

To have even more detailed control over your stitching, use the brush palette to select specialized stitch brushes. These brushes offer additional settings, such as the ability to simulate punctures or seams, adding even more realism to your design. However, like the Auto-Stitch, once these stitches are painted down, they’re fixed to that layer.

Be prepared to adjust your settings repeatedly, as finding the perfect stitch type and configuration may take some time. You can also use the Lazy Mouse feature to smooth out your strokes and maintain consistent stitching across your texture. While editing settings might take some trial and error, combining these brushes with Auto-Stitch offers a highly efficient way to add stitching to your designs.


Watch the full clip from an AnimSchool lecture here: 

At AnimSchool, we teach students who want to make 3D characters move and act. Our instructors are professionals at film and game animation studios like Dreamworks, Pixar, Sony Pictures, Blizzard & Disney. ⁠Get LIVE feedback on your Animation from the pros. Learn more at https://animschool.edu/

Blog cover image credit: Niles Thiselton

Modeling the Ear

When approaching a big modeling task, the big picture may become so overwhelming that it becomes difficult to remember how to break down a model into smaller parts. By slowing down and approaching a character model as the sum of its parts, as opposed to an all-encompassing project, we are able to set ourselves up to succeed. In this lecture taught by AnimSchool instructor Emilie Austin, we approach a small feature in a character model, the ear. Modeling an ear in 3D can be one of the trickiest aspects of character design. The ear’s unique shape, curves, and intricate details can pose challenges for even experienced artists. Emilie demonstrates how with careful planning, great reference, and patience we are able to break down this complicated shape into a manageable and approachable task, focusing on key techniques for creating a realistic and functional ear. Such a technique is applicable not only to the ear, but any modeling task at hand.

Start with the Basics: The Plane

Begin by creating a simple plane to use as your starting geometry. This is the foundation for shaping the ear. Instead of extruding the geometry from the head, which can create messy topology, it’s better to model the ear separately and merge it into the head later. This method avoids disrupting the face geometry and ensures that both the head and ear can be worked on individually for precision. Block out the basic shape of the ear from the side view, then move the plane into the desired position and adjust the orientation as needed.

Extruding the Ear’s Structure

With the base shape established, start extruding parts of the ear to give it depth. The back of the ear is crucial to define early on, so pay attention to its curvature and the way it wraps around the head. As you extrude, focus on the ear’s thickness and how it gradually tapers at different points. Add edge loops as necessary to preserve the ear’s form and detail.

Shaping and Refining Details

As you continue to extrude and adjust the topology, take time to refine the ear’s unique features, like its folds and curves. Ears have many subtle shapes that contribute to their realistic appearance, such as the helix and the concha. In many 3D programs, you can slide edges and vertices to manipulate these areas more efficiently. Don’t forget to constantly check your reference images to ensure accuracy.

Final Adjustments and Optimization

Once you’ve blocked out the main structure of the ear, continue refining it by adding details like the inner ear folds and adjusting areas where the geometry is too thin or too thick. Afterward, check the ear’s alignment with the head and adjust the angles as needed.

It’s perfectly fine if your model initially contains some triangles. These will be hidden in areas where they aren’t visible, such as the interior of the ear, which doesn’t need to be highly detailed. Finally, add a few holding edges to reinforce curves and make sure the ear transitions smoothly with the rest of the character’s face.

Modeling an ear in 3D may seem daunting, but breaking it down into steps—blocking out the shape, extruding to form depth, and refining details—makes the process manageable. With practice, you’ll be able to model ears quickly and efficiently, whether you’re designing realistic characters or stylized ones for animation and games.


Watch the full clip from an AnimSchool lecture here: 

At AnimSchool, we teach students who want to make 3D characters move and act. Our instructors are professionals at film and game animation studios like Dreamworks, Pixar, Sony Pictures, Blizzard & Disney. ⁠Get LIVE feedback on your Animation from the pros. Learn more at https://animschool.edu/

Handling Hands in Animation

Animating a new shot can be an incredibly daunting task. Not only do you have to figure out your staging, your poses, and your story, but in order to have a truly successful shot, you need to find your rhythm. What does rhythm have to do with animation?

Rhythm is how an animator can find drama and excitement in the smallest of actions. It is how emotion and movement can create tension or stillness. By using contrasting beats and a variation of rhythm to guide your character, the viewer is able to follow your characters seamlessly through their story. But how? There is no one way to show rhythm in animation but a great place to look is in body language and in the movement of the hands.

In this lecture, Animschool Instructor Brendan Kirschbaum uses feature film animation to demonstrate the successful use of rhythm to animate the smallest details of the hands. In his frame-by-frame analysis of The Incredibles, he dives past the scene audiences know and love to the complex and detailed rhythmic animation underneath.


The use of hands and body language helps build character identity and bring moments to life. In a particular scene from The Incredibles, Bob is shown entering the scene very casually and relaxed before being surprised by his wife and snapping into a surprised, ninja-like pose. His hands are used to support his poses and punctuate the scene to reveal aspects of his mindset. A seemingly simple gesture, like the way a hand rests or moves, can reveal a lot about how a character is feeling—whether relaxed, intense, or sarcastic.

Later on in the same scene, Helen makes a point to pick something small up from Bob’s clothing. The placement of her fingers in specific poses is deliberately designed to not only draw the viewer’s attention, but also create visually appealing shapes, making the character’s gestures feel more intentional and expressive. Small changes—such as separating a finger or slightly bending a hand—can drastically improve the appeal of a pose and make the gesture more believable.

As Bob and Helen continue to converse, Bob employs a subtle finger spread on the word “fire” to emphasize the seriousness of the situation. Albeit short, taking place over the course of just three to four frames, it accentuates the moment. Similar hand gestures are used throughout to highlight key points and convey nuanced emotions without overwhelming the overall scene – the balance here is crucial, as the overuse of hand gestures can create an unnatural feeling.

Ultimately, hands in animation are not just tools for communication—they are extensions of the character themselves. Whether used to express sarcasm, highlight a dramatic moment, or reveal a character’s inner world, the hands add complexity to animated performances, making them one of the most important elements in conveying story and emotion.


Watch the full clip from an AnimSchool lecture here: 

At AnimSchool, we teach students who want to make 3D characters move and act. Our instructors are professionals at film and game animation studios like Dreamworks, Pixar, Sony Pictures, Blizzard & Disney. ⁠Get LIVE feedback on your Animation from the pros. Learn more at https://animschool.edu/

What Makes an Appealing Pose?

When your shot begins, you have an extremely limited amount of time to introduce your character to the viewer. The first time your viewer sees a character in front of them, they will immediately start to pick up small nuanced details that not only describe your character, but also how they fit into the story. Are they nervous, excited, scared, or calm? It only takes one clear and defined pose to place a character in your story. In this lecture, AnimSchool instructor Brendan Kirschbaum demonstrates how clear posing through Line of Action can be used to silhouette and place a character in a scene. By having a clean and strong line of action you not only show where your character is going, but where they have been. The ability to provide as much information as possible in a single moment not only allows your animations to look good, but also establishes your character in a story and allows the viewer to step into the moment and immerse themselves in a new world.

Before you start posing your character, consider some questions that will help you determine their motivation within the scene and inform your decisions:

  • Who is your character?
  • What are they thinking in this moment?
  • What is the context?
  • Is the subtext of the scene clear?

A crucial principle is the Line of Action, or the flow of energy in a pose. It serves as a guide for the viewer’s eye, directing their attention to the most important part of the image and creating clarity. A well-established line of action ensures that the character’s movement or intention is easily understood even without motion.

Consider these two poses of Tom. In the first, the pose is chaotic and confusing. The angles of his limbs are disjointed, and there’s no clear direction for the viewer’s eye to follow. In contrast, the second pose has a smooth, flowing line of action starting from his toe, moving up his leg, through his body, and to the tip of his newspaper. This clear line makes it easy for the viewer to anticipate what Tom is about to do, adding excitement and direction to the shot.


The Line of Action gives information about direction of force. Subtle cues within the pose allow the audience to understand the physical dynamics at play, even without additional animation or motion. A character’s posture, the orientation of their body, and the direction of their gaze all inform the viewer about the action, giving them a sense of movement and anticipation.

In The Incredibles, we can tell that Mr. Incredible is exerting force on a machine because his pose is fully extended, and the line of action clearly communicates the direction of that force. Similarly, in another scene from The Incredibles 2, Violet is pushed up against a wall, and we can see the direction of the force applied to her, as indicated by her body’s response and the motion of her hair.


The Line of Action can also tell us a lot about the relationship between characters and the emotions at play.

In the scene from Coraline, the mother’s posture dominates the frame, towering over Coraline with a threatening, predatory air. The mother’s higher position makes her seem more in control, while the sharp angle of her arm encroaching on Coraline reinforces her menacing nature. Coraline, on the other hand, is hunched in the corner of the frame, feeling small and vulnerable in contrast to the looming presence of her mother.

This interaction is not only expressed through the characters’ physical placement but through the subtext of their poses. The mother’s spider-like form creates an unsettling feeling, emphasizing her sinister role in the story. The way each character is positioned in relation to the other speaks volumes about their emotional states and the power dynamics between them.

Posing in animation is a powerful storytelling tool. Through line of action, animators can convey force, emotion, and character relationships in a single frame, making it a crucial element in bringing a story to life.


Watch the full clip from an AnimSchool lecture here: 

At AnimSchool, we teach students who want to make 3D characters move and act. Our instructors are professionals at film and game animation studios like Dreamworks, Pixar, Sony Pictures, Blizzard & Disney. ⁠Get LIVE feedback on your Animation from the pros. Learn more at https://animschool.edu/