Month: April 2024

3D Head Modeling Topology & Techniques

Establishing good practices in 3D modeling is crucial to ensure that the model deforms correctly during animation, allowing for smooth and natural movements of characters or objects. Additionally, clean topology facilitates easier modification and editing of the model, enabling artists to iterate quickly and make adjustments as needed. It not only improves the visual quality of the model but also streamlines the entire production process, making it an essential aspect of professional 3D modeling.

AnimSchool instructor Jackie Marion shows how she gets started in creating new 3D character models and discusses the workflow of a production modeler.


Creating a Head: The Forms
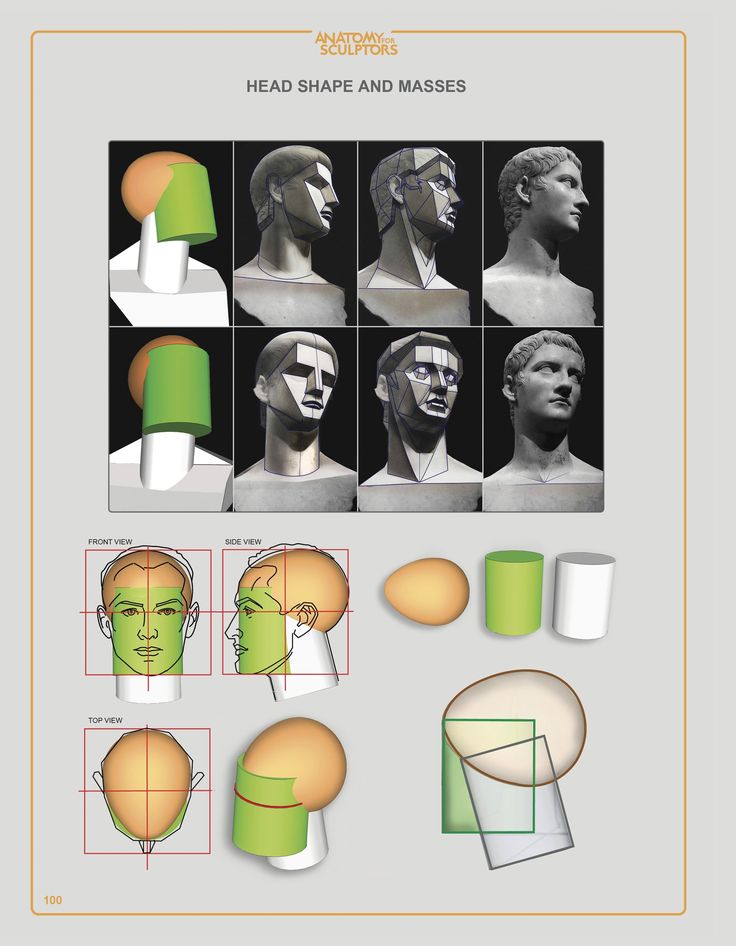
When modeling a head, consider what different forms make up the overall shape of the head. Jackie advises against starting with a sphere – though it may be your initial instinct to start with a sphere, the grid-like topology and edge flow of a basic sphere primitive in Maya will work against the design of a face.

The head is typically much more than a sphere (though some stylized characters can have a very spherical head). Generally, the top of the head is egg-shaped, while the face and neck areas can be formed with cylinders.

Start Modeling
When patch modeling a head, Jackie explains that she starts with a plane (subdivisions width 2, height 1). This plane has an edge running down the center which will allow her to maintain symmetry across the X axis as she extrudes new faces and edges from the plane. She typically places the plane somewhere near the center of the face, such as along the bridge of the nose, and then starts to extrude new segments that follow the form and contour of the face.
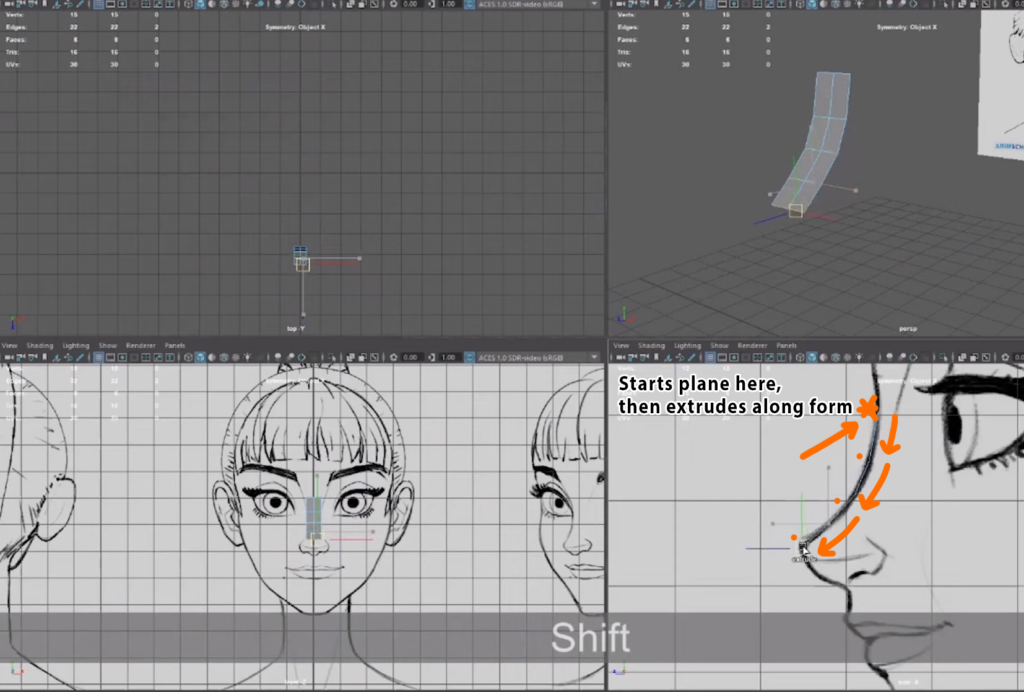
Jackie recommends to find a good rhythm as you place new sections – don’t go so far apart that you lose the form, but also don’t go too close together that you end up with too many edges and too much detail. Once she has formed a basic frame that wraps around the form of the head, she uses Fill Hole to start closing the gaps. 
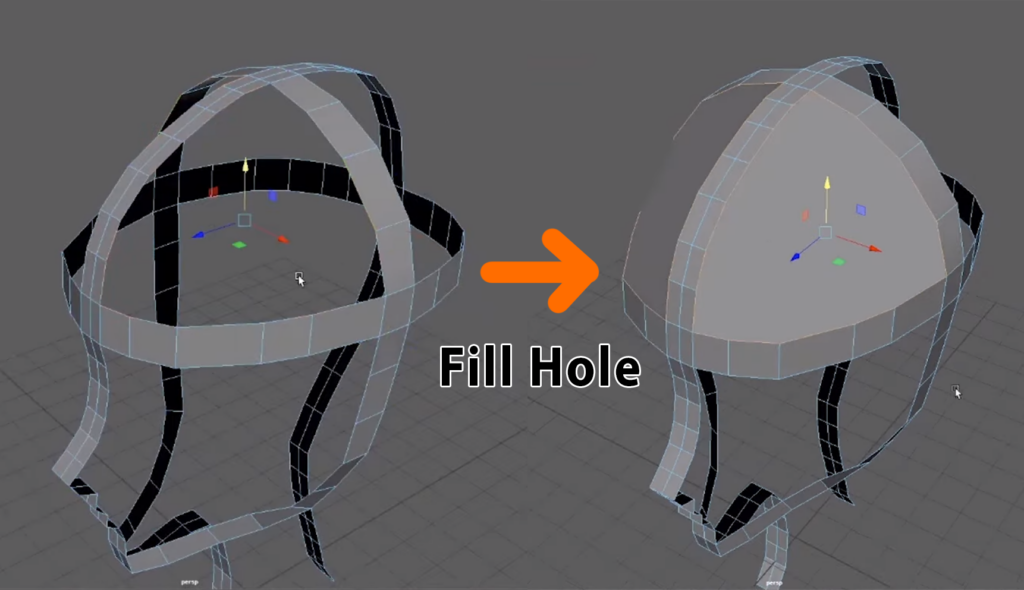
There are various alternative methods to closing these gaps, such as extruding the inner edges or using the Append tool, but Jackie mentions that she prefers to use Fill Hole so that she can add in the topology and edge flow afterwards with the Multi-Cut tool.

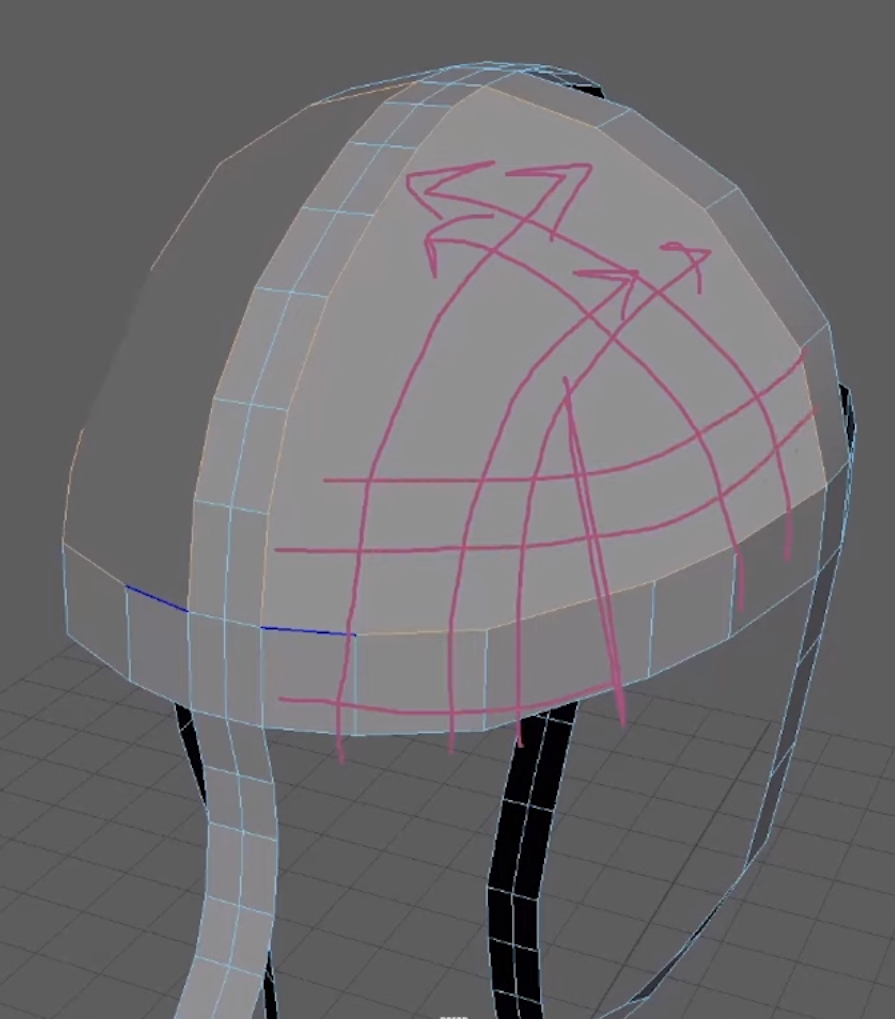
Jackie explains that the “rule” to follow here is to determine where the “corner” is, and build your edge flow from that. For instance, all edges on the left and in front of the corner might flow towards the back, while edges on the right and behind the corner might flow up and towards the left. Once you have established the rule for your own models, you can apply it to the other sections as well.
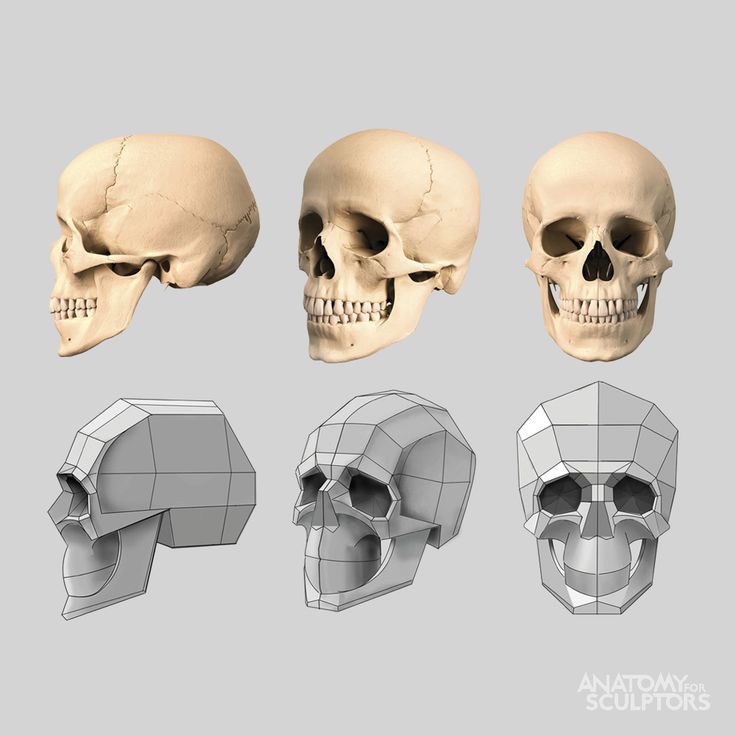
When building out the form of the face, remember that, even though you are only making the exterior “shell,” there is anatomy underneath that is informing the shapes you are building. This is what will help you achieve a realistic and believable look.
Watch the full snippet from an AnimSchool class lecture here:

At AnimSchool, we teach students who want to make 3D characters move and act. Our instructors are professionals at film and game animation studios like Dreamworks, Pixar, Sony Pictures, Blizzard & Disney. ⁠Get LIVE feedback on your Animation from the pros. 
Learn more at https://animschool.edu/

Follow Through and Overlap: Animation Tips

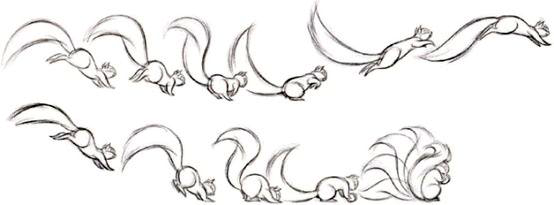
Follow through and overlap are essential principles in animation, adding depth, realism, and fluidity to movement. These techniques not only enhance the visual appeal of animations but also convey a sense of weight, mass, and physics, making the animation more believable and engaging to the audience. Mastering follow-through and overlap empowers animators to breathe life into their creations, elevating the art form to new levels of expression and immersion.

Pro Animator and AnimSchool instructor Philip Hall explains these concepts and how they are used in animation to break up movements.


Key Concepts:

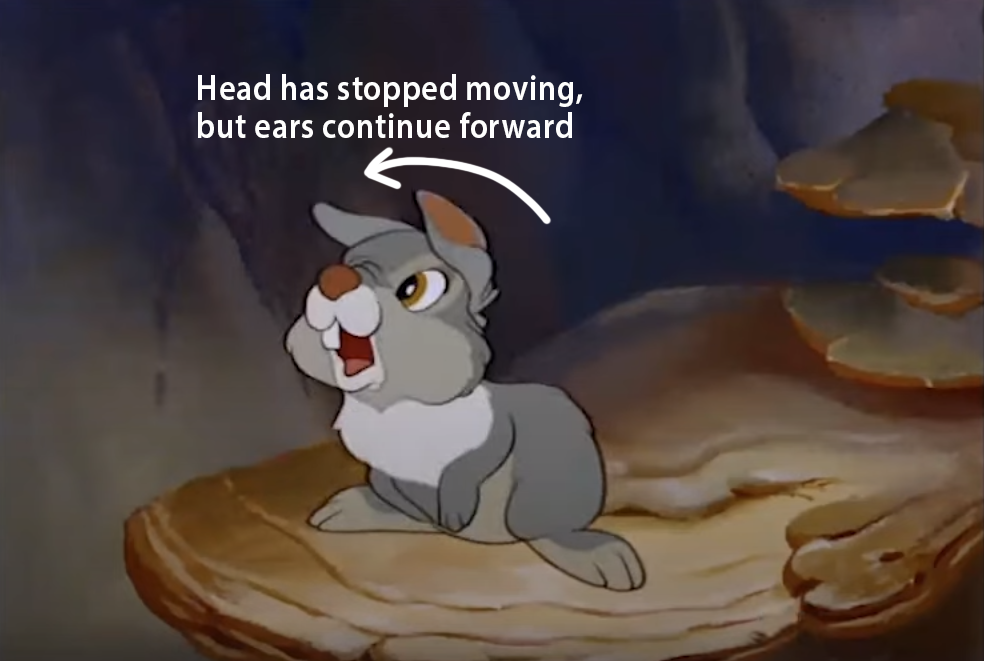
  • Follow Through: Separate parts of a body or object will continue to move after the action has been completed, or after the body has come to a stop
    • Example: When throwing a ball, your arm continues to move after the ball has left your hand; swinging the arm “through” the ball
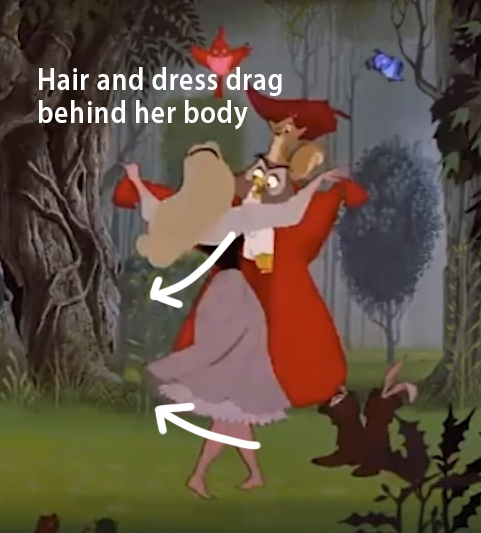
  • Drag: Parts of a character or object trail behind in an action
    • Example: Flowing fabric or hair will trail behind the body/head
  • Lead & Follow: One section of the body goes first, and another section of the body goes after until all parts of the body have arrived at the next pose
    • Example: Getting up from laying down – the head might lead the action, then the rest of the body follows in an arc
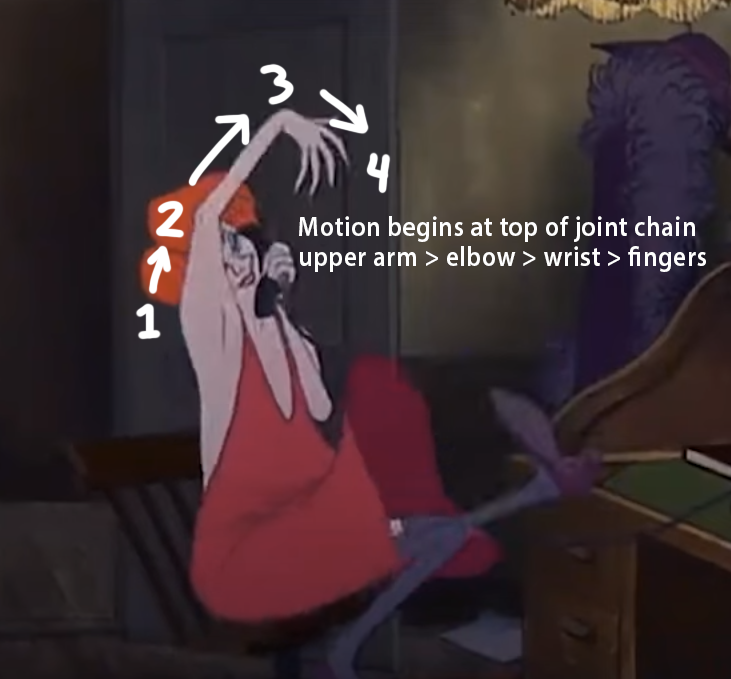
  • Successive Breaking of Joints: As one object leads an action the successive joints bend or “break” in the opposite direction; Joint 1 breaks, then Joint 2, then Joint 3…
    • Example: When raising an arm, you might lead with the upper arm, then elbow, then wrist, then fingers

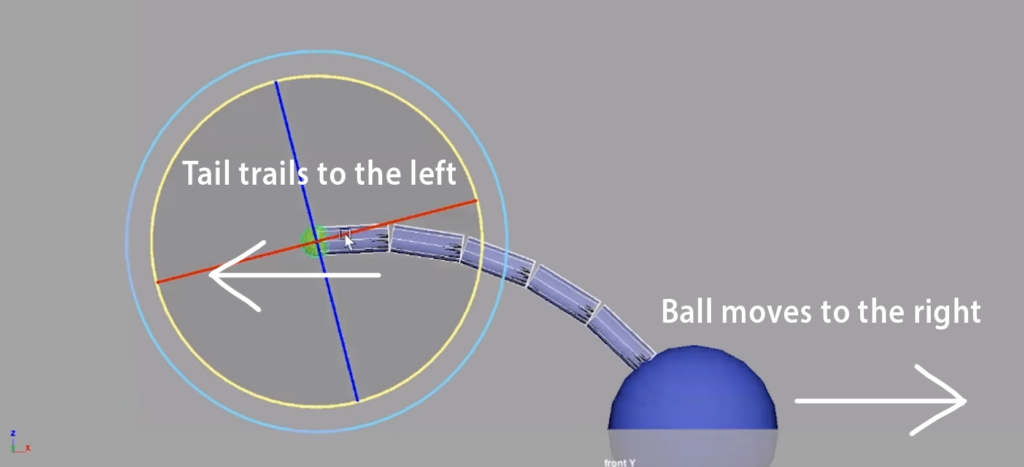
Philip demonstrates the concept of follow through with a ball and “tail” rig, showing how the tail drags behind the movement of the ball as it moves forward and hits an invisible wall. Once stopped, the back-and-forth movement of the tail is likened to the repetitive motion of a door stopper when flicked.

Watch the full snippet from an AnimSchool lecture here:

At AnimSchool, we teach students who want to make 3D characters move and act. Our instructors are professionals at film and game animation studios like Dreamworks, Pixar, Sony Pictures, Blizzard & Disney. ⁠Get LIVE feedback on your Animation from the pros. 
Learn more at https://animschool.edu/
The Key Poses of a Run Cycle

Disney Animation Supervisor and AnimSchool Instructor Angelo Sta Catalina shares his best tips on animating a run cycle.

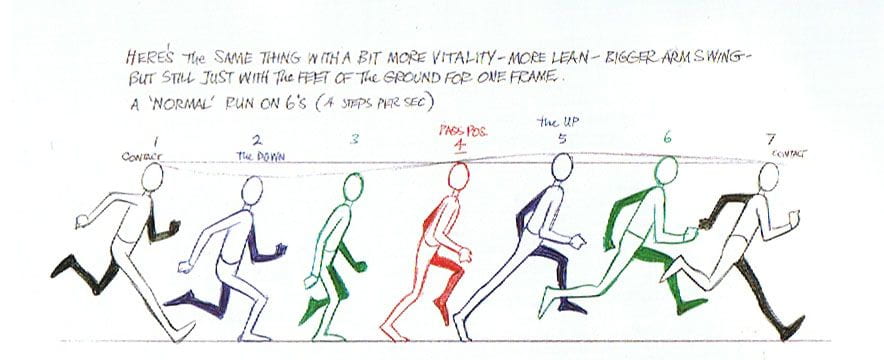
In this snippet from an AnimShool class lecture, Angelo discusses the key poses and principles that make a run cycle come to life. Angelo breaks down key poses including the contact, down, push, and peak, providing valuable tips for naturalistic and stylized runs while preserving the core principles of body mechanics.

A run cycle shares many poses with a walk cycle, which typically consists of a contact pose, down, passing, up, and back to the contact pose. However, there are some crucial differences – in a run, the character is in the air for longer than they would be for a walk, resulting in some different key poses.


Run Cycle Key Poses

Contact > Down > Push > Peak > Contact

Contact: Front foot (typically heel) makes contact with the ground
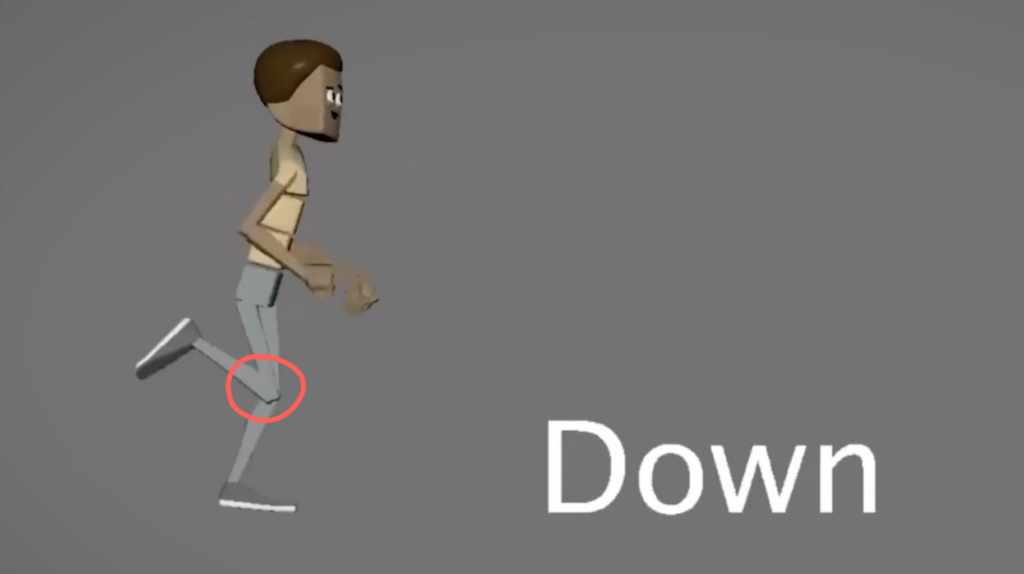
Down: Lowest, most “squashed” pose; the leg in contact with ground is bent
Push: Starting to “push” off into the air; in some cases, this pose may already be fully in the air
Peak: Highest pose; character is fully in the air, and knees generally stay still from previous pose


Reality vs. Exaggeration

When creating your poses and observing them in your reference(s), think about how exaggerated or realistic you want the run cycle to be. 

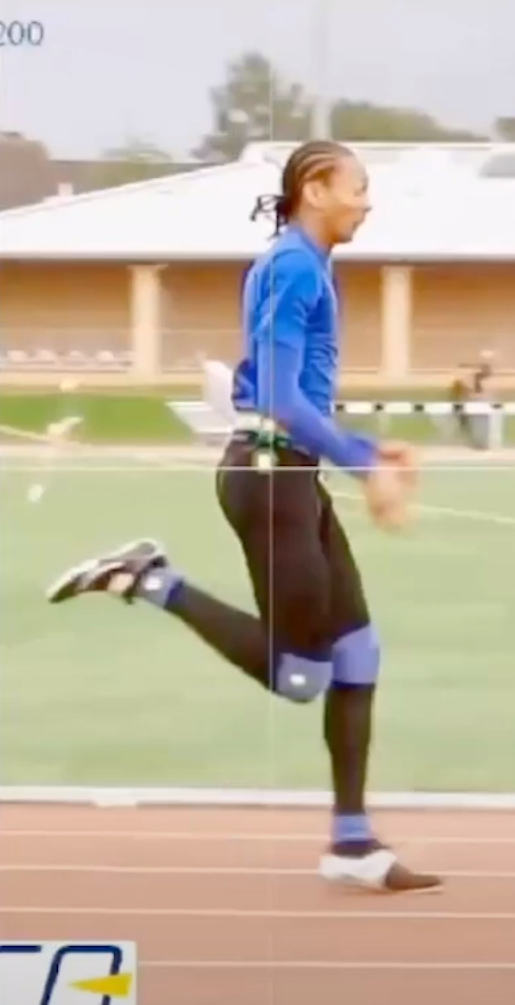
In Angelo’s reference of a track runner, he points out a few characteristics that make the run cycle appear more true to real life: in the contact pose, the runner lands on the ball of the foot rather than the heel. The feet are closer together, and the leg that makes contact with the ground is closer to the center mass of the body.In more exaggerated runs, animators might have the character’s foot land farther away from the body; in these cases, it is the heel that makes contact with the ground to compensate for the distance of the foot. 

To achieve the feeling of a weight shift, Angelo recommends looking closely between the contact and down poses. In the contact pose, try to find a straight leg, then contrast that with a bent leg in the down pose. In a more realistic and natural run cycle, the runner may not always completely straighten their leg – animating with this in mind can result in a more realistic animation. However, keep in mind that pushing the poses to have a straight leg can help with the clarity of the overall mechanics of the run. 


Be Aware of Tangents in Your Poses!

Tangents are common occurrences in reality, and you may end up with some in your animation, especially if you are using a realistic reference – just be sure they are intentional, or make small adjustments to avoid them!


Watch the full excerpt from an AnimSchool class lecture here:

At AnimSchool, we teach students who want to make 3D characters move and act. Our instructors are professionals at film and game animation studios like Dreamworks, Pixar, Sony Pictures, Blizzard & Disney. ⁠Get LIVE feedback on your Animation from the pros. 
Learn more at https://animschool.edu/
Crafting the Perfect Animated Pose

In animation, the significance of well-executed poses cannot be overstated. Posing is the foundation upon which character expression, emotion, and storytelling are built. A carefully crafted pose communicates the essence of a character’s personality and intentions, providing vital visual cues to the audience.

AnimSchool instructor Aleksander Kolev explains how to find appealing poses, and how they can be used effectively in your shots.


Asymmetry
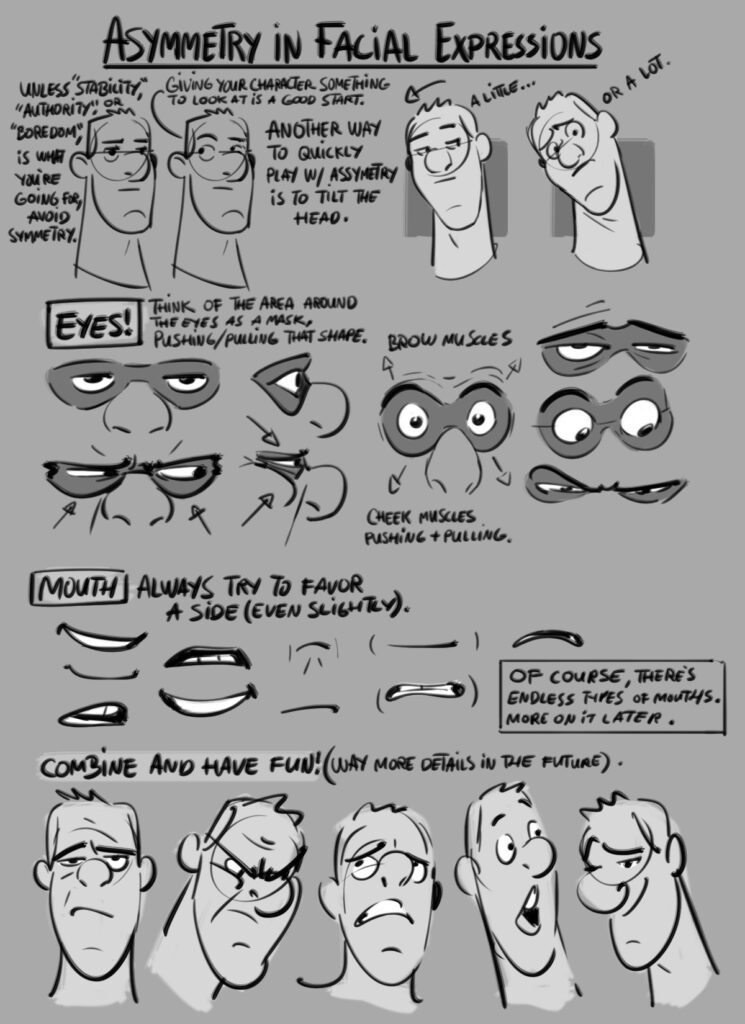
Having both asymmetry in the face and body will keep your poses interesting. Depending on how realistic or unrealistic your shot is, you can push and pull exaggeration in certain places to create asymmetry. This can include subtle changes like raising an eyebrow and tilting a hip, or more extreme changes like stretching the eyes and head. 

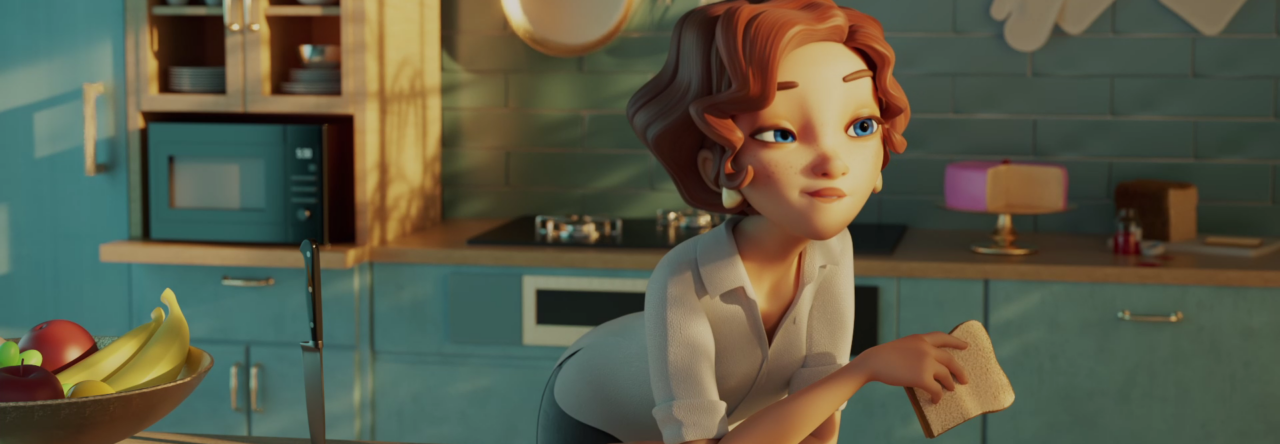
Aleksander also mentions that he uses > and < as a guide to dictate directional poses, such as where a character is looking. For instance, if a character looks to the left, the facial features and head will be positioned so that implied angles form in a > shape to drive the character’s action. (See pink draw-over lines below)


Shapes
Shapes help to define and simplify poses. While it may seem like more of a 2D concept, thinking with shapes can be helpful to create contrast throughout different poses, in both 2D and 3D. Aleksander shows an example of a scene he worked on from Hotel Transylvania, in which a round mummy character, Murray, dances. He explains how he pushed the stretching and squashing of the character to imitate vase-like shapes, and posed the arms in such a way to create flow throughout the form. 


Line of Action
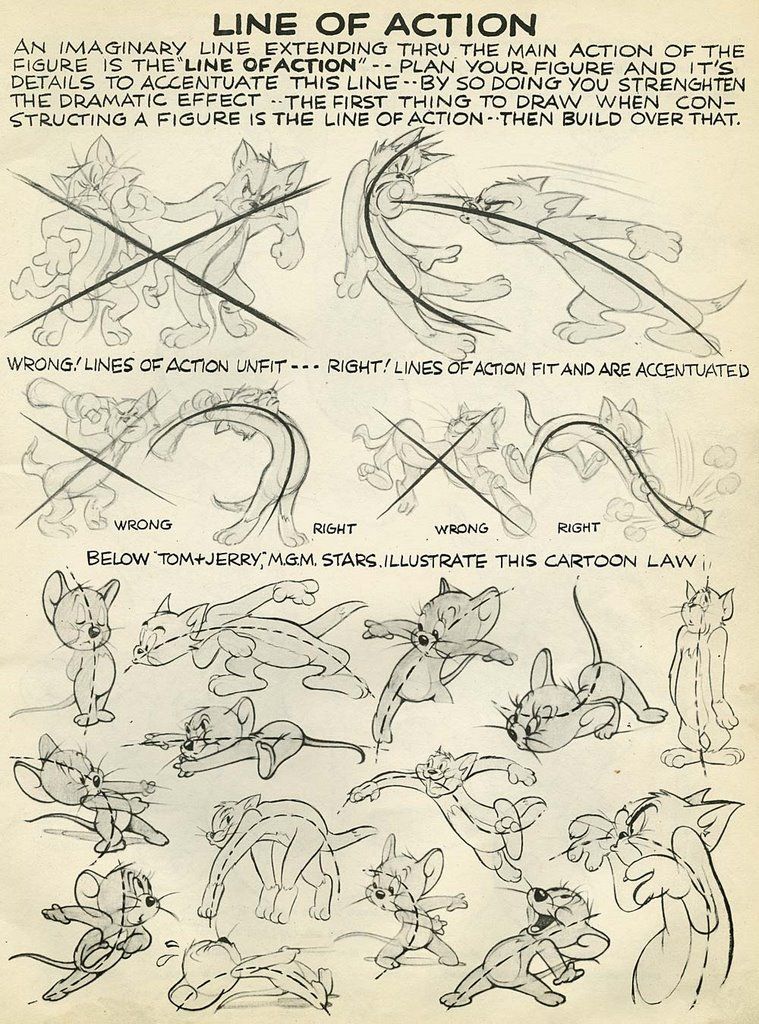
The line of action is the most general line of flow through a character’s body. It helps to focus the audience’s attention, give the character energy and flow, and clarify the character’s pose. Tom and Jerry offers some great examples of utilizing the line of action to depict how energy is transferred with clear posing and action.


Silhouettes
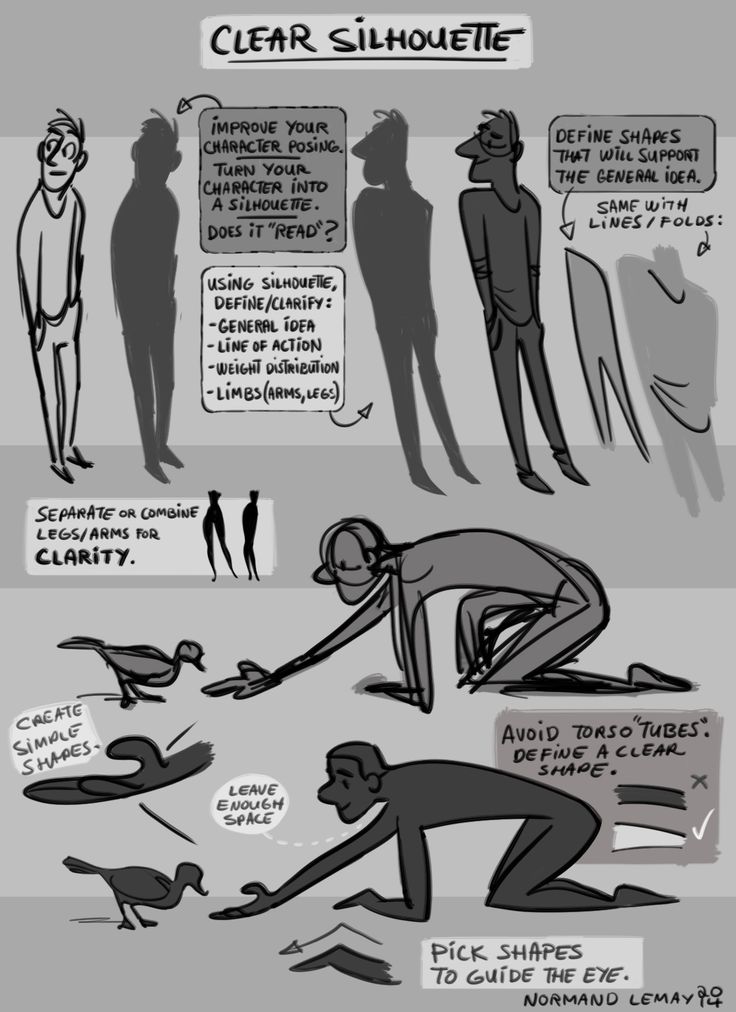
Silhouettes are essential in defining a clear idea of who the character is and what they are doing. When the audience can identify the character and action just from looking at the blacked out shape, it means you have a good pose. Oftentimes silhouettes can be simplified into a general shape that defines the flow and overall form, but more complex and less cartoony animations may result in more complex silhouettes as well. Watch out for tangents as poses and silhouettes get more complex with overlapping objects! Keeping readability in mind is key for crafting any pose.


Watch the full excerpt from a live AnimSchool lecture below:

At AnimSchool, we teach students who want to make 3D characters move and act. Our instructors are professionals at film and game animation studios like Dreamworks, Pixar, Sony Pictures, Blizzard & Disney. ⁠Get LIVE feedback on your Animation from the pros. 
Learn more at https://animschool.edu/